> ## Documentation Index
> Fetch the complete documentation index at: https://docs.gelato.cloud/llms.txt
> Use this file to discover all available pages before exploring further.

# Run OP Node

> Learn how to build and run an op-node from source

This guide will walk you through the process of building a node from source, focusing on the op-node and op-geth implementations. These steps are essential if you want to run a node on a specific architecture or inspect the source code of the node you're running.

## What you're going to Build

### Rollup Node (op-node)

* Responsible for deriving L2 block payloads from L1 data and passing those payloads to the Execution Client
* Analogous to a consensus client in Ethereum

### Execution Client (op-geth)

* Executes the block payloads it receives from the Rollup Node
* Exposes the standard JSON-RPC API used by Ethereum developers

## Software Dependencies

{(() => {
const softwareDependencies = [
  { software: "git", version: "^2", command: "`git --version`" },
  { software: "go", version: "^1.22.6", command: "`go version`" },
  { software: "node", version: "^20", command: "`node --version`" },
  { software: "just", version: "^1.34", command: "`just --version`" },
  { software: "foundry", version: "^0.2.0", command: "`forge --version`" },
  { software: "make", version: "^4", command: "`make --version`" }
];

return (
  <div className="w-full max-w-4xl mx-auto">
    <div className="overflow-x-auto rounded-lg border border-gray-200 dark:border-gray-700">
      <div className="flex w-full bg-gray-50 dark:bg-gray-900">
        <div className="flex-1 py-4 px-4 sm:px-4 font-semibold text-gray-800 dark:text-white text-sm sm:text-xs">
          Software
        </div>
        <div className="flex-1 py-4 px-4 sm:px-4 font-semibold text-gray-800 dark:text-white text-sm sm:text-xs">
          Version
        </div>
        <div className="flex-1 py-4 px-4 font-semibold text-gray-800 dark:text-white text-sm sm:text-xs">
          Command
        </div>
      </div>
      {softwareDependencies.map((item, idx) => (
        <div
          key={idx}
          className="flex w-full border-b border-gray-100 dark:border-gray-800 transition-colors duration-200"
        >
          <div className="flex-1 py-4 px-6 font-medium text-gray-700 dark:text-gray-300 text-sm sm:text-xs">
            {item.software}
          </div>
          <div className="flex-1 py-4 px-6 text-gray-600 dark:text-gray-400 text-sm sm:text-xs">
            {item.version}
          </div>
          <div className="flex-1 py-4 px-6 text-gray-600 dark:text-gray-400 text-sm sm:text-xs">
            {item.command}
          </div>
        </div>
      ))}
    </div>
  </div>
);
})()}

## Folder Structure

<Info>
  This guide supports running nodes for arbitrary Gelato RaaS chains, both
  testnets, and mainnets. Feel free to use any folder structure that suits your
  needs. For the purposes of this documentation, we will use the following
  structure:
</Info>

```
op-rollup-node/
├── config/
│   ├── testnet/
│   │   ├── genesis.json
│   │   └── rollup.json
│   ├── mainnet/
│   │   ├── genesis.json
│   │   └── rollup.json
├── op-geth/
│   ├── init-geth.sh
│   ├── jwt.txt
│   ├── .env
│   └── ...
├── optimism/
│   ├── jwt.txt
│   ├── .env
│   ├── op-node
│   └── ...
└── jwt.txt
```

## Create a JWT file

To communicate with op-node and enable the Engine API, you'll need to generate a JWT secret file and enable Geth's authenticated RPC endpoint.

```bash theme={null}
cd /path/to/op-rollup-node
openssl rand -hex 32 > jwt.txt
```

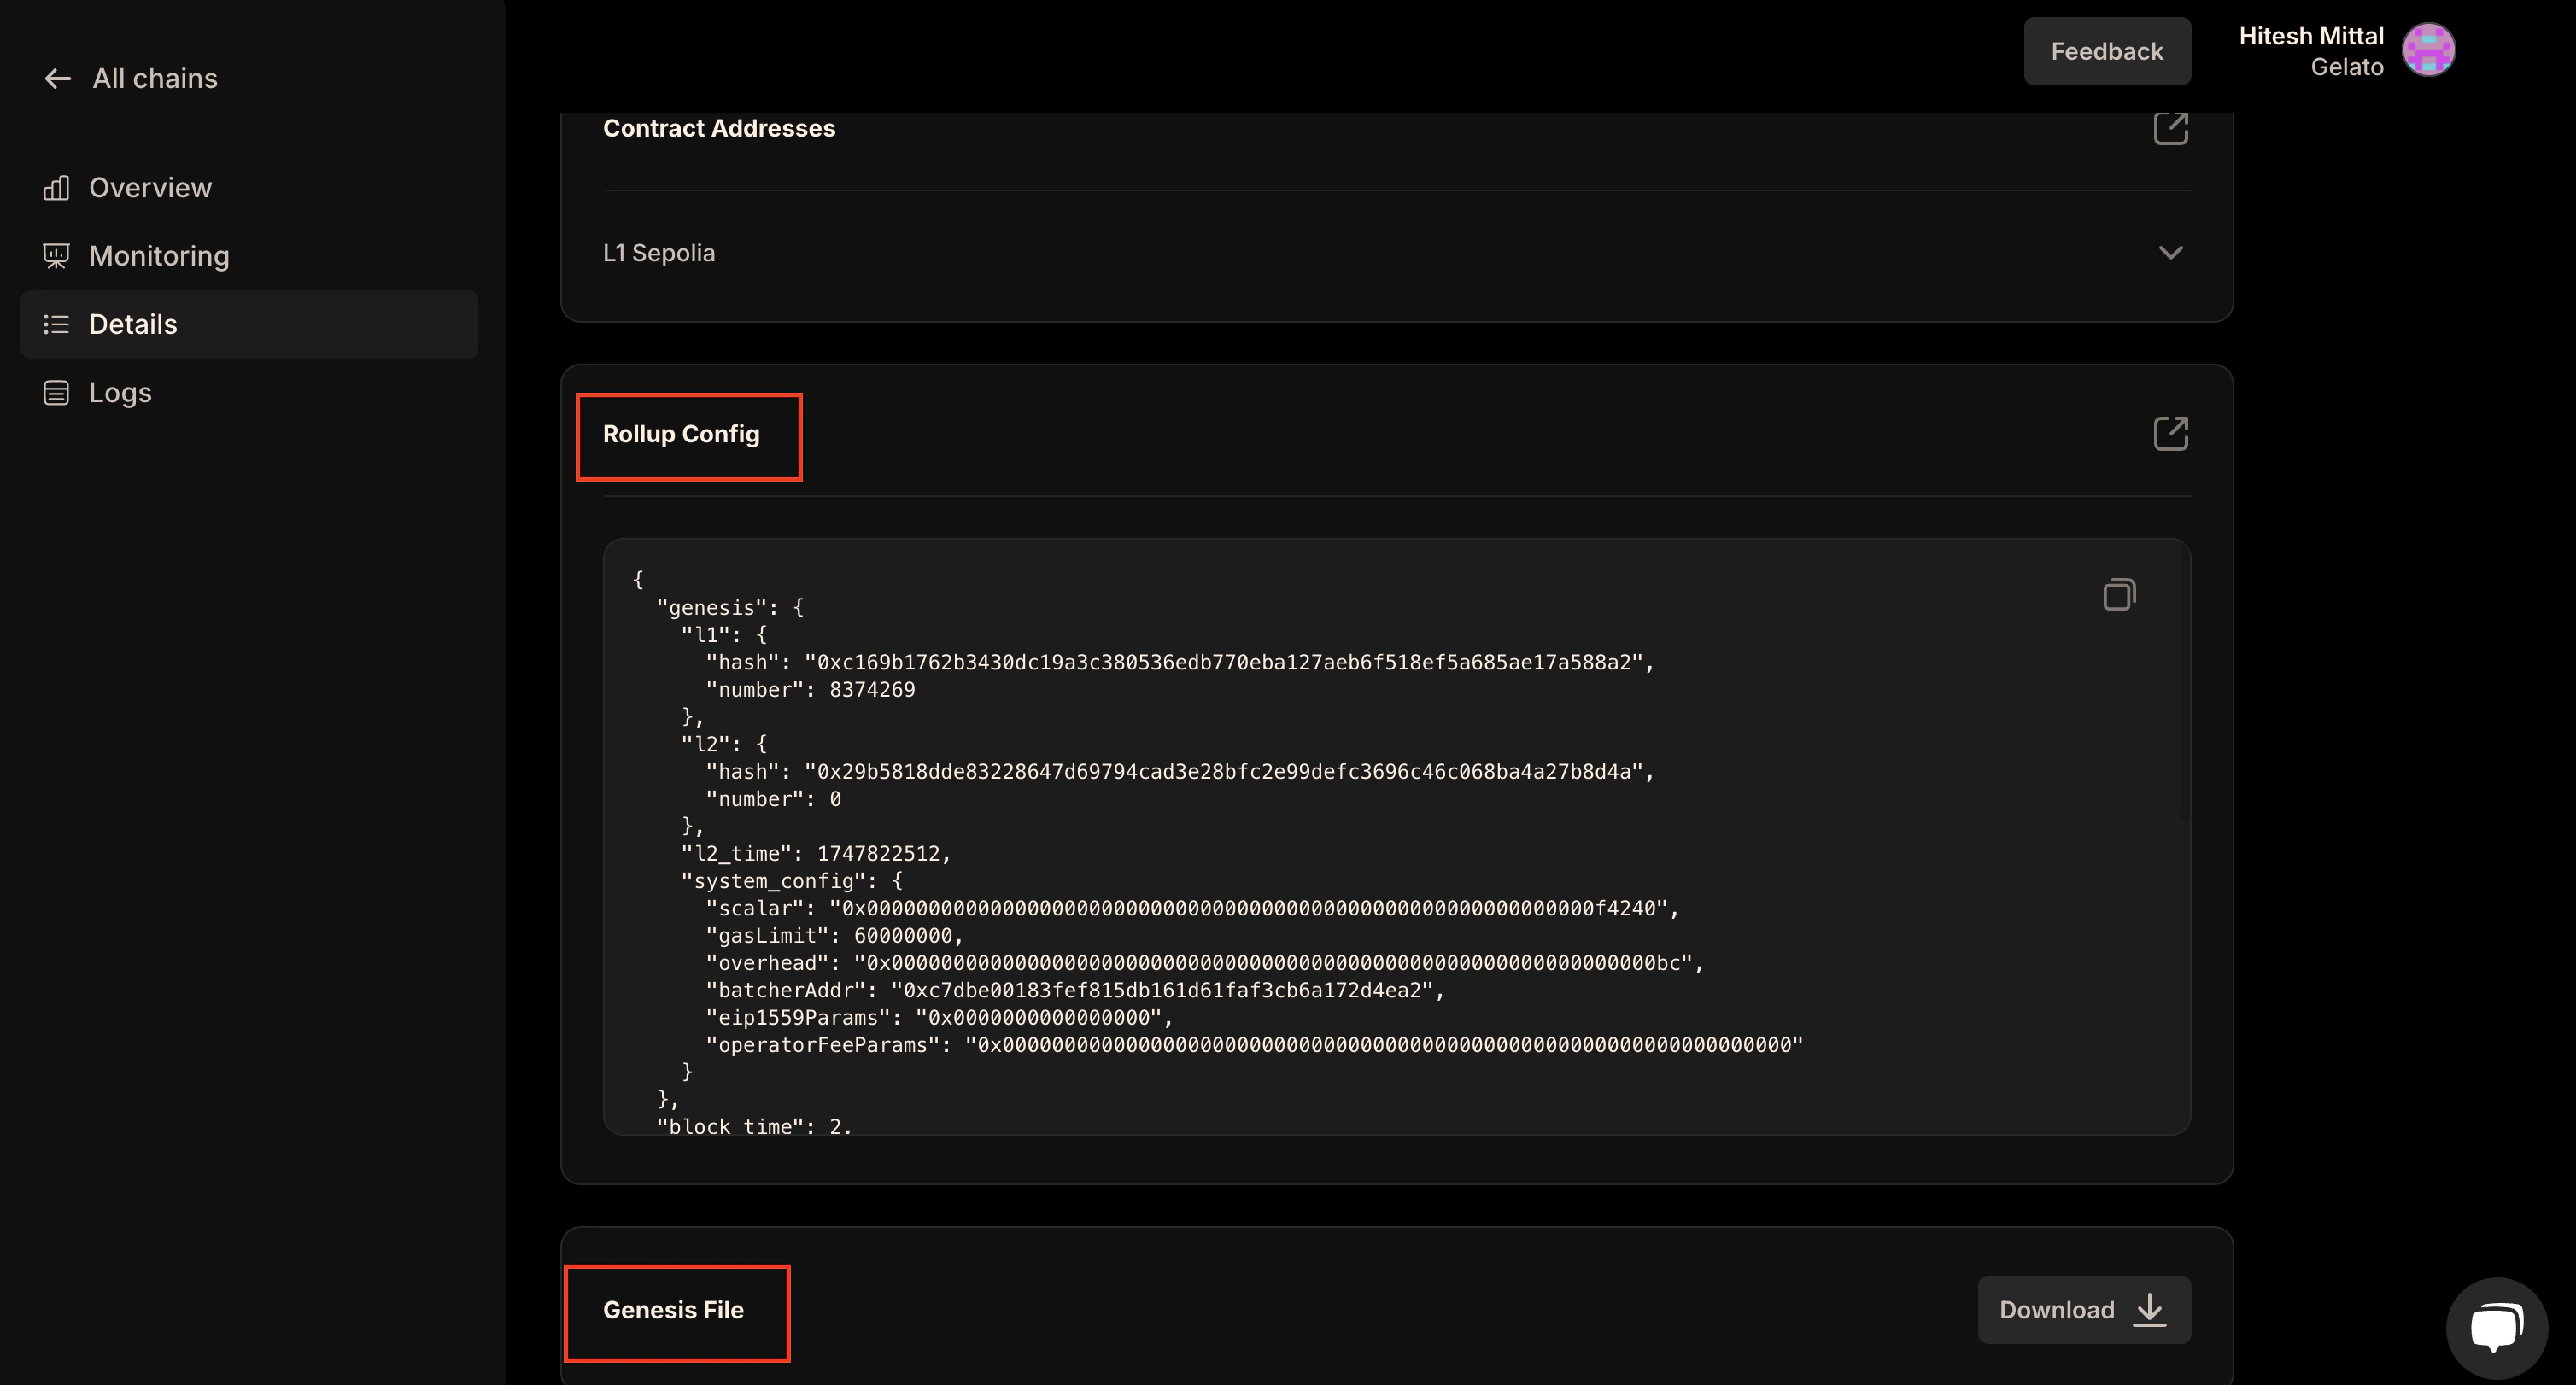
## Obtain genesis.json and rollup.json

1. Log in to your Dashboard
2. Download `rollup.json` (rollup config) and `genesis.json` (genesis config) from the details section
3. Place them in your `config/testnet` in the op-rollup-node directory

<img src="https://mintcdn.com/gelato-6540eeb1/8BeiyOhSgNF7mtMT/images/rollup-config.png?fit=max&auto=format&n=8BeiyOhSgNF7mtMT&q=85&s=2666d229934d8494b1fb75701bdc4e1b" alt="Gelato RaaS Genesis JSON" width="3016" height="1622" data-path="images/rollup-config.png" />

## Build the Rollup Node

* Clone the Optimism Monorepo

```bash theme={null}
git clone https://github.com/ethereum-optimism/optimism.git
cd optimism
```

* Check Out the Required Release Tag

```bash theme={null}
git checkout ddc37daa49558c2fb5c1a92e694eeb7de5942e00
```

* Build op-node

```bash theme={null}
make build
```

## Build the Execution Client

* Clone op-geth

```bash theme={null}
git clone https://github.com/ethereum-optimism/op-geth.git
cd op-geth
```

* Check Out the Required Release Tag

```bash theme={null}
git checkout 7c2819836018bfe0ca07c4e4955754834ffad4e0
```

* Build op-geth

```bash theme={null}
make geth
```

## Running op-geth

* Create a Data Directory

```bash theme={null}
cd /path/to/op-rollup-node/op-geth
mkdir data-geth
```

* Create a .env File

Create a `.env` file in the op-geth directory with the following content:

```bash theme={null}
GENESIS_FILE_PATH="<GENESIS_FILE_PATH>"
SNAPSHOT_FILE_PATH="<SNAPSHOT_FILE_PATH>"
GETH_DATADIR="<DATADIR_PATH>"
GETH_AUTHRPC_ADDR="0.0.0.0"
GETH_AUTHRPC_PORT="<ENGINE_RPC_PORT>"
GETH_AUTHRPC_JWTSECRET="<JWT_FILE_PATH>"
GETH_AUTHRPC_VHOSTS="*"
GETH_METRICS="true"
GETH_METRICS_EXPENSIVE="false"
GETH_METRICS_ADDR="0.0.0.0"
GETH_METRICS_PORT="<METRICS_PORT>"
GETH_GCMODE="archive"
GETH_SYNCMODE="full"
GETH_MAXPEERS="0"
GETH_NODISCOVER="true"
GETH_HTTP="true"
GETH_HTTP_ADDR="0.0.0.0"
GETH_HTTP_PORT="<HTTP_RPC_PORT>"
GETH_HTTP_VHOSTS="*"
GETH_HTTP_CORSDOMAIN="*"
GETH_HTTP_API="web3,debug,eth,txpool,net,engine"
GETH_WS="true"
GETH_WS_ADDR="0.0.0.0"
GETH_WS_PORT="<WS_RPC_PORT>"
GETH_WS_ORIGINS="*"
GETH_WS_API="debug,eth,txpool,net,engine"
GETH_RPC_ALLOW_UNPROTECTED_TXS="false"
```

### Initialize op-geth

<Info>
  Feel free to customize the base configurations provided in the Optimism
  documentation to suit your specific requirements. While we will use the
  recommended configurations for this guide, you can explore and add additional
  flags as needed. Detailed information about execution layer configurations can
  be found
  [here](https://docs.optimism.io/builders/node-operators/configuration/base-config#working-base-configuration).
</Info>

Create `init-geth.sh`:

```bash theme={null}
cd /path/to/op-rollup-node/op-geth
nano init-geth.sh
```

```bash theme={null}
#!/bin/bash

# Set environment variables
source .env

# Create data directory if it doesn't exist
mkdir -p $DATADIR_PATH

# Initialize geth with the genesis file
echo "Initializing geth with genesis file..."
./build/bin/geth --datadir=$DATADIR_PATH init $GENESIS_PATH

# Generate JWT secret if it doesn't exist
if [ ! -f "$JWT_SECRET_PATH" ]; then
  echo "Generating JWT secret..."
  openssl rand -hex 32 > $JWT_SECRET_PATH
fi
```

### Run the geth Node

```bash theme={null}
cd /path/to/op-rollup-node/op-geth

# Load environment variables from the .env file in the root directory
source .env

# Initialize geth
./init-geth.sh

# Run the geth command with the environment variables
./build/bin/geth
```

### Testing the Running Geth Instance

After starting your geth instance, you can test if it's running and confirm the chain ID:

```bash theme={null}
curl -X POST http://127.0.0.1:8545 \
-H "Content-Type: application/json" \
--data '{"method":"eth_chainId","params":[],"id":1,"jsonrpc":"2.0"}'
```

You should see a response similar to this:

```json theme={null}
{
  "jsonrpc": "2.0",
  "id": 1,
  "result": "0x2a88" // This is your chain id in hex, in this case its 10888
}
```

## Running op-node

<Info>
  We will utilize the base configurations provided in the Optimism documentation
  for the consensus layer. However, you can adjust and expand these
  configurations to fit your specific requirements. For a comprehensive
  understanding of all available configurations, refer to the detailed
  documentation on consensus layer configurations
  [here](https://docs.optimism.io/builders/node-operators/configuration/base-config#working-base-configuration-1).
</Info>

### Create a .env File

Create a `.env` file in the optimism directory with the following content:

```bash theme={null}
OP_NODE_L1_ETH_RPC="<L1_RPC>"
OP_NODE_L1_RPC_KIND="standard"
OP_NODE_L2_ENGINE_AUTH="<JWT_FILE_PATH>"
OP_NODE_ROLLUP_LOAD_PROTOCOL_VERSIONS="true"
OP_NODE_ROLLUP_HALT="major"
OP_NODE_ROLLUP_CONFIG="<ROLLUP_JSON_PATH>"
OP_NODE_SEQUENCER_ENABLED="false"
OP_NODE_SEQUENCER_L1_CONFS="5"
OP_NODE_VERIFIER_L1_CONFS="4"
OP_NODE_LOG_FORMAT="json"
OP_NODE_LOG_LEVEL="info"
OP_NODE_P2P_DISABLE="false"
OP_NODE_P2P_LISTEN_IP="0.0.0.0"
OP_NODE_P2P_LISTEN_TCP_PORT="<P2P_TCP_PORT>"
OP_NODE_P2P_LISTEN_UDP_PORT="<P2P_UDP_PORT>"
OP_NODE_P2P_PEER_SCORING="none"
OP_NODE_P2P_PEER_BANNING="false"
OP_NODE_P2P_PEER_BANNING_DURATION="0h1m0s"
OP_NODE_P2P_BOOTNODES="<BOOTNODE_ENR>"
OP_NODE_P2P_ADVERTISE_TCP="<EXTERNAL_P2P_TCP_PORT>"
OP_NODE_P2P_ADVERTISE_UDP="<EXTERNAL_P2P_UDP_PORT>"
OP_NODE_P2P_ADVERTISE_IP="<EXTERNAL_P2P_IP>"
OP_NODE_P2P_SYNC_REQ_RESP="true"
OP_NODE_P2P_STATIC="<STATIC_PEERS>"
OP_NODE_P2P_PRIV_RAW="<P2P_NODE_PRIVATE_KEY>"
OP_NODE_RPC_ADDR="0.0.0.0"
OP_NODE_RPC_PORT="<ROLLUP_RPC_PORT>"
OP_NODE_RPC_ENABLE_ADMIN="true"
OP_NODE_SNAPSHOT_LOG="<SNAPSHOT_LOG_PATH>"
OP_NODE_METRICS_ENABLED="true"
OP_NODE_METRICS_ADDR="0.0.0.0"
OP_NODE_METRICS_PORT="<METRICS_PORT>"
OP_NODE_PPROF_ENABLED="true"
OP_NODE_L1_BEACON="<L1_BEACCON_API_URL>"
OP_NODE_L2_ENGINE_RPC="<GETH_ENGINE_RPC_URL>"
```

<Info>
  Ensure that op-node P2P ports (`<EXTERNAL_P2P_TCP_PORT>` and `<EXTERNAL_P2P_UDP_PORT>`) are accessible externally via `<EXTERNAL_P2P_IP>`. This allows the node to communicate with other peers on the network.

  Add the sequencer node's multiaddr to `<STATIC_PEERS>` in your configuration. This helps establish a direct connection with the sequencer, ensuring smooth operation and synchronization.
</Info>

### Run the op-node

```bash theme={null}
cd /path/to/op-rollup-node/optimism

# Load environment variables from the .env file in the root directory
source .env

# Run the op-node command with the environment variables
./op-node/bin/op-node
```
