Gelato Developer Docs
Build gasless, seamless onchain experiences. Enable users to transact without holding native tokens.
Gasless ERC4337
Provides infrastructure for Account Abstraction, supporting both ERC-4337 and EIP-7702.
Gasless Turbo Relayer
Gasless transactions across EVM, TRON, and Solana. Pay with ERC20s
7702 Turbo Relayer with Smart Account
Native EIP-7702 gasless transactions. #1 in gas efficiency and latency.
Quick Start
Sponsored Transactions
Send sponsored transactions with Paymaster & Bundler
Sync Transactions
Send transactions and wait for results in one call
Multichain Transactions
Send transactions across multiple chains
Payment Methods
Sponsored, ERC-20, and native token payments
Products
Gasless SDK
Build smart wallets with EIP-7702 and ERC-4337. Sponsor transactions, batch calls, and integrate with any wallet provider.
Learn more →
Rollup as a Service
Deploy your own L2 rollup in minutes. OP Stack, Arbitrum Orbit, and custom configurations available.
Learn more →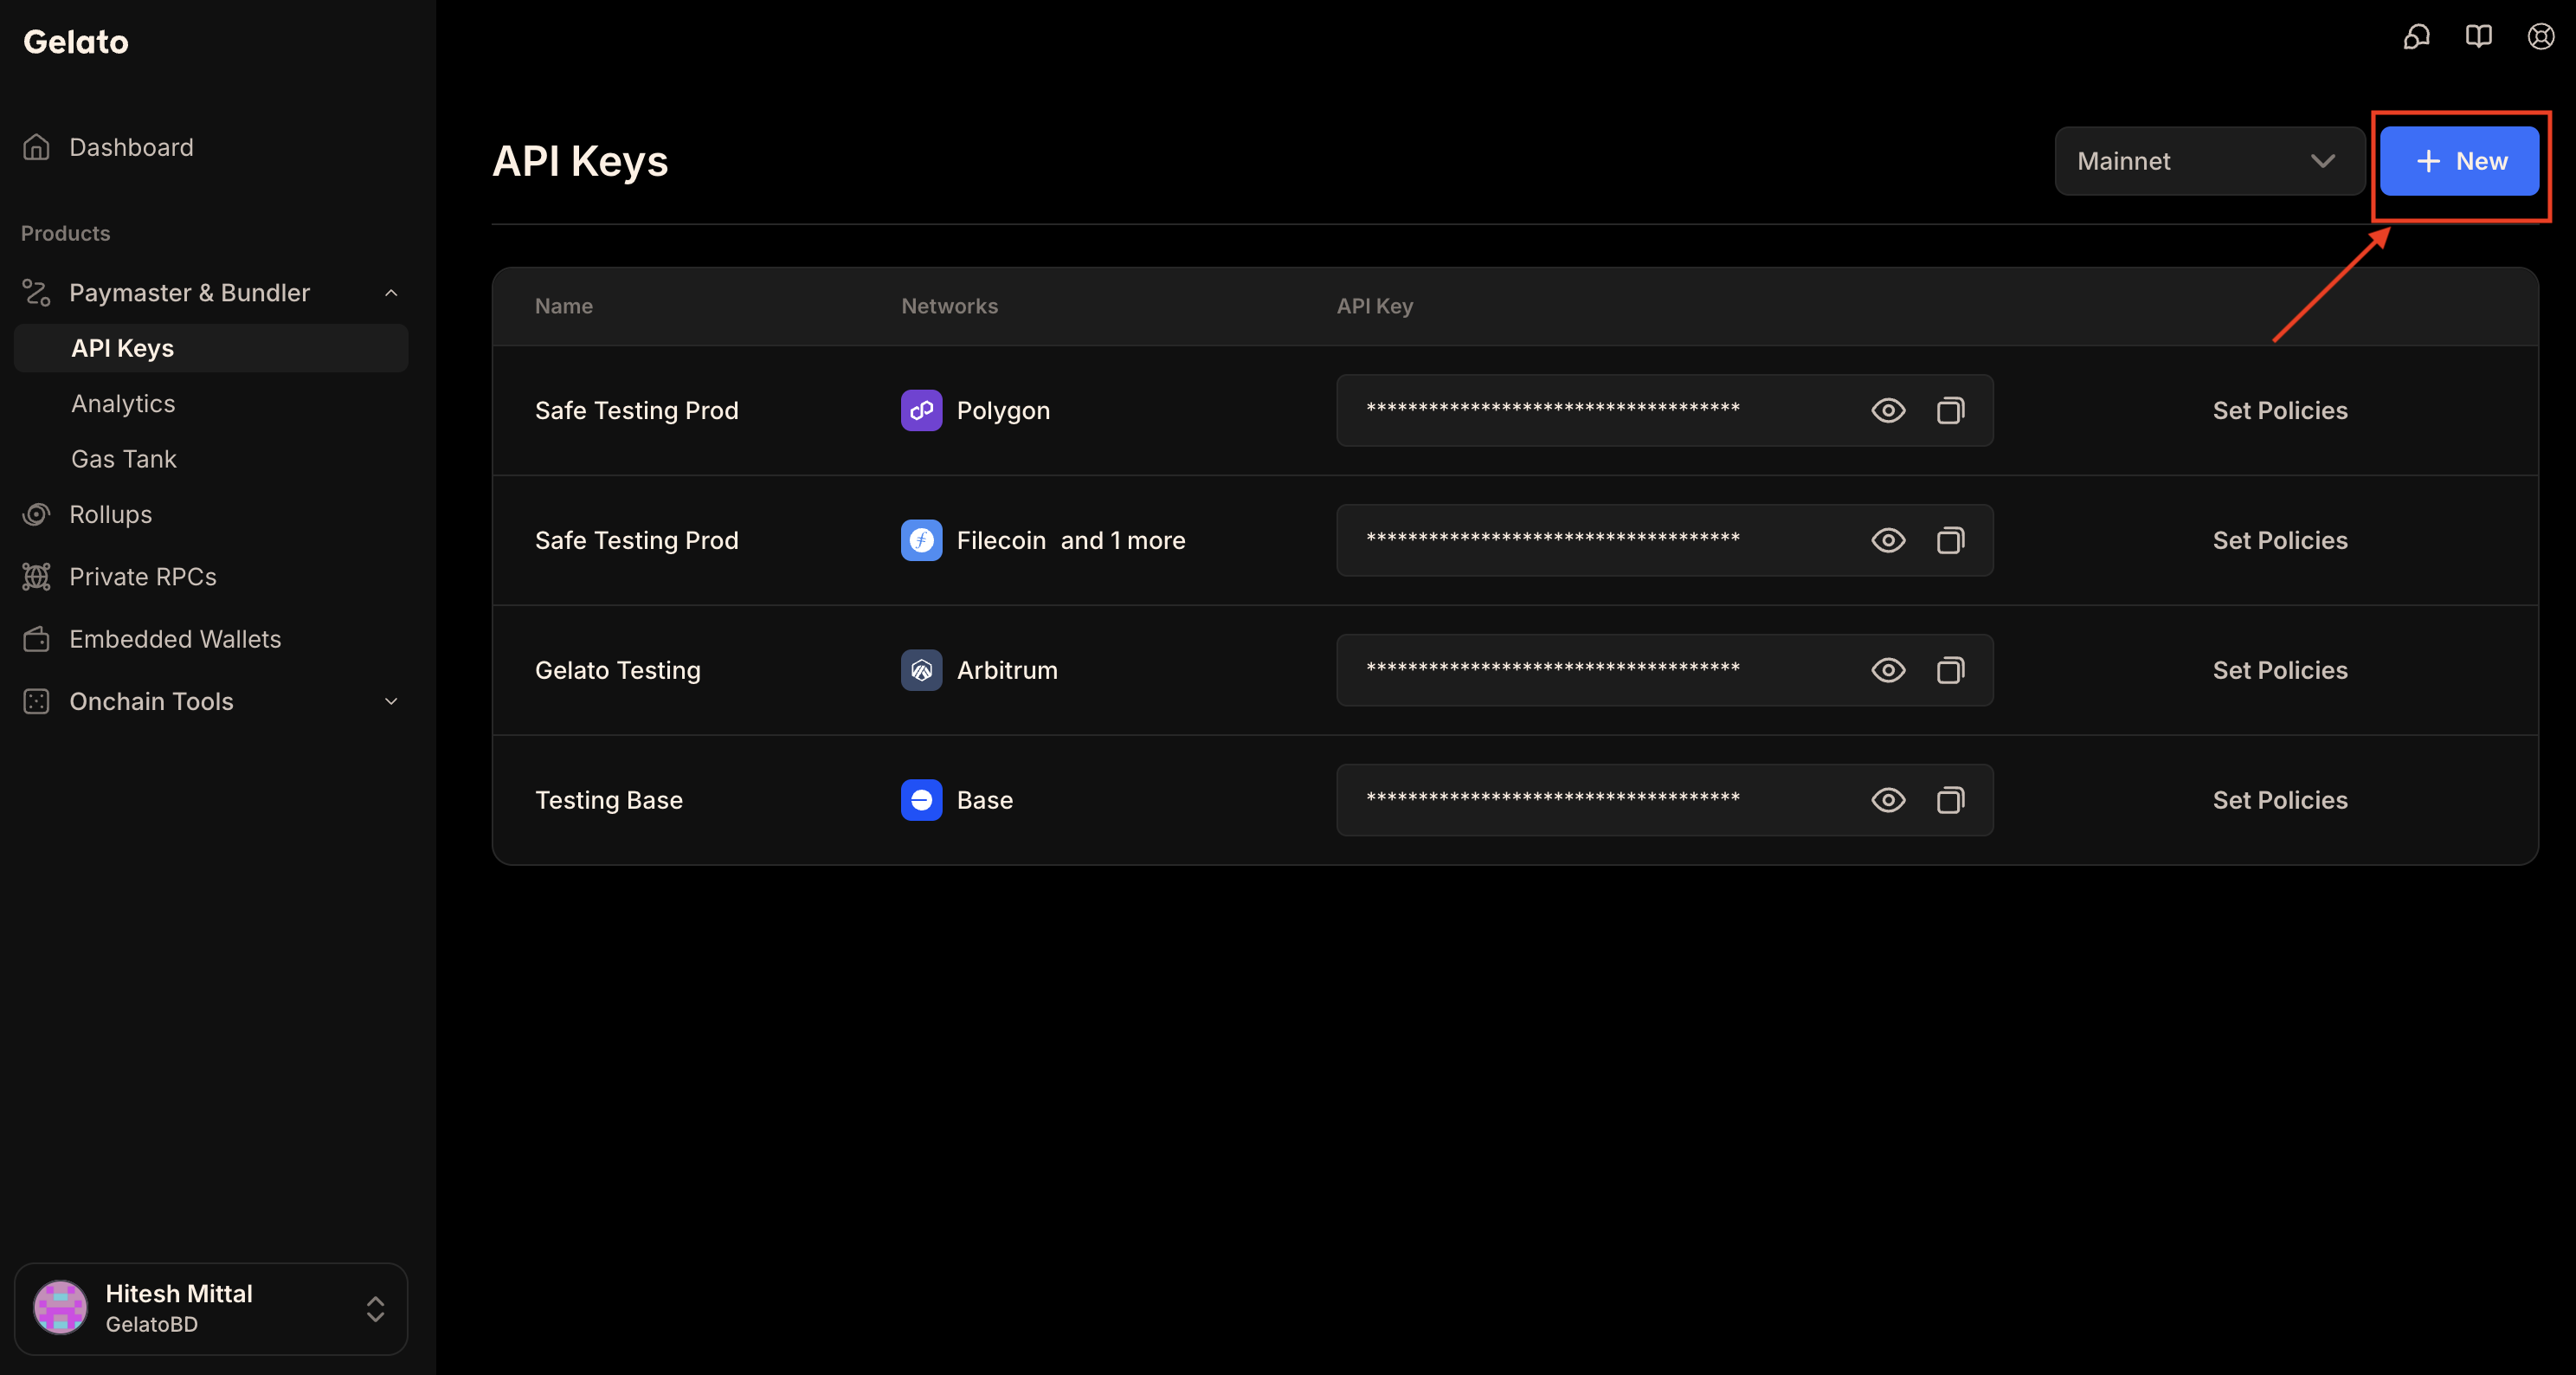 After creating the API Key, navigate to its dashboard to locate your API Key.
Gelato API Keys now supports API key rotation, allowing users to create and delete API keys. This helps prevent unauthorized usage in case an API key is exposed.
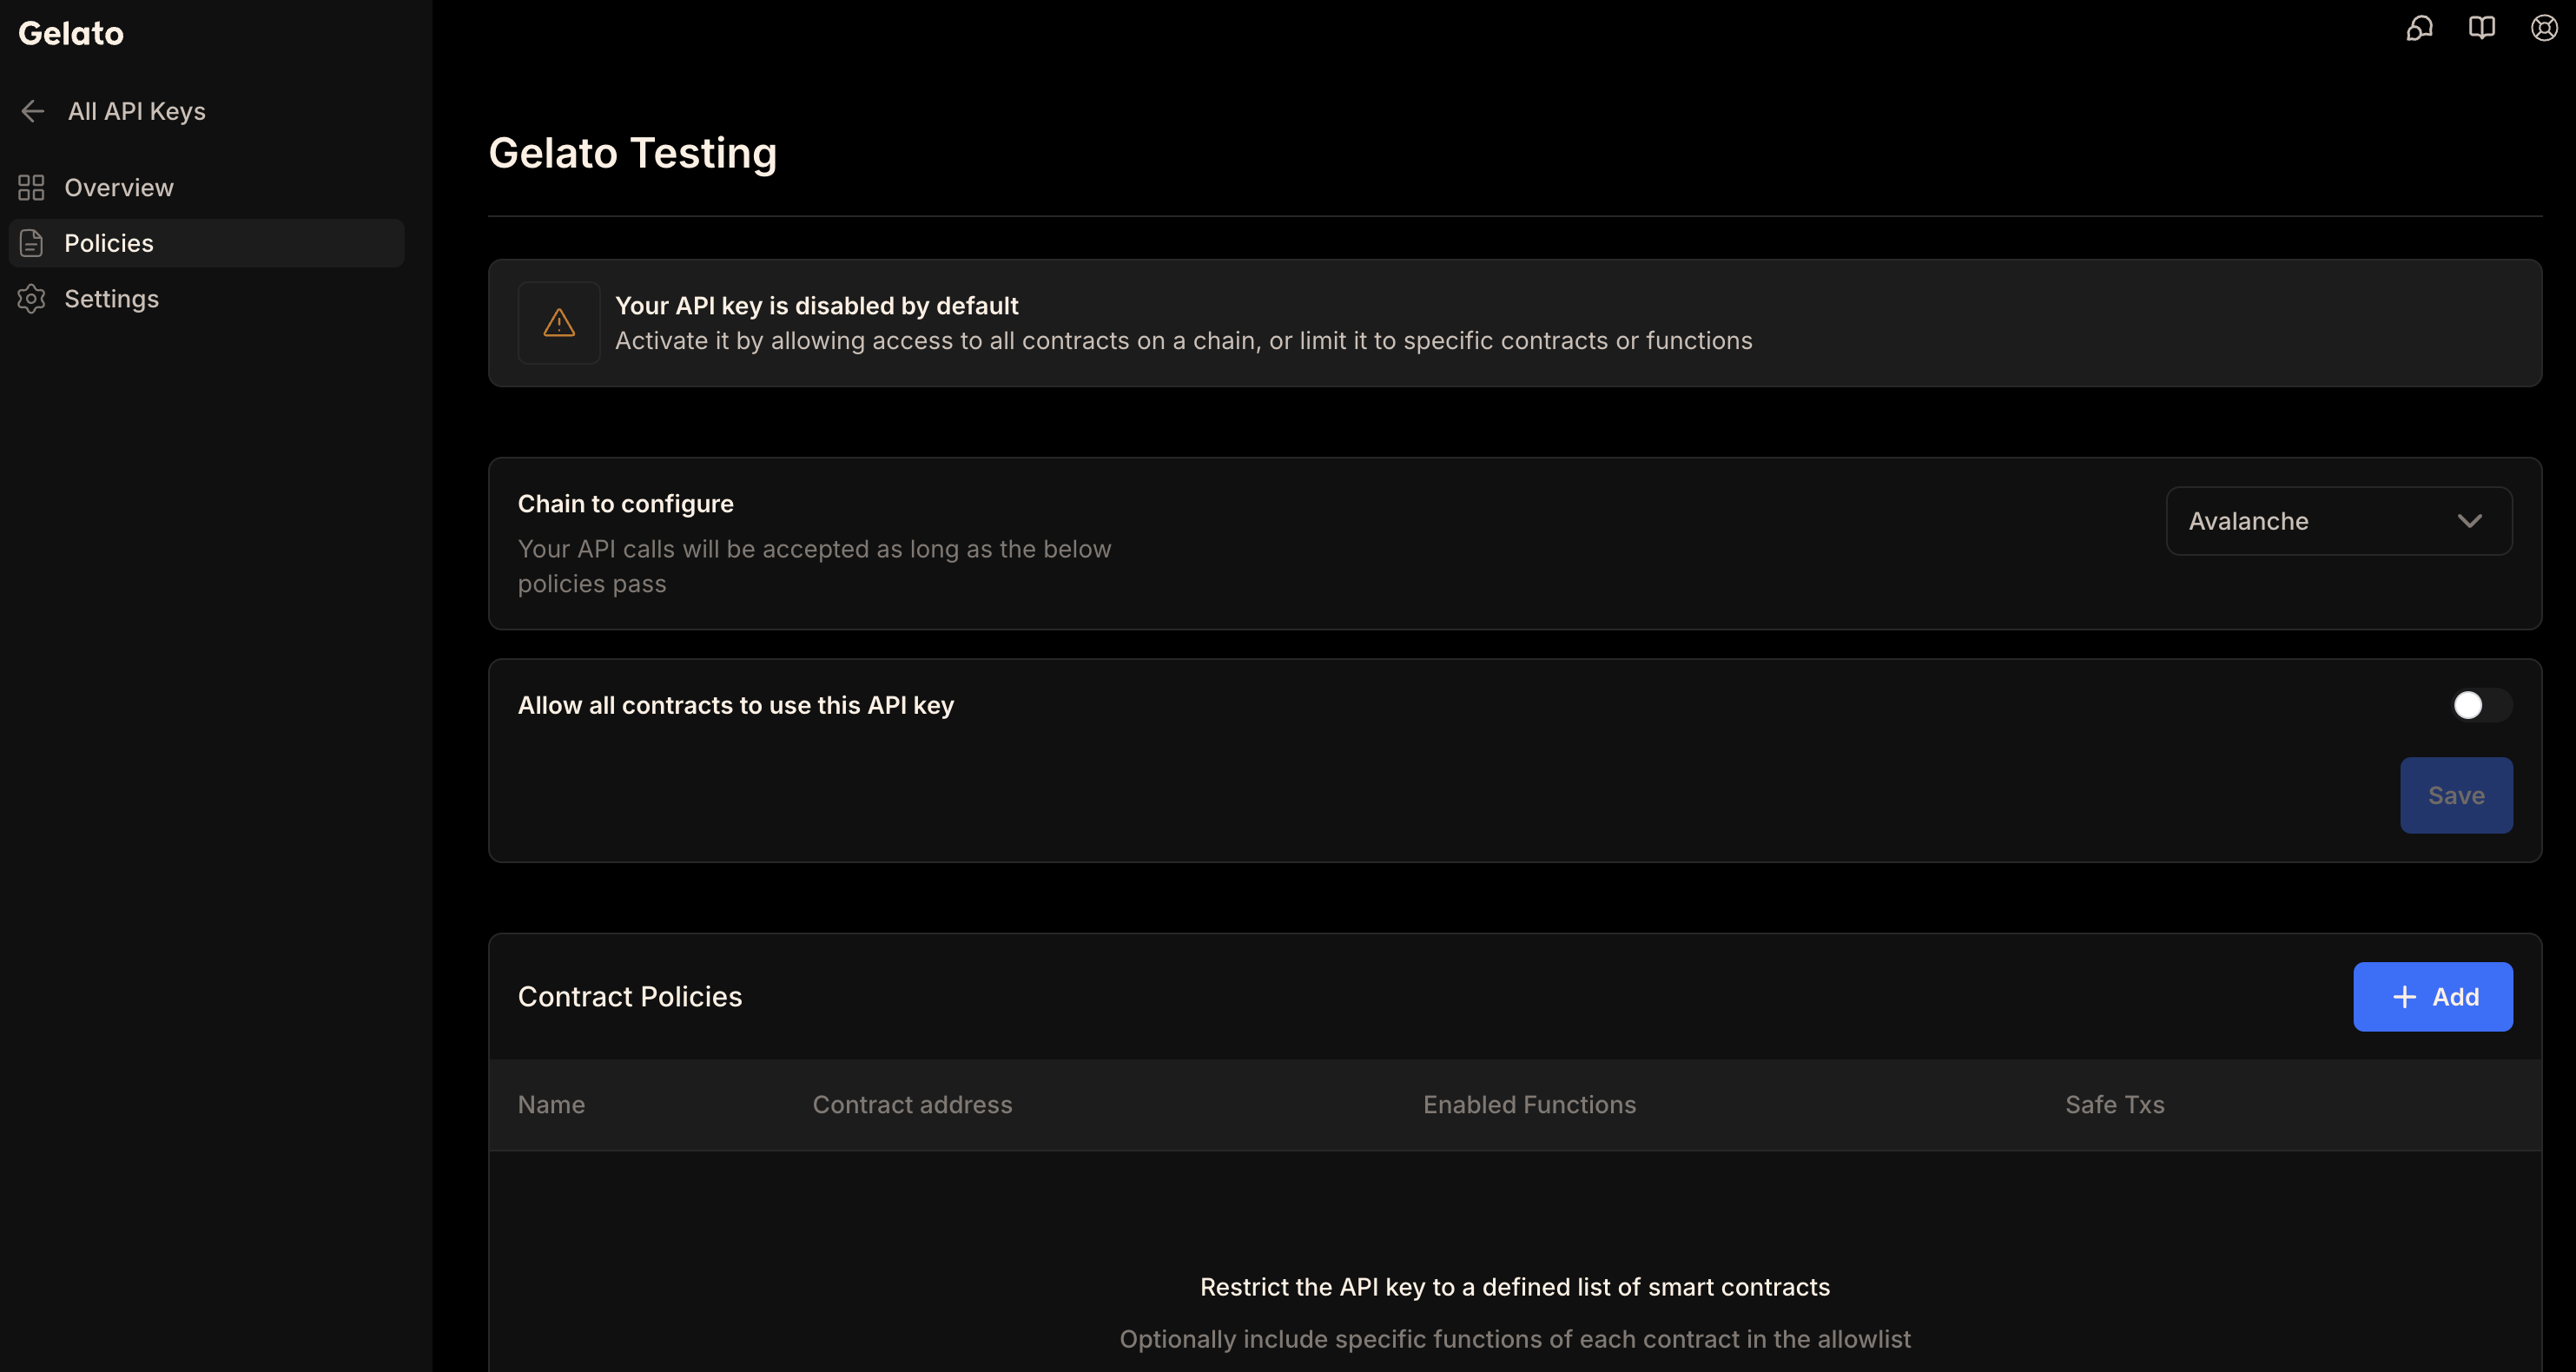
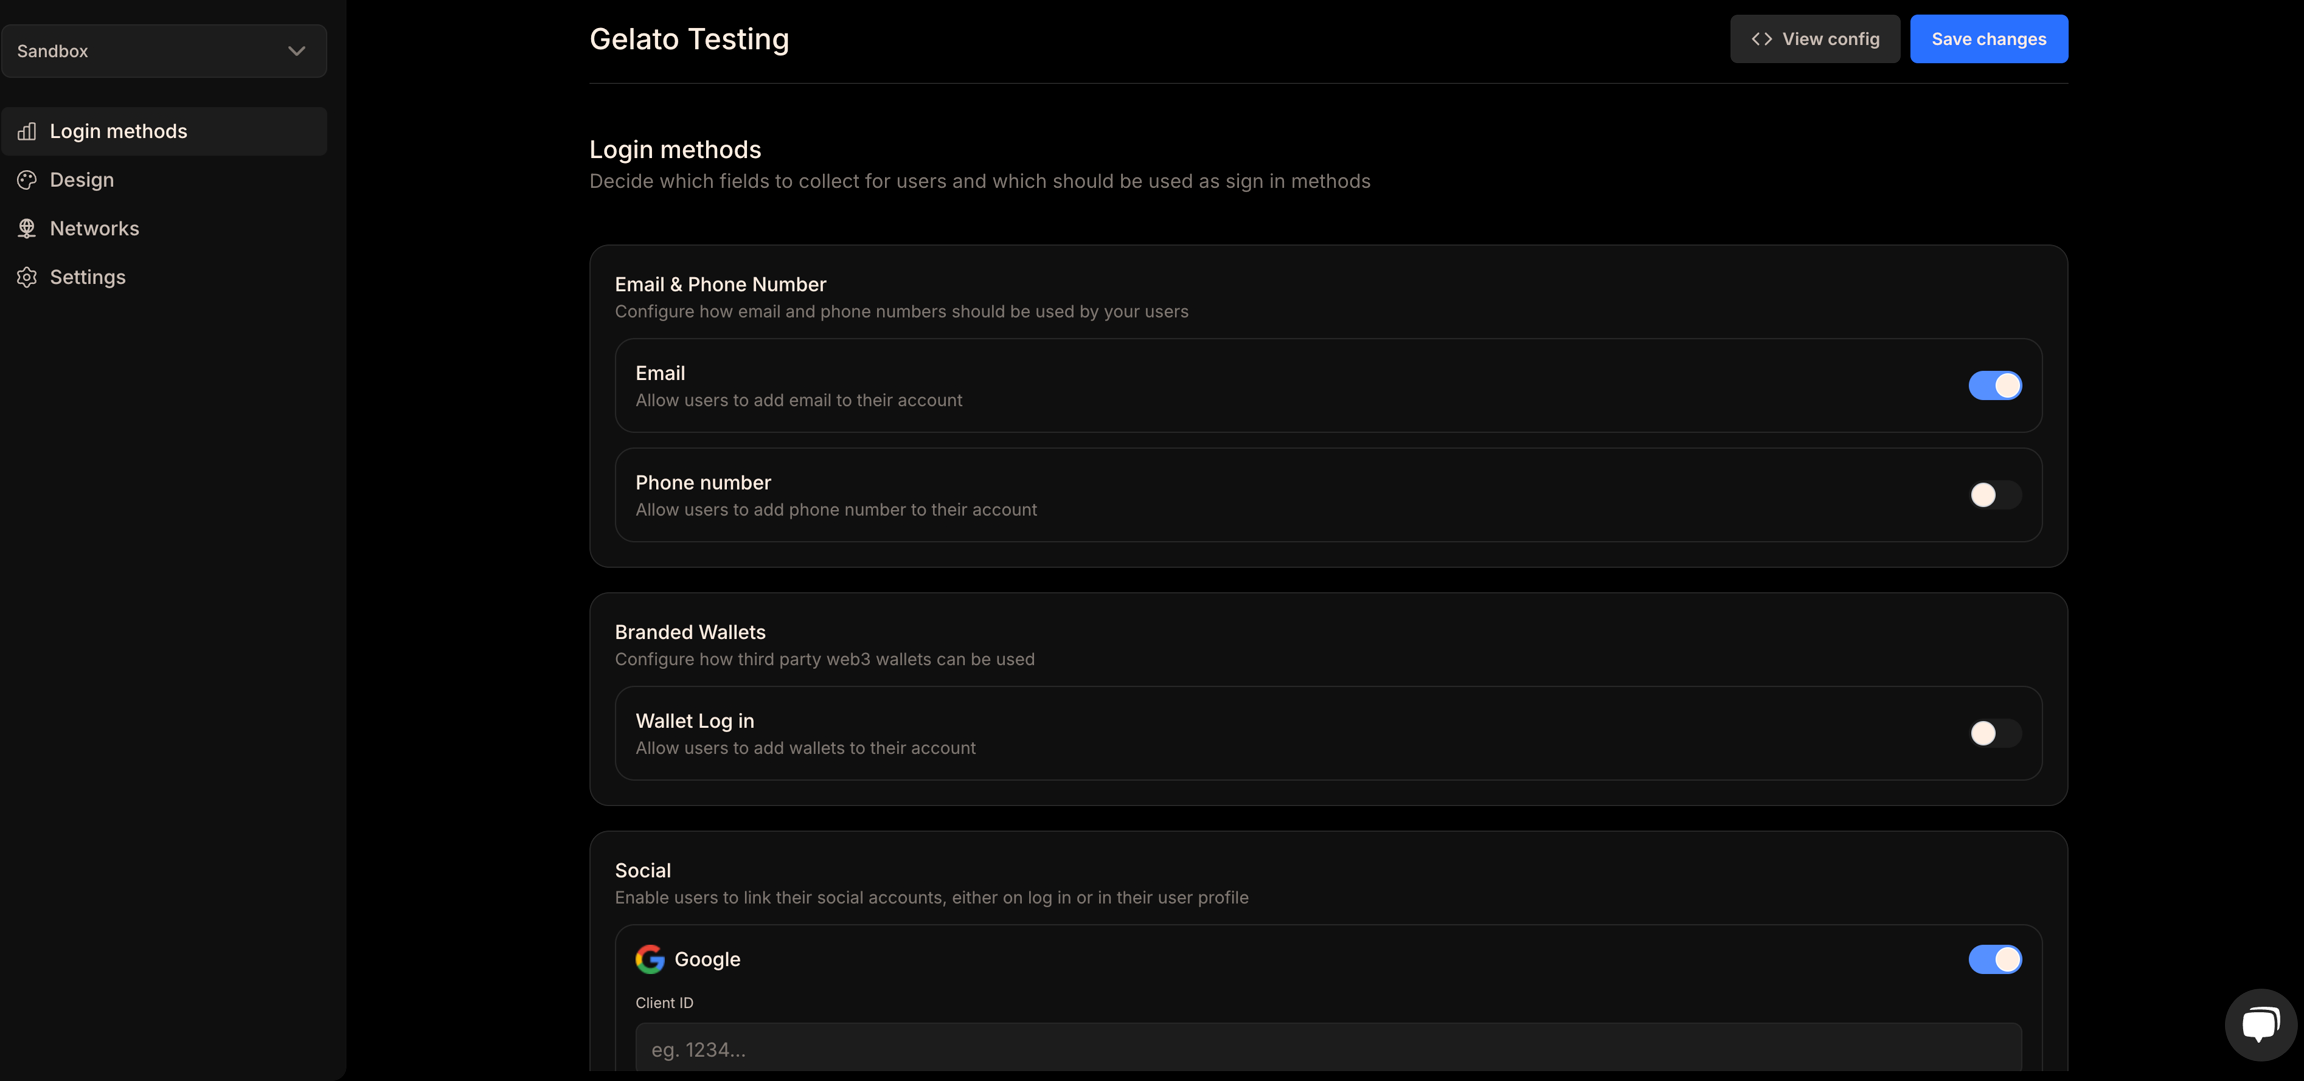
`Activate` your API key by allowing access to `all contracts` on a network, or restrict it to `specific contracts` or `specific functions` in policies section.
Here, you can configure different networks. For each network, you can choose to allow access to all target contracts or limit it to selected contracts or specific functions.
After creating the API Key, navigate to its dashboard to locate your API Key.
Gelato API Keys now supports API key rotation, allowing users to create and delete API keys. This helps prevent unauthorized usage in case an API key is exposed.
`Activate` your API key by allowing access to `all contracts` on a network, or restrict it to `specific contracts` or `specific functions` in policies section.
Here, you can configure different networks. For each network, you can choose to allow access to all target contracts or limit it to selected contracts or specific functions.
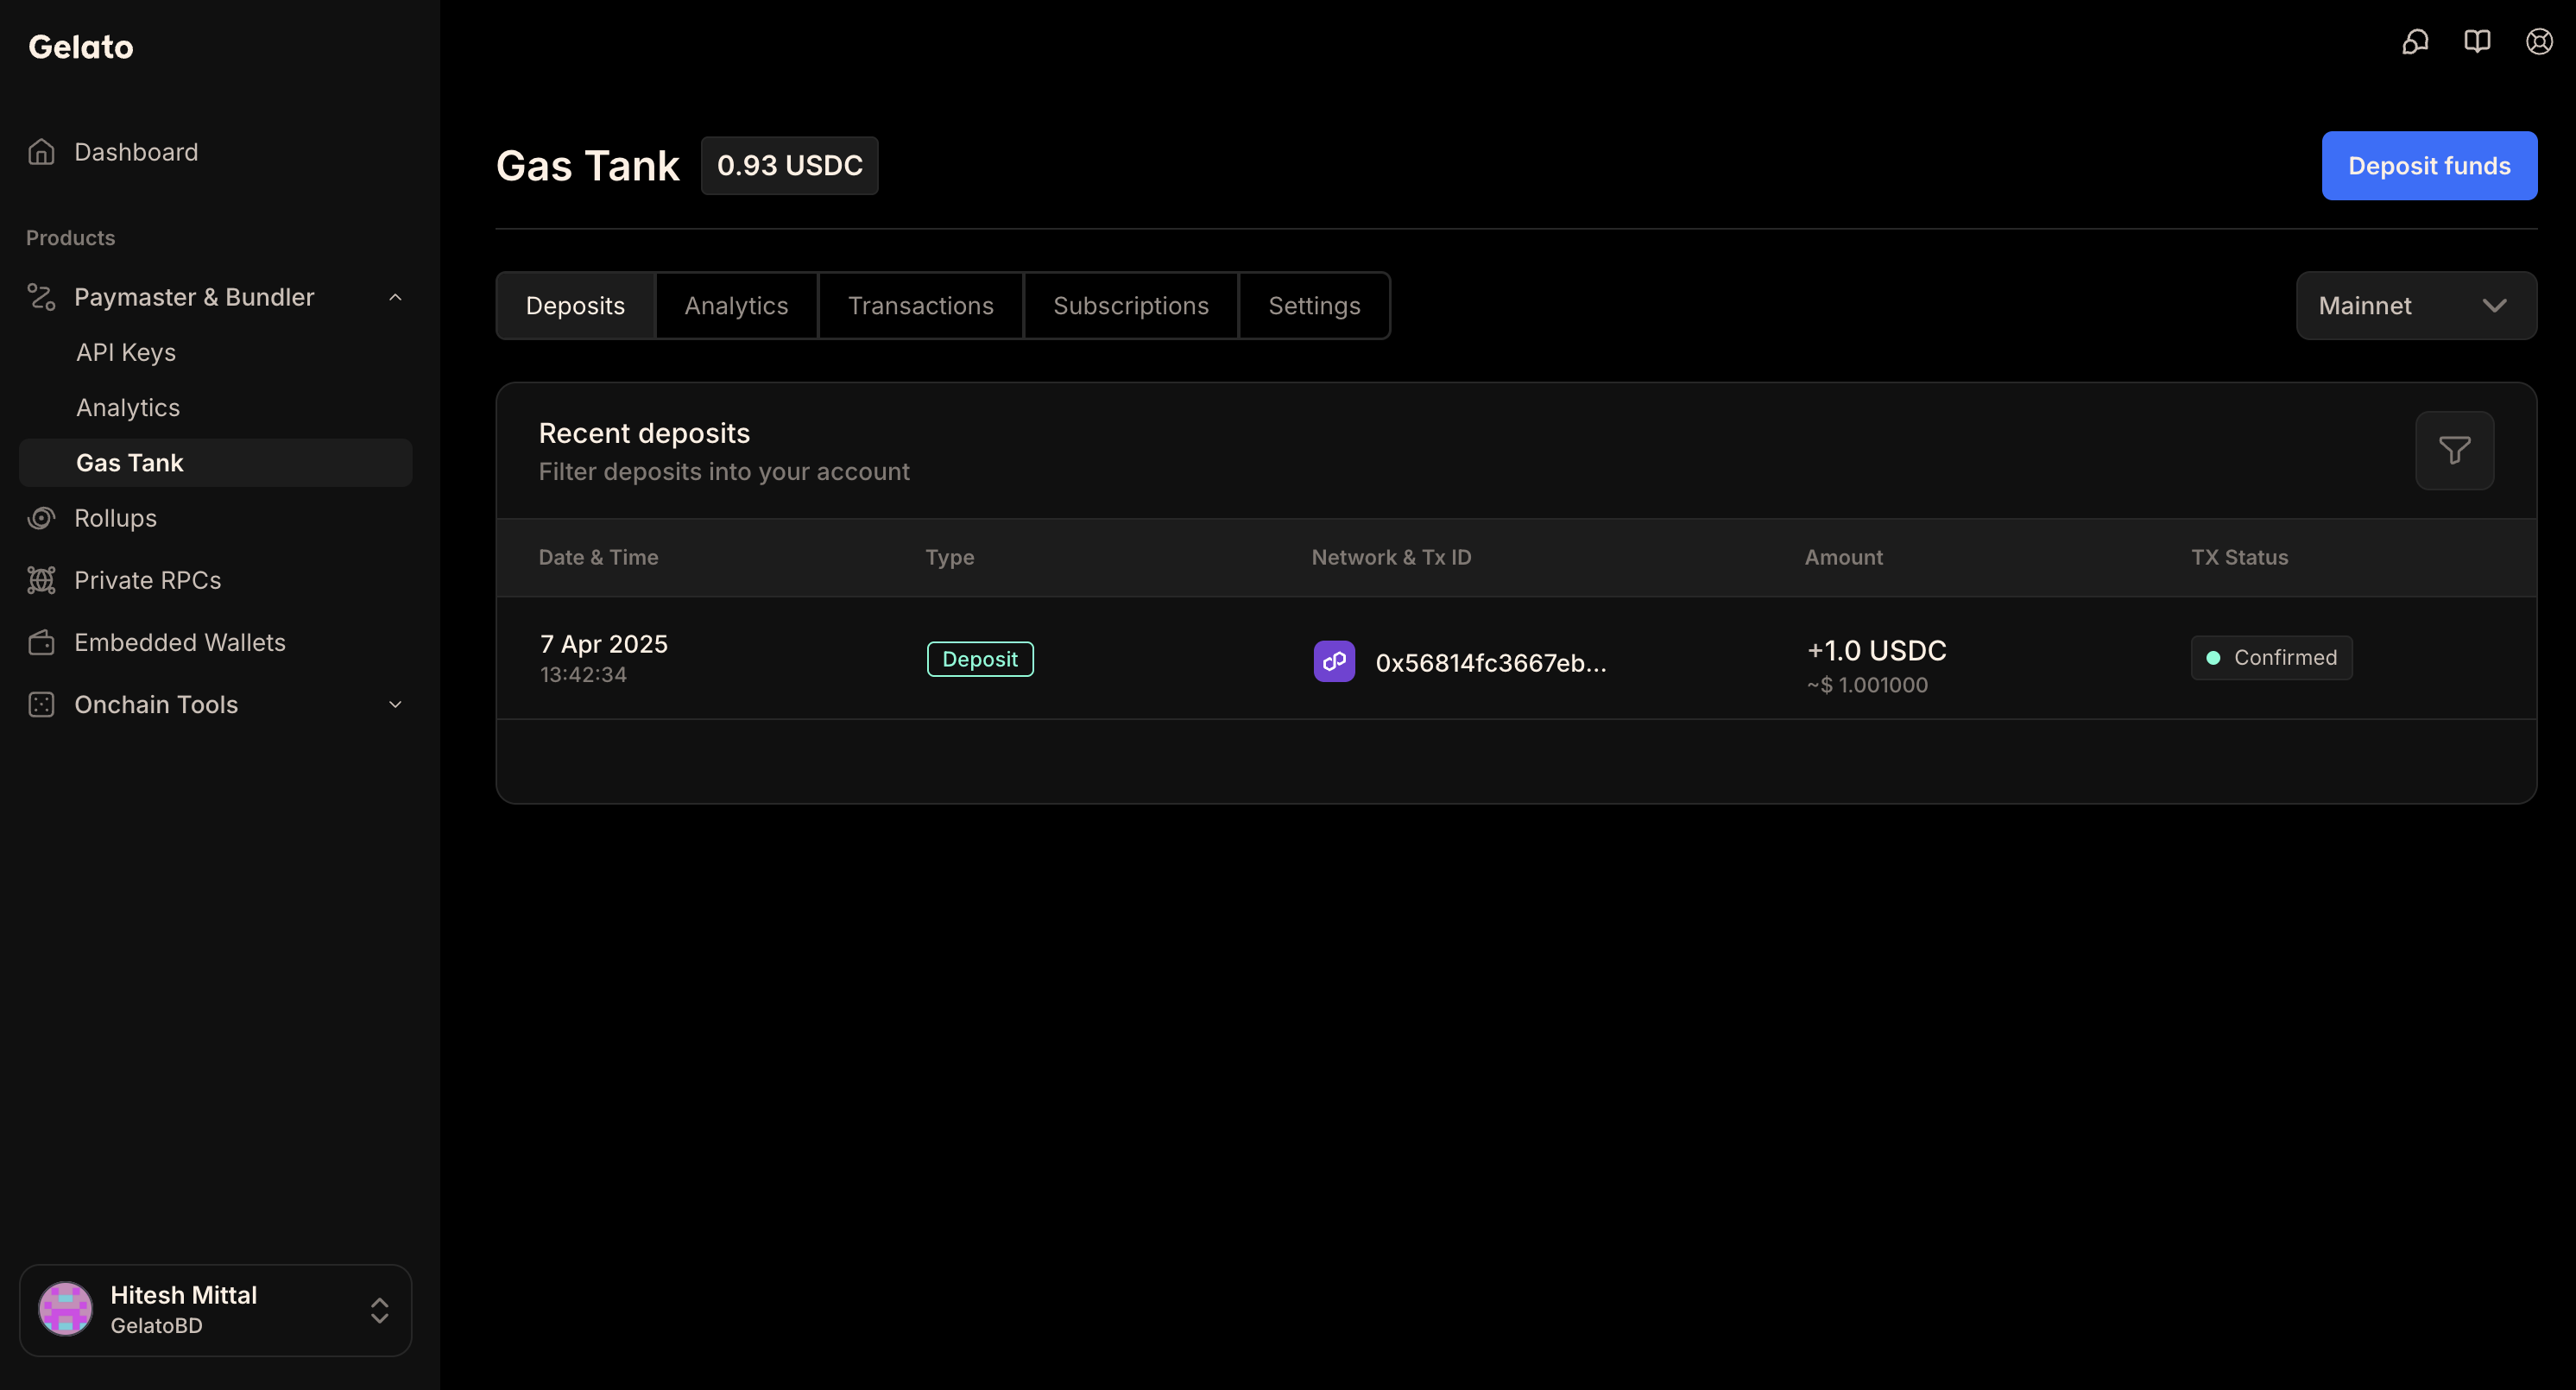
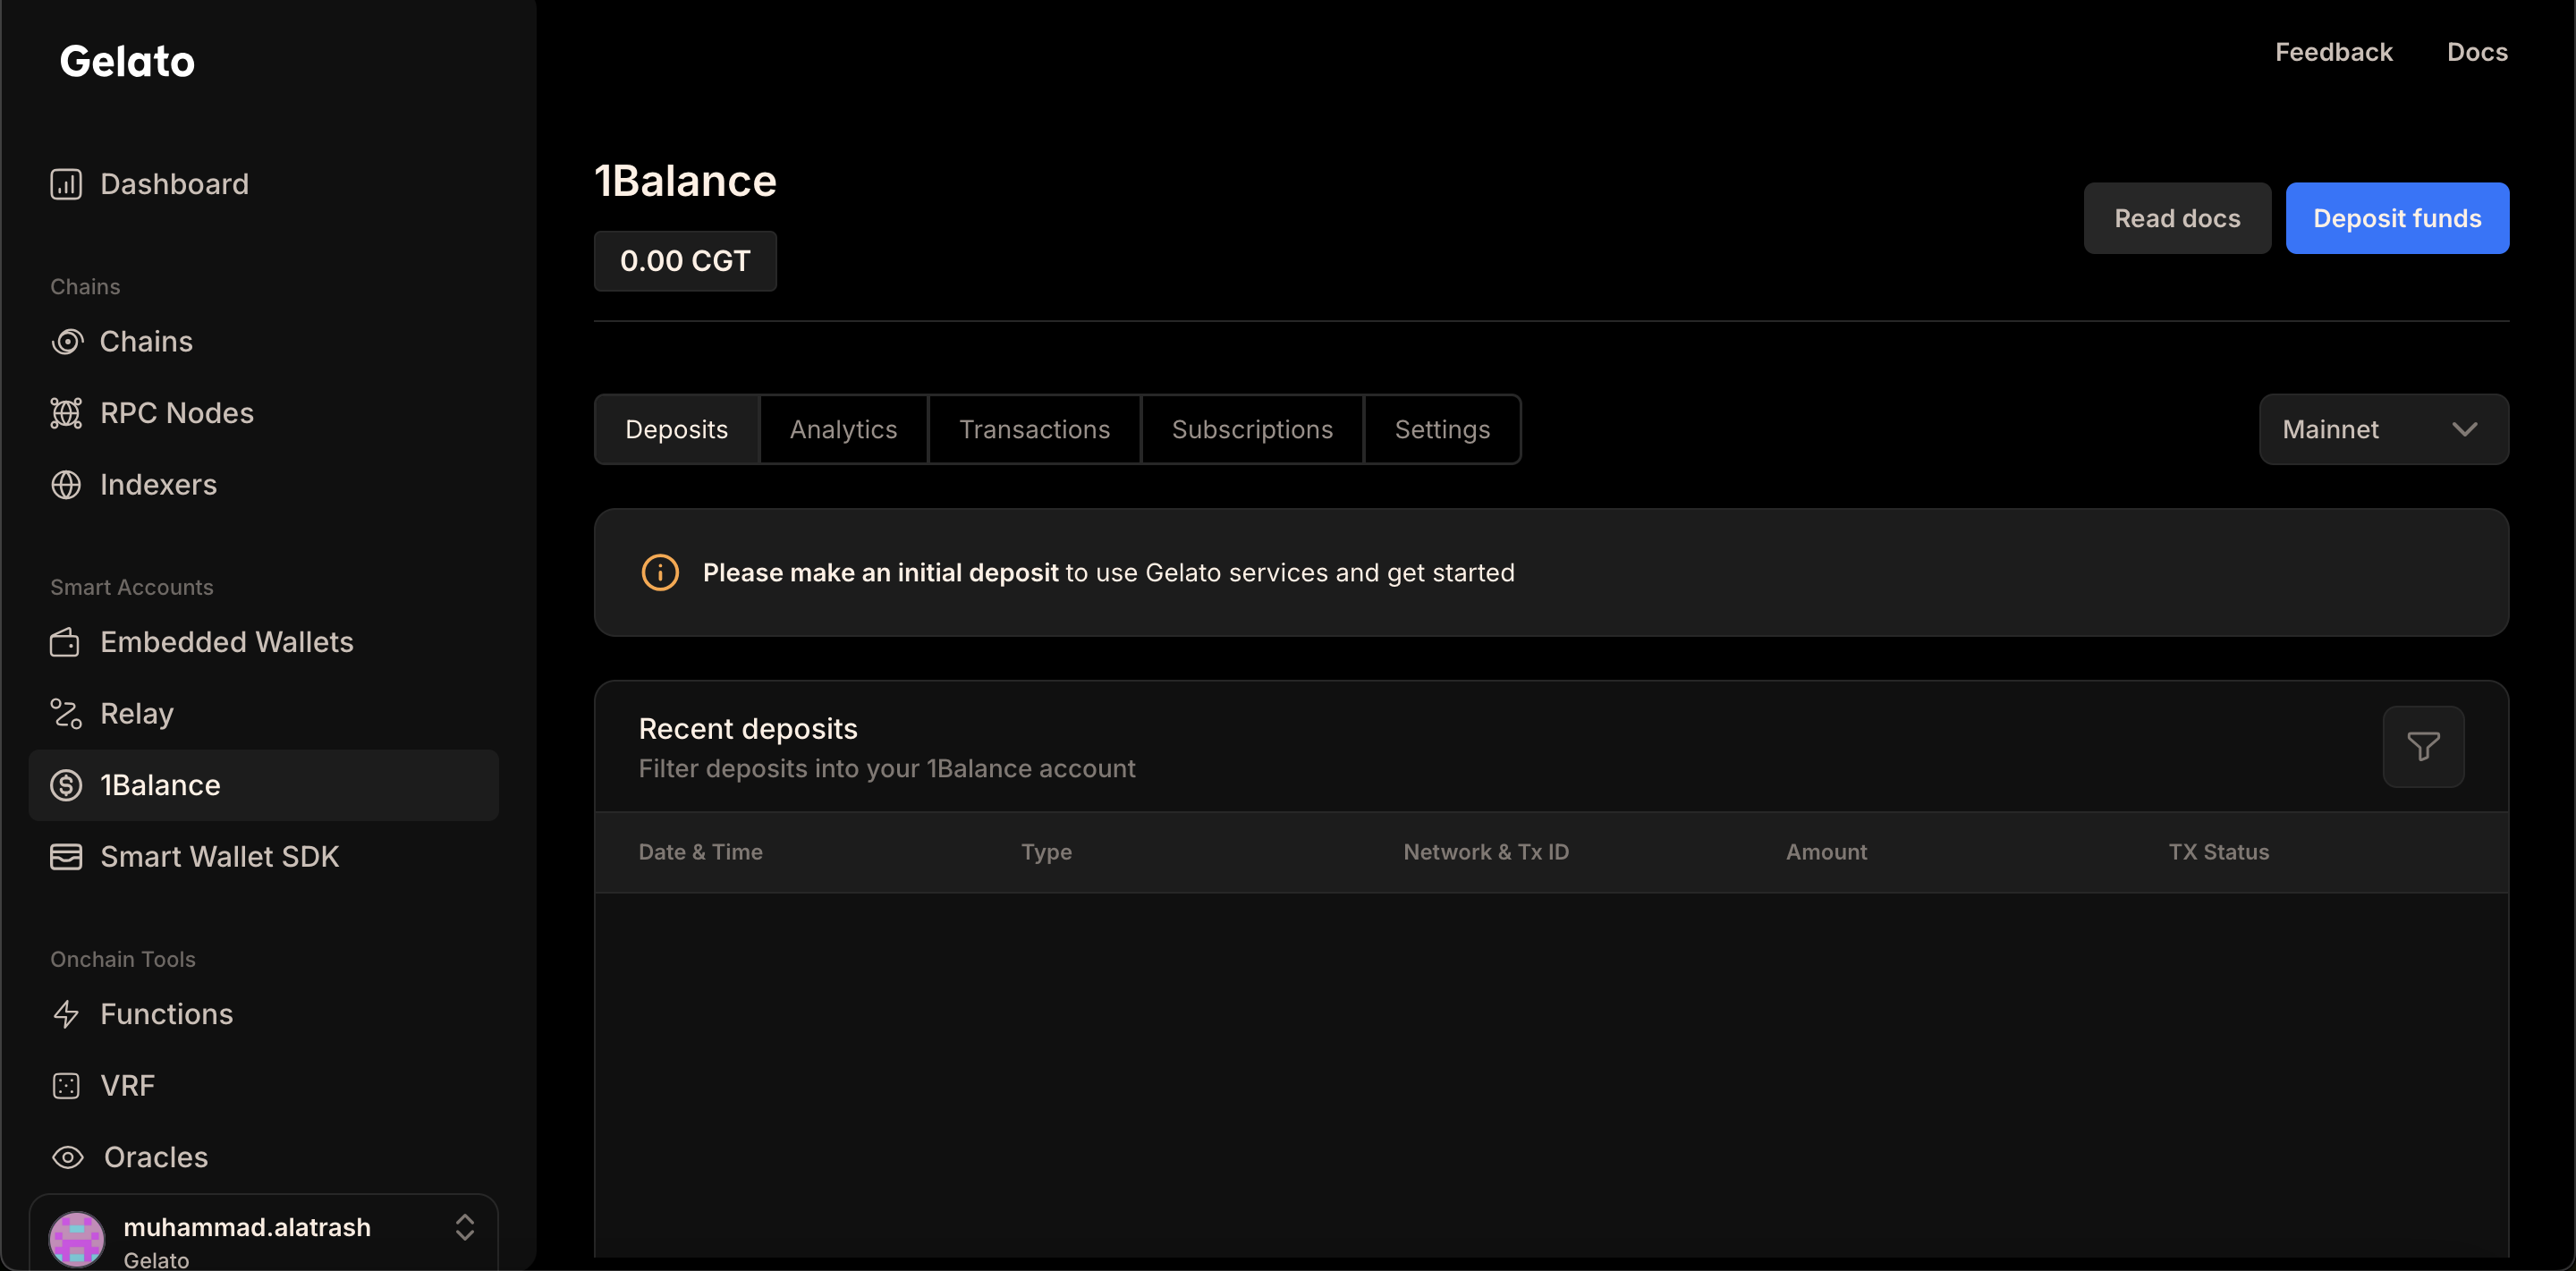
 Before you can start sponsoring gas with Gas Tank, you need to setup your Gas Tank. Check out our [Guide](/paymaster-&-bundler/gastank/setting-up-gastank) for detailed instructions on setting up your Gas Tank.
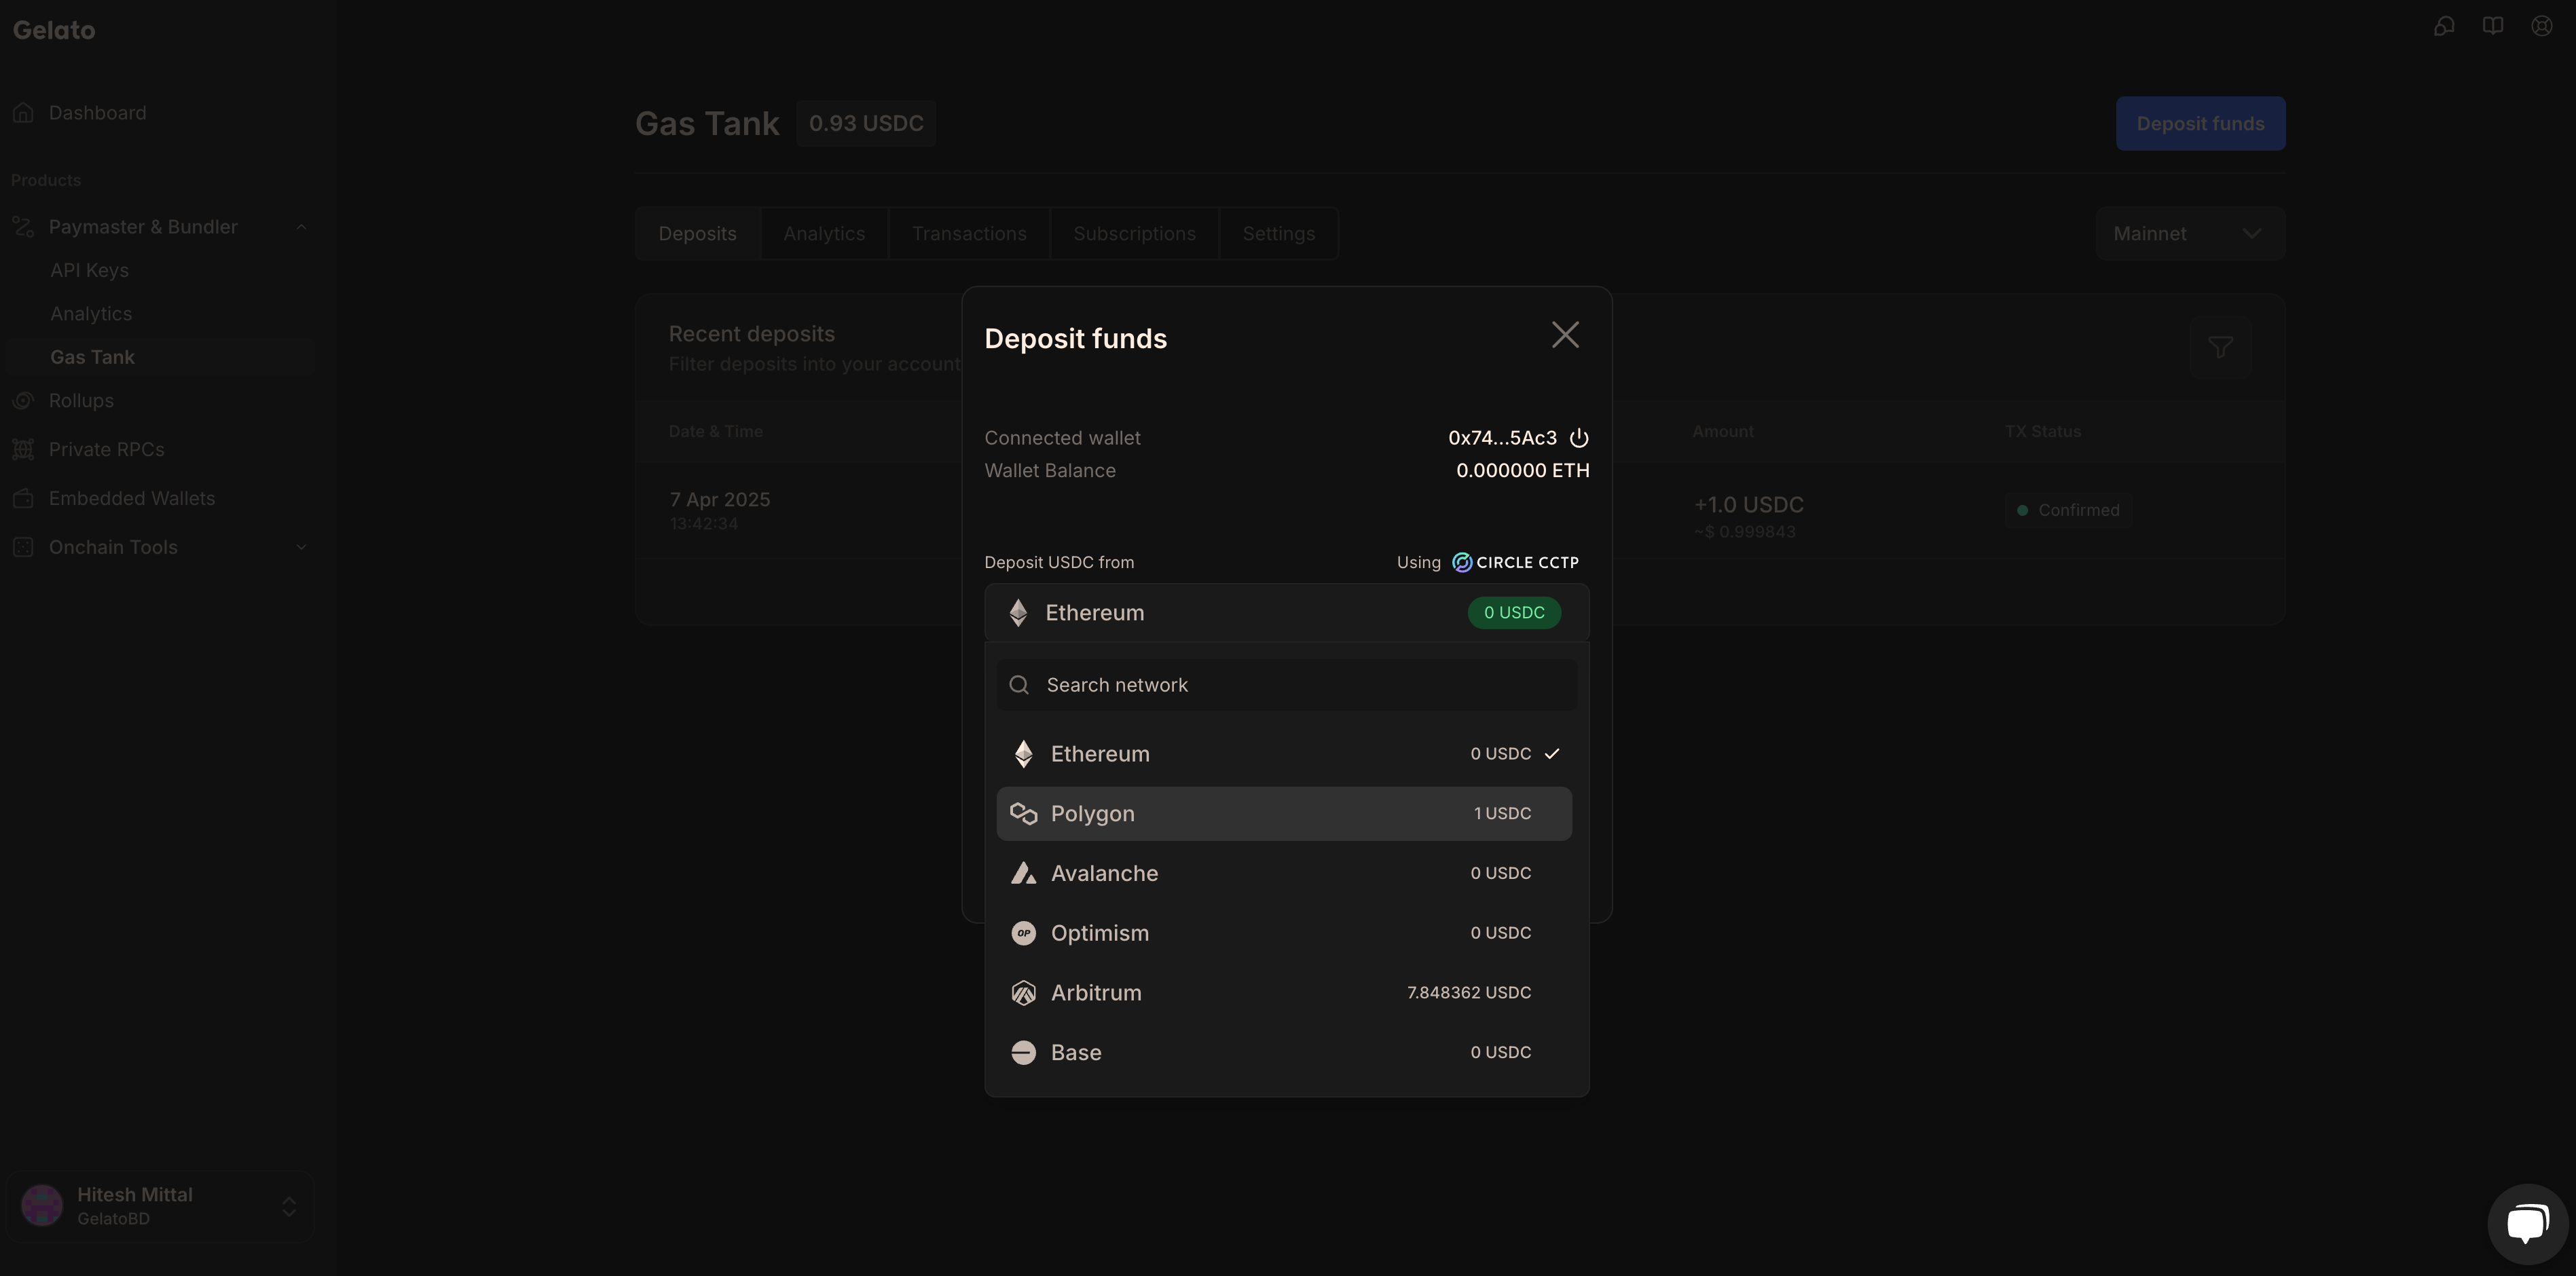
For `Sponsorship` purposes, add funds to your Gas Tank account according to your target environment:
- **Mainnets**: Deposit USDC.
- **Testnets**: Deposit Sepolia ETH.
Since Gas Tank is deployed on Polygon, you can deposit USDC in one step, and deposits from other networks are supported via Circle CCTP. Learn [more](/paymaster-&-bundler/gastank/introduction).
Before you can start sponsoring gas with Gas Tank, you need to setup your Gas Tank. Check out our [Guide](/paymaster-&-bundler/gastank/setting-up-gastank) for detailed instructions on setting up your Gas Tank.
For `Sponsorship` purposes, add funds to your Gas Tank account according to your target environment:
- **Mainnets**: Deposit USDC.
- **Testnets**: Deposit Sepolia ETH.
Since Gas Tank is deployed on Polygon, you can deposit USDC in one step, and deposits from other networks are supported via Circle CCTP. Learn [more](/paymaster-&-bundler/gastank/introduction).
 ---
---
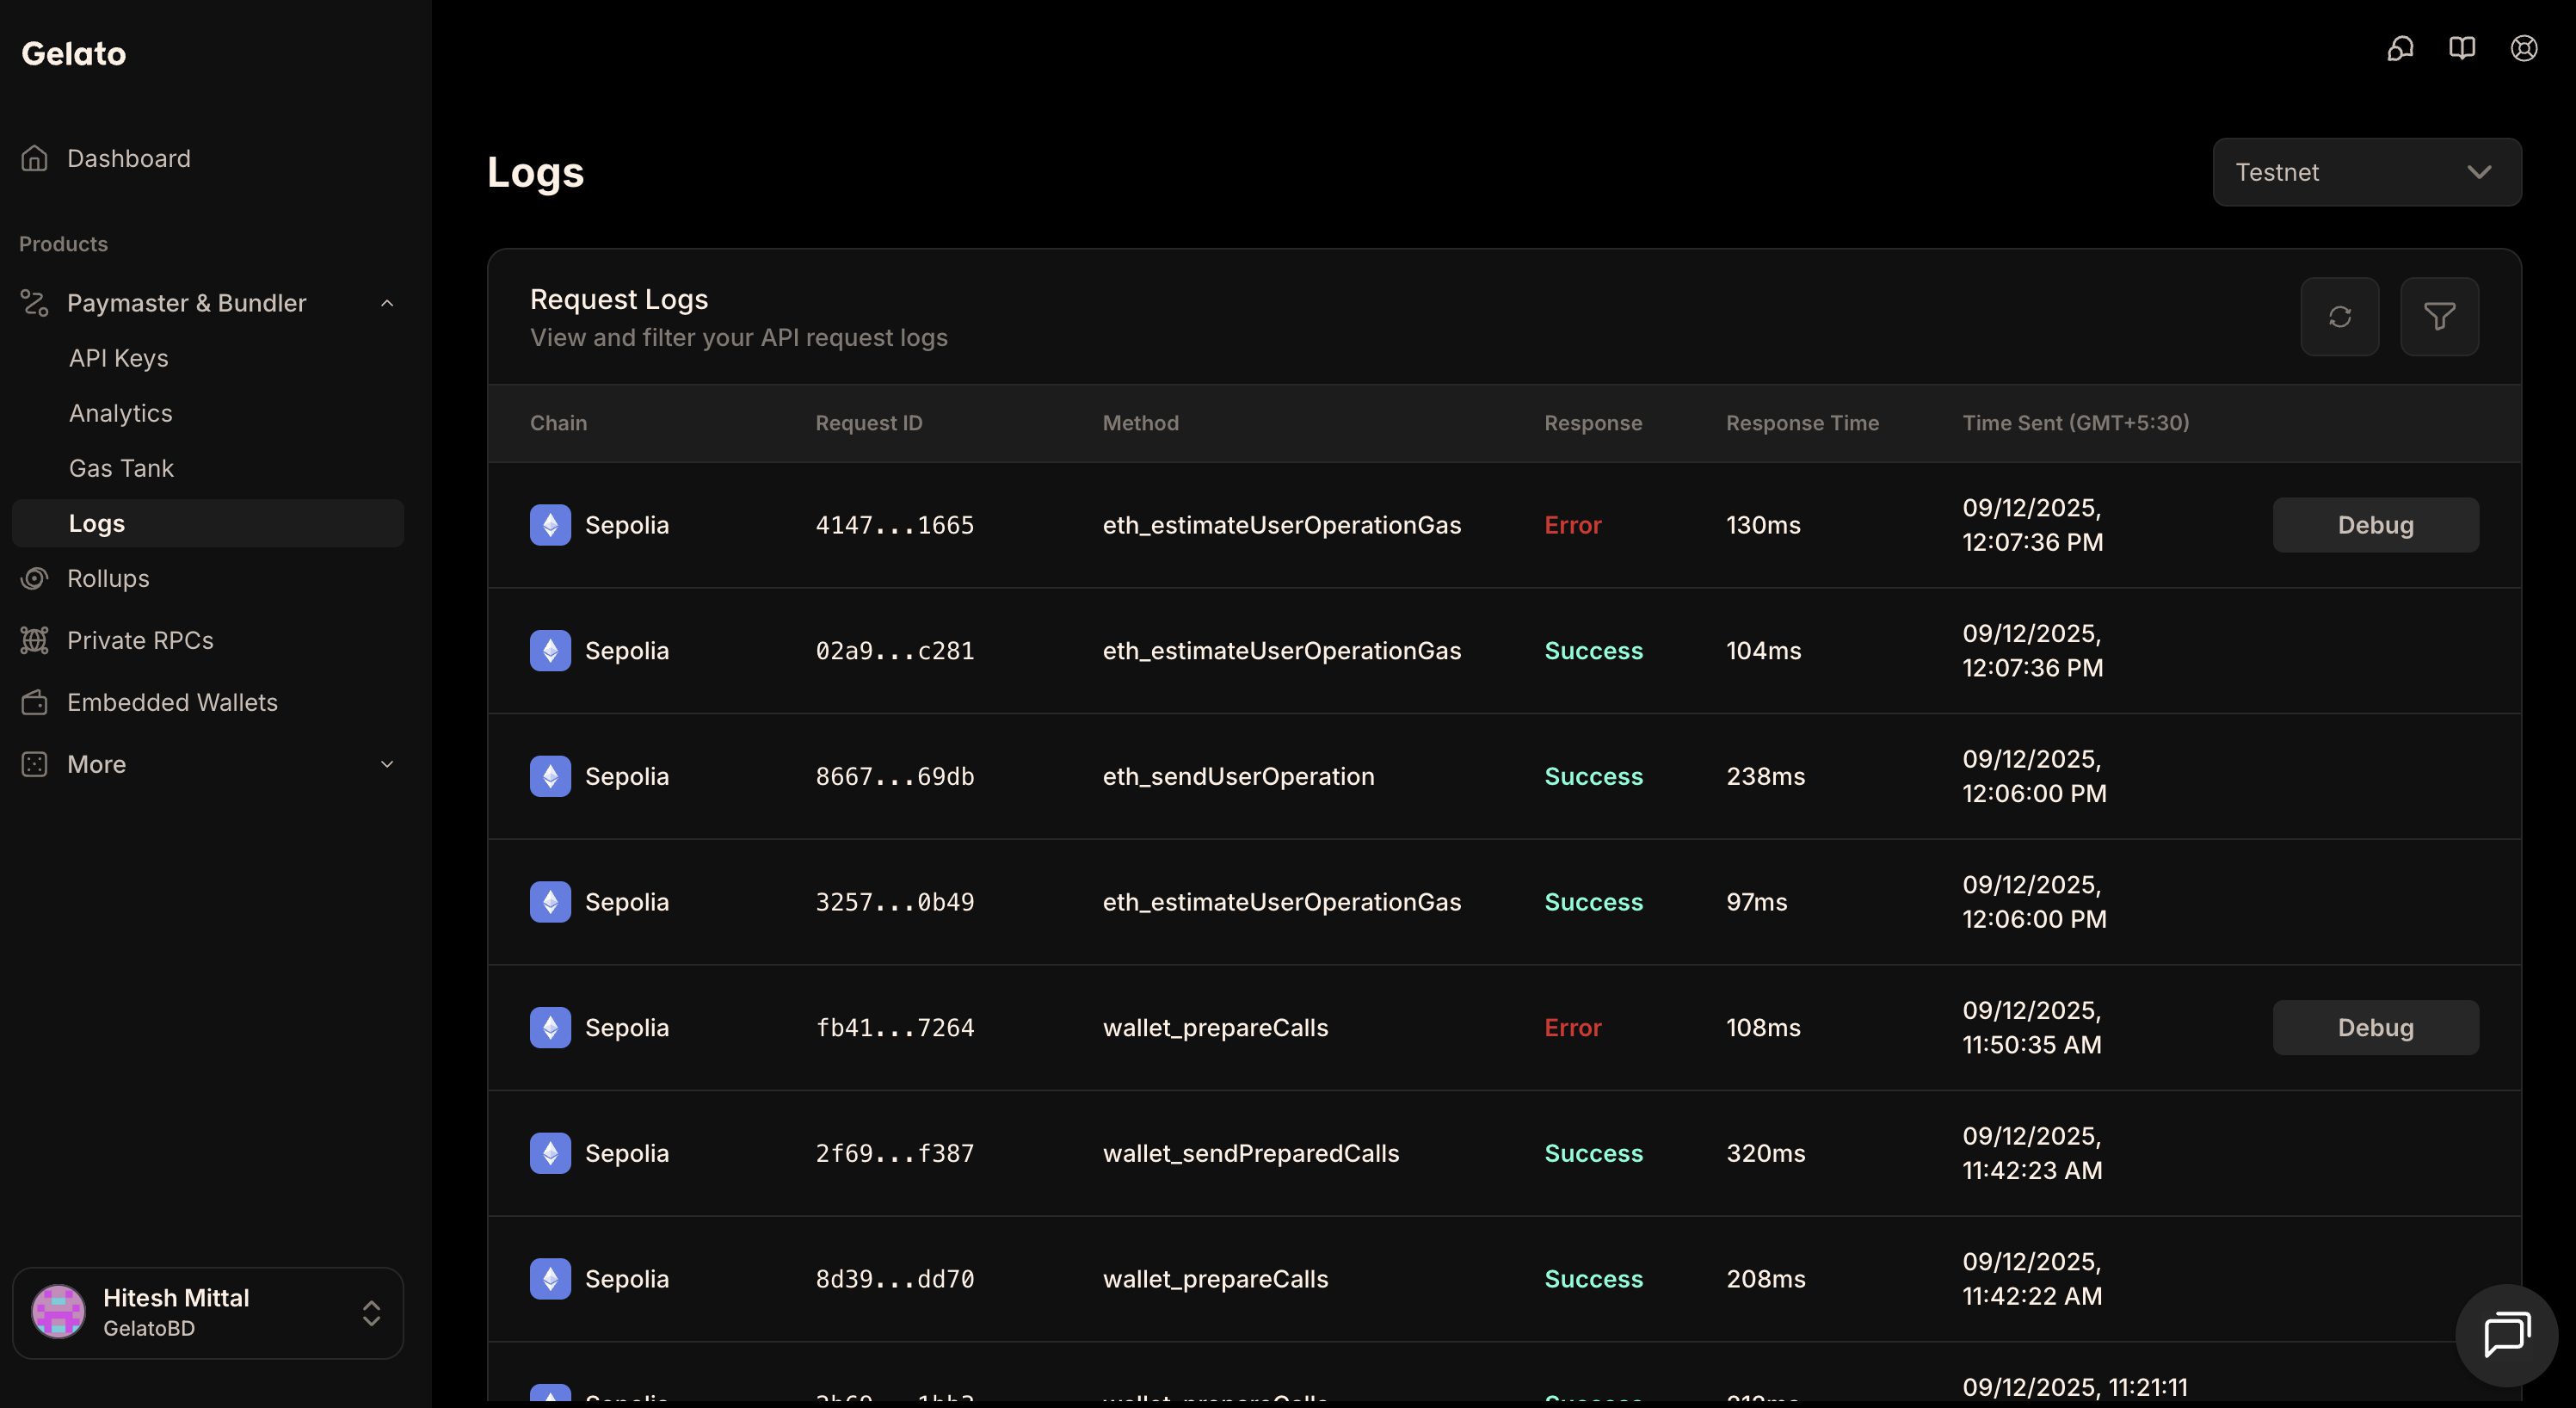 ### Steps to Debug
1. Go to the **logs** section and locate your failed relay request.
2. On the right side of the log entry, click the **Debug** button.
3. A new option, **View Debug**, will appear. Click it.
4. This will open a **Tenderly simulation**, which you can use to analyze and debug the failed request.
## Using Status Endpoint
If you call the `relayer_sendTransaction` or `relayer_sendTransactionSync` API endpoints, the returned `id` can also be used to track the status of the transaction through Gelato's infrastructure like this:
```bash
curl --request POST \
--url https://api.gelato.cloud/rpc \
--header 'Content-Type: application/json' \
--header 'X-API-Key: YOUR_API_KEY' \
--data '{
"id": 1,
"jsonrpc": "2.0",
"method": "relayer_getStatus",
"params": {
"id": "0x0e670ec64341771606e55d6b4ca35a1a6b75ee3d5145a99d05921026d1527331",
"logs": false
}
}'
```
### Response
```json
{
"jsonrpc": "2.0",
"id": 1,
"result": {
"id": "0x0e670ec64341771606e55d6b4ca35a1a6b75ee3d5145a99d05921026d1527331",
"status": 200,
"message": "Transaction included",
"receipt": {
"transactionHash": "0x...",
"blockNumber": 12345678,
"gasUsed": "21000"
}
}
}
```
## Status Codes
The `relayer_getStatus` endpoint returns numeric status codes:
| Code | Status | Description |
|------|--------|-------------|
| `100` | Pending | Transaction is queued and waiting to be processed |
| `110` | Submitted | Transaction has been submitted to the network |
| `200` | Included | Transaction was successfully included in a block |
| `400` | Rejected | Transaction was rejected (invalid parameters, insufficient funds, etc.) |
| `500` | Reverted | Transaction was included but execution reverted |
### Using Status Codes in Code
When using the SDK, you can import `StatusCode` for type-safe comparisons:
```typescript
const result = await relayer.sendTransactionSync({ ... });
if (result.status === StatusCode.Included) {
console.log(`Success! Hash: ${result.receipt.transactionHash}`);
} else if (result.status === StatusCode.Reverted) {
console.log(`Transaction reverted: ${result.message}`);
} else if (result.status === StatusCode.Rejected) {
console.log(`Transaction rejected: ${result.message}`);
}
```
When using the API directly, check against the numeric values:
```typescript
const data = await response.json();
const status = data.result.status;
// Terminal states
if (status === 200) {
console.log('Transaction included');
} else if (status === 400) {
console.log('Transaction rejected');
} else if (status === 500) {
console.log('Transaction reverted');
}
// Non-terminal states (keep polling)
else if (status === 100 || status === 110) {
console.log('Transaction pending...');
}
```
---
### Steps to Debug
1. Go to the **logs** section and locate your failed relay request.
2. On the right side of the log entry, click the **Debug** button.
3. A new option, **View Debug**, will appear. Click it.
4. This will open a **Tenderly simulation**, which you can use to analyze and debug the failed request.
## Using Status Endpoint
If you call the `relayer_sendTransaction` or `relayer_sendTransactionSync` API endpoints, the returned `id` can also be used to track the status of the transaction through Gelato's infrastructure like this:
```bash
curl --request POST \
--url https://api.gelato.cloud/rpc \
--header 'Content-Type: application/json' \
--header 'X-API-Key: YOUR_API_KEY' \
--data '{
"id": 1,
"jsonrpc": "2.0",
"method": "relayer_getStatus",
"params": {
"id": "0x0e670ec64341771606e55d6b4ca35a1a6b75ee3d5145a99d05921026d1527331",
"logs": false
}
}'
```
### Response
```json
{
"jsonrpc": "2.0",
"id": 1,
"result": {
"id": "0x0e670ec64341771606e55d6b4ca35a1a6b75ee3d5145a99d05921026d1527331",
"status": 200,
"message": "Transaction included",
"receipt": {
"transactionHash": "0x...",
"blockNumber": 12345678,
"gasUsed": "21000"
}
}
}
```
## Status Codes
The `relayer_getStatus` endpoint returns numeric status codes:
| Code | Status | Description |
|------|--------|-------------|
| `100` | Pending | Transaction is queued and waiting to be processed |
| `110` | Submitted | Transaction has been submitted to the network |
| `200` | Included | Transaction was successfully included in a block |
| `400` | Rejected | Transaction was rejected (invalid parameters, insufficient funds, etc.) |
| `500` | Reverted | Transaction was included but execution reverted |
### Using Status Codes in Code
When using the SDK, you can import `StatusCode` for type-safe comparisons:
```typescript
const result = await relayer.sendTransactionSync({ ... });
if (result.status === StatusCode.Included) {
console.log(`Success! Hash: ${result.receipt.transactionHash}`);
} else if (result.status === StatusCode.Reverted) {
console.log(`Transaction reverted: ${result.message}`);
} else if (result.status === StatusCode.Rejected) {
console.log(`Transaction rejected: ${result.message}`);
}
```
When using the API directly, check against the numeric values:
```typescript
const data = await response.json();
const status = data.result.status;
// Terminal states
if (status === 200) {
console.log('Transaction included');
} else if (status === 400) {
console.log('Transaction rejected');
} else if (status === 500) {
console.log('Transaction reverted');
}
// Non-terminal states (keep polling)
else if (status === 100 || status === 110) {
console.log('Transaction pending...');
}
```
---
 5. After confirming your deposit transaction in your wallet you will see a Pending deposit appear in your deposits history:
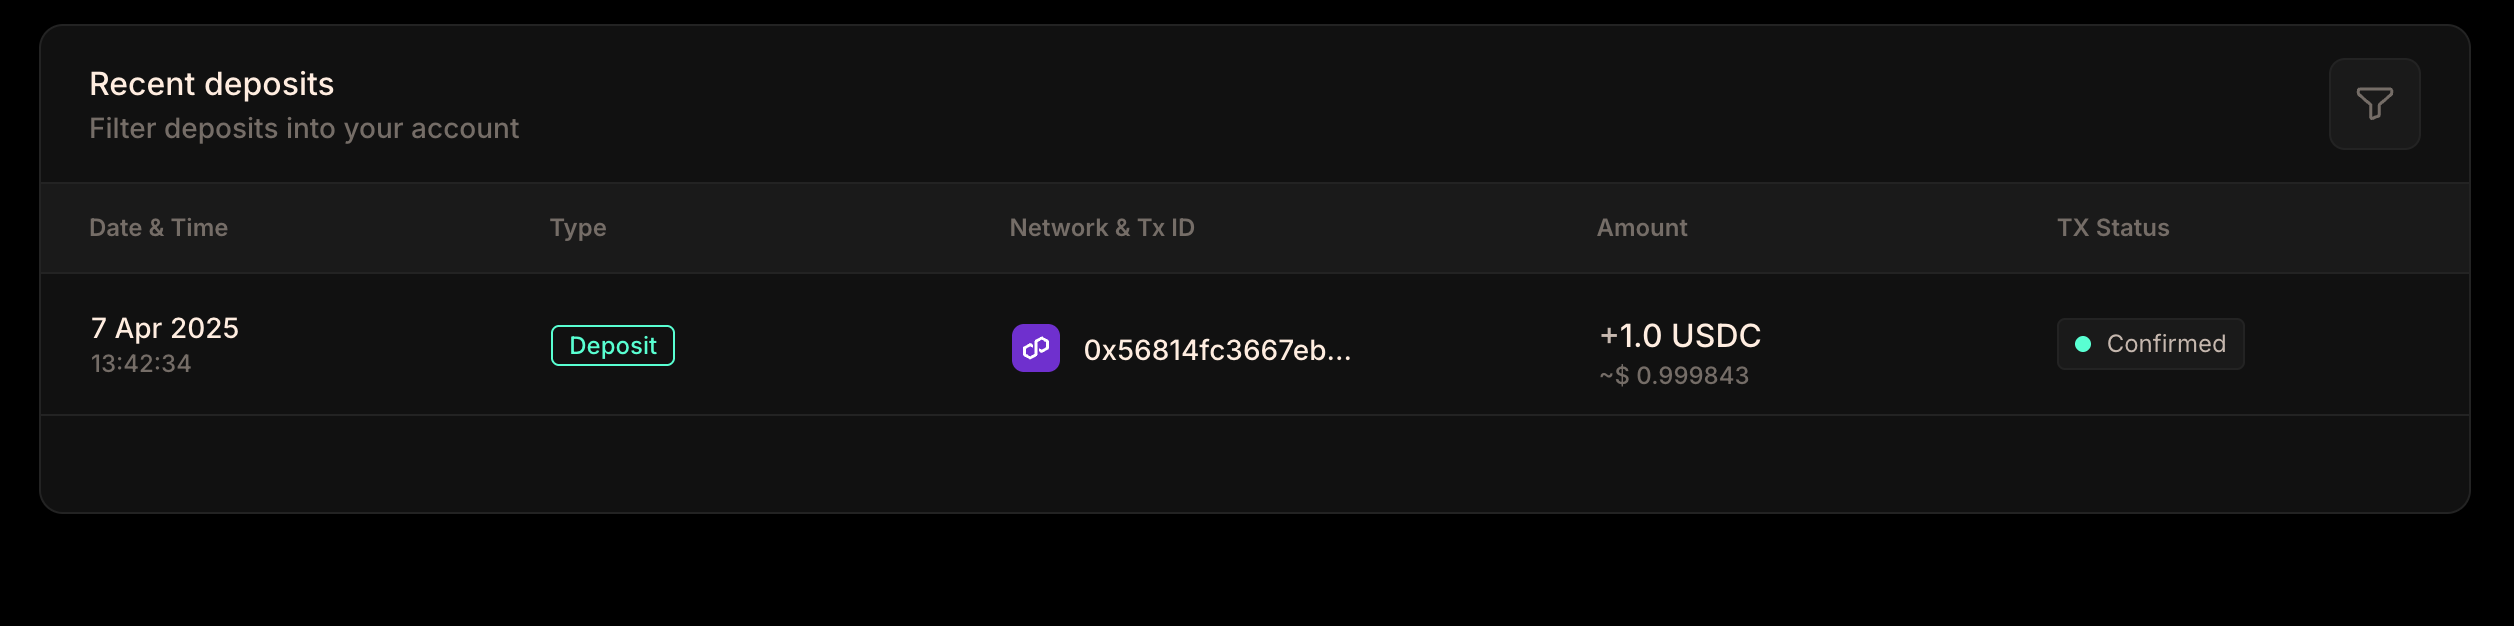 Once the required number of confirmations has been reached your deposit will be credited and your Gas Tank is ready for use.
## Depositing from Network other than Polygon
When you deposit USDC into your Gas Tank account from a network other than Polygon, your deposit will undergo a two-step process that ensures your funds are securely bridged and deposited using Circle’s Cross-Chain Transfer Protocol (CCTP).
For this example, we will be making use of USDC on Base:
- We have entered 0.5 USDC that we wish to deposit into our Gas Tank.
- The funds will first undergo a 'Bridging' process, with a clear display of the bridging fee that covers the gas costs
- Confirm the transaction from our wallet, then track the two-step process—Bridging followed by Depositing, culminating in the funds reflecting in our Gas Tank, typically within 15 minutes.
Once the required number of confirmations has been reached your deposit will be credited and your Gas Tank is ready for use.
## Depositing from Network other than Polygon
When you deposit USDC into your Gas Tank account from a network other than Polygon, your deposit will undergo a two-step process that ensures your funds are securely bridged and deposited using Circle’s Cross-Chain Transfer Protocol (CCTP).
For this example, we will be making use of USDC on Base:
- We have entered 0.5 USDC that we wish to deposit into our Gas Tank.
- The funds will first undergo a 'Bridging' process, with a clear display of the bridging fee that covers the gas costs
- Confirm the transaction from our wallet, then track the two-step process—Bridging followed by Depositing, culminating in the funds reflecting in our Gas Tank, typically within 15 minutes.
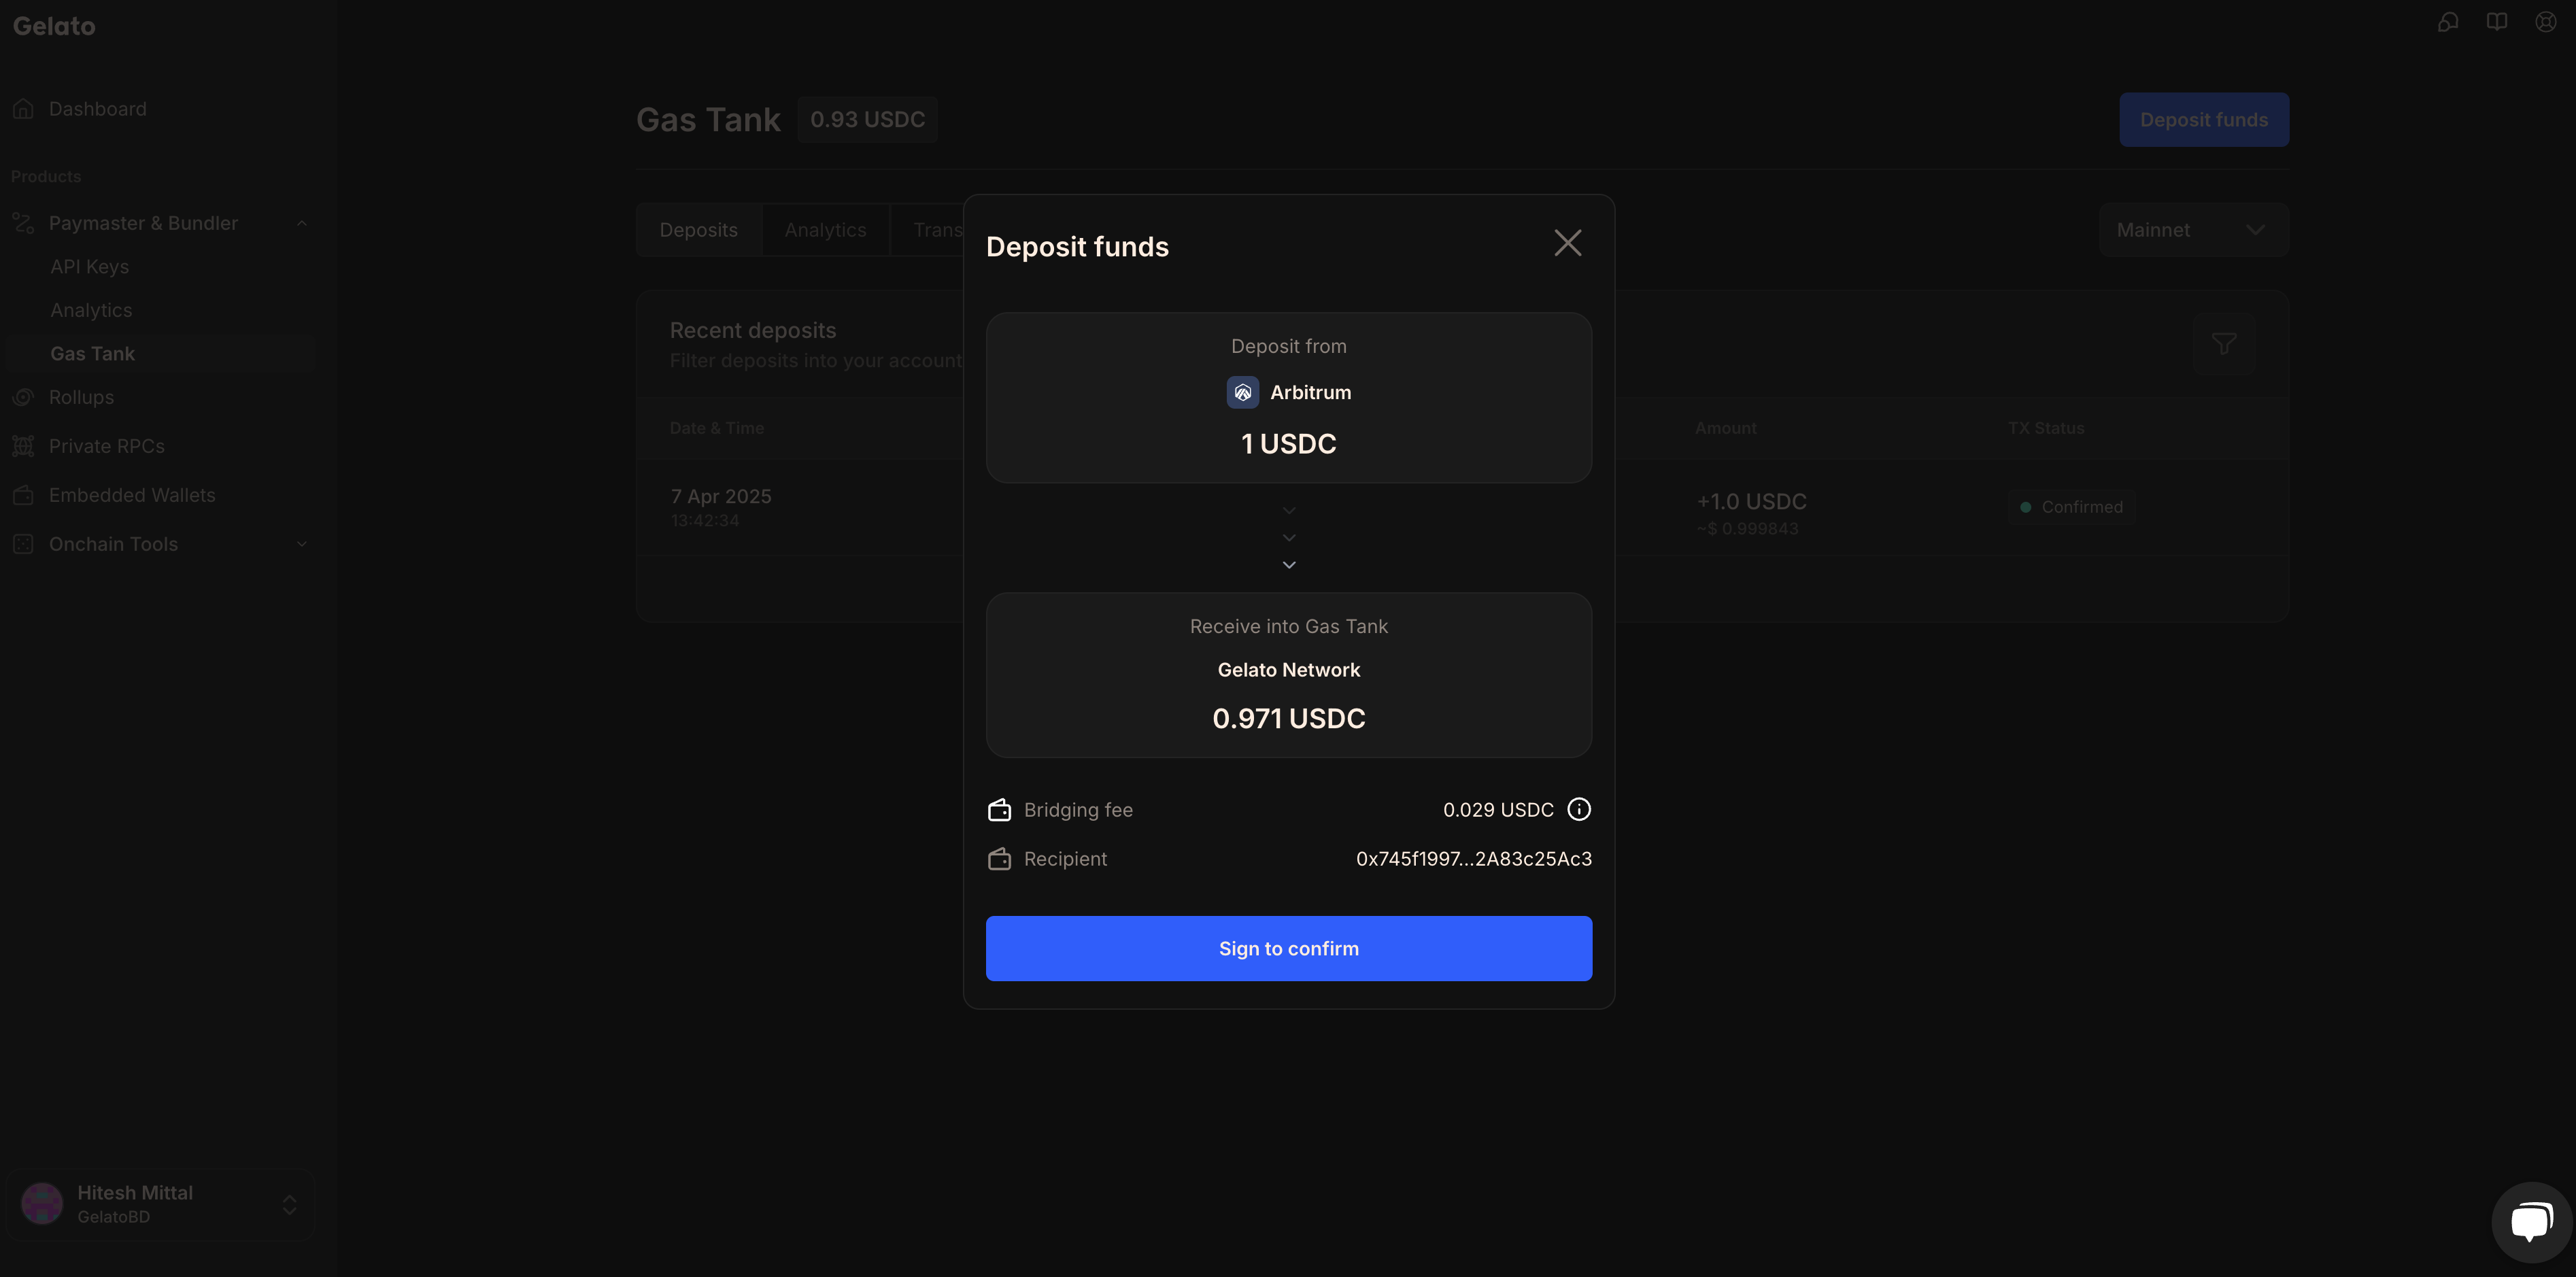 When you make a deposit from a network other than Polygon, you'll notice a small fee applied during the bridging process. It's important to understand that these fees are strictly to cover the CCTP and gas costs. Gas Tank does not charge any additional fees for this service.
## Fees
More details on the fees applied by each service are available:
- [Paymaster & Bundler Fees](/pricing/pricing-plans)
- [Web3 Function Fees](/pricing/pricing-plans)
## Low Balance Alerts
To ensure that your transactions execute as you expect, it is critical that you have sufficient funds deposited in Gas Tank. To help you monitor your balance and receive alerts when it drops below you preferred threshold, we provide a [Gas Tank Alerts service](/paymaster-&-bundler/gastank/gastank-alerts).
---
When you make a deposit from a network other than Polygon, you'll notice a small fee applied during the bridging process. It's important to understand that these fees are strictly to cover the CCTP and gas costs. Gas Tank does not charge any additional fees for this service.
## Fees
More details on the fees applied by each service are available:
- [Paymaster & Bundler Fees](/pricing/pricing-plans)
- [Web3 Function Fees](/pricing/pricing-plans)
## Low Balance Alerts
To ensure that your transactions execute as you expect, it is critical that you have sufficient funds deposited in Gas Tank. To help you monitor your balance and receive alerts when it drops below you preferred threshold, we provide a [Gas Tank Alerts service](/paymaster-&-bundler/gastank/gastank-alerts).
---
 ## Key Benefits
- **Zero code changes** – fully managed from the dashboard
- **Seamless monetization** – earn revenue from ERC-20 flows
- **Weekly USDC payouts** – consistent, automated deposits
- **Flexible configuration** – set margins per chain and update anytime
- **Universal support** – works with all ERC-20 tokens, no restrictions
## How It Works
1. **User pays gas in ERC-20**
- The Paymaster sponsors the transaction, while the user pays for it using any ERC-20 token.
2. **Add a revenue margin**
- Define a percentage margin (e.g., 5%) on top of the actual gas cost.
- Example: If gas costs **1 USD**, and you set a **5%** margin, the total is **1.05 USD**.
- **1 USD** covers the gas
- **0.05 USD** is your revenue
3. **Automated conversion & payout**
- Gelato collects the margin in ERC-20
- Revenue is converted into **USDC weekly**
- Converted USDC is automatically deposited into your **Gas Tank**
## Getting Started
1. Log in to the **[Gelato Cloud Platform](https://app.gelato.cloud/)**
2. Navigate to: **API Key → Policies → Gas Revenue Policy**
3. Select your network
4. Define your gas revenue percentage (e.g., 5%)
5. Save your settings
Your margin is applied immediately, and payouts appear weekly in USDC.
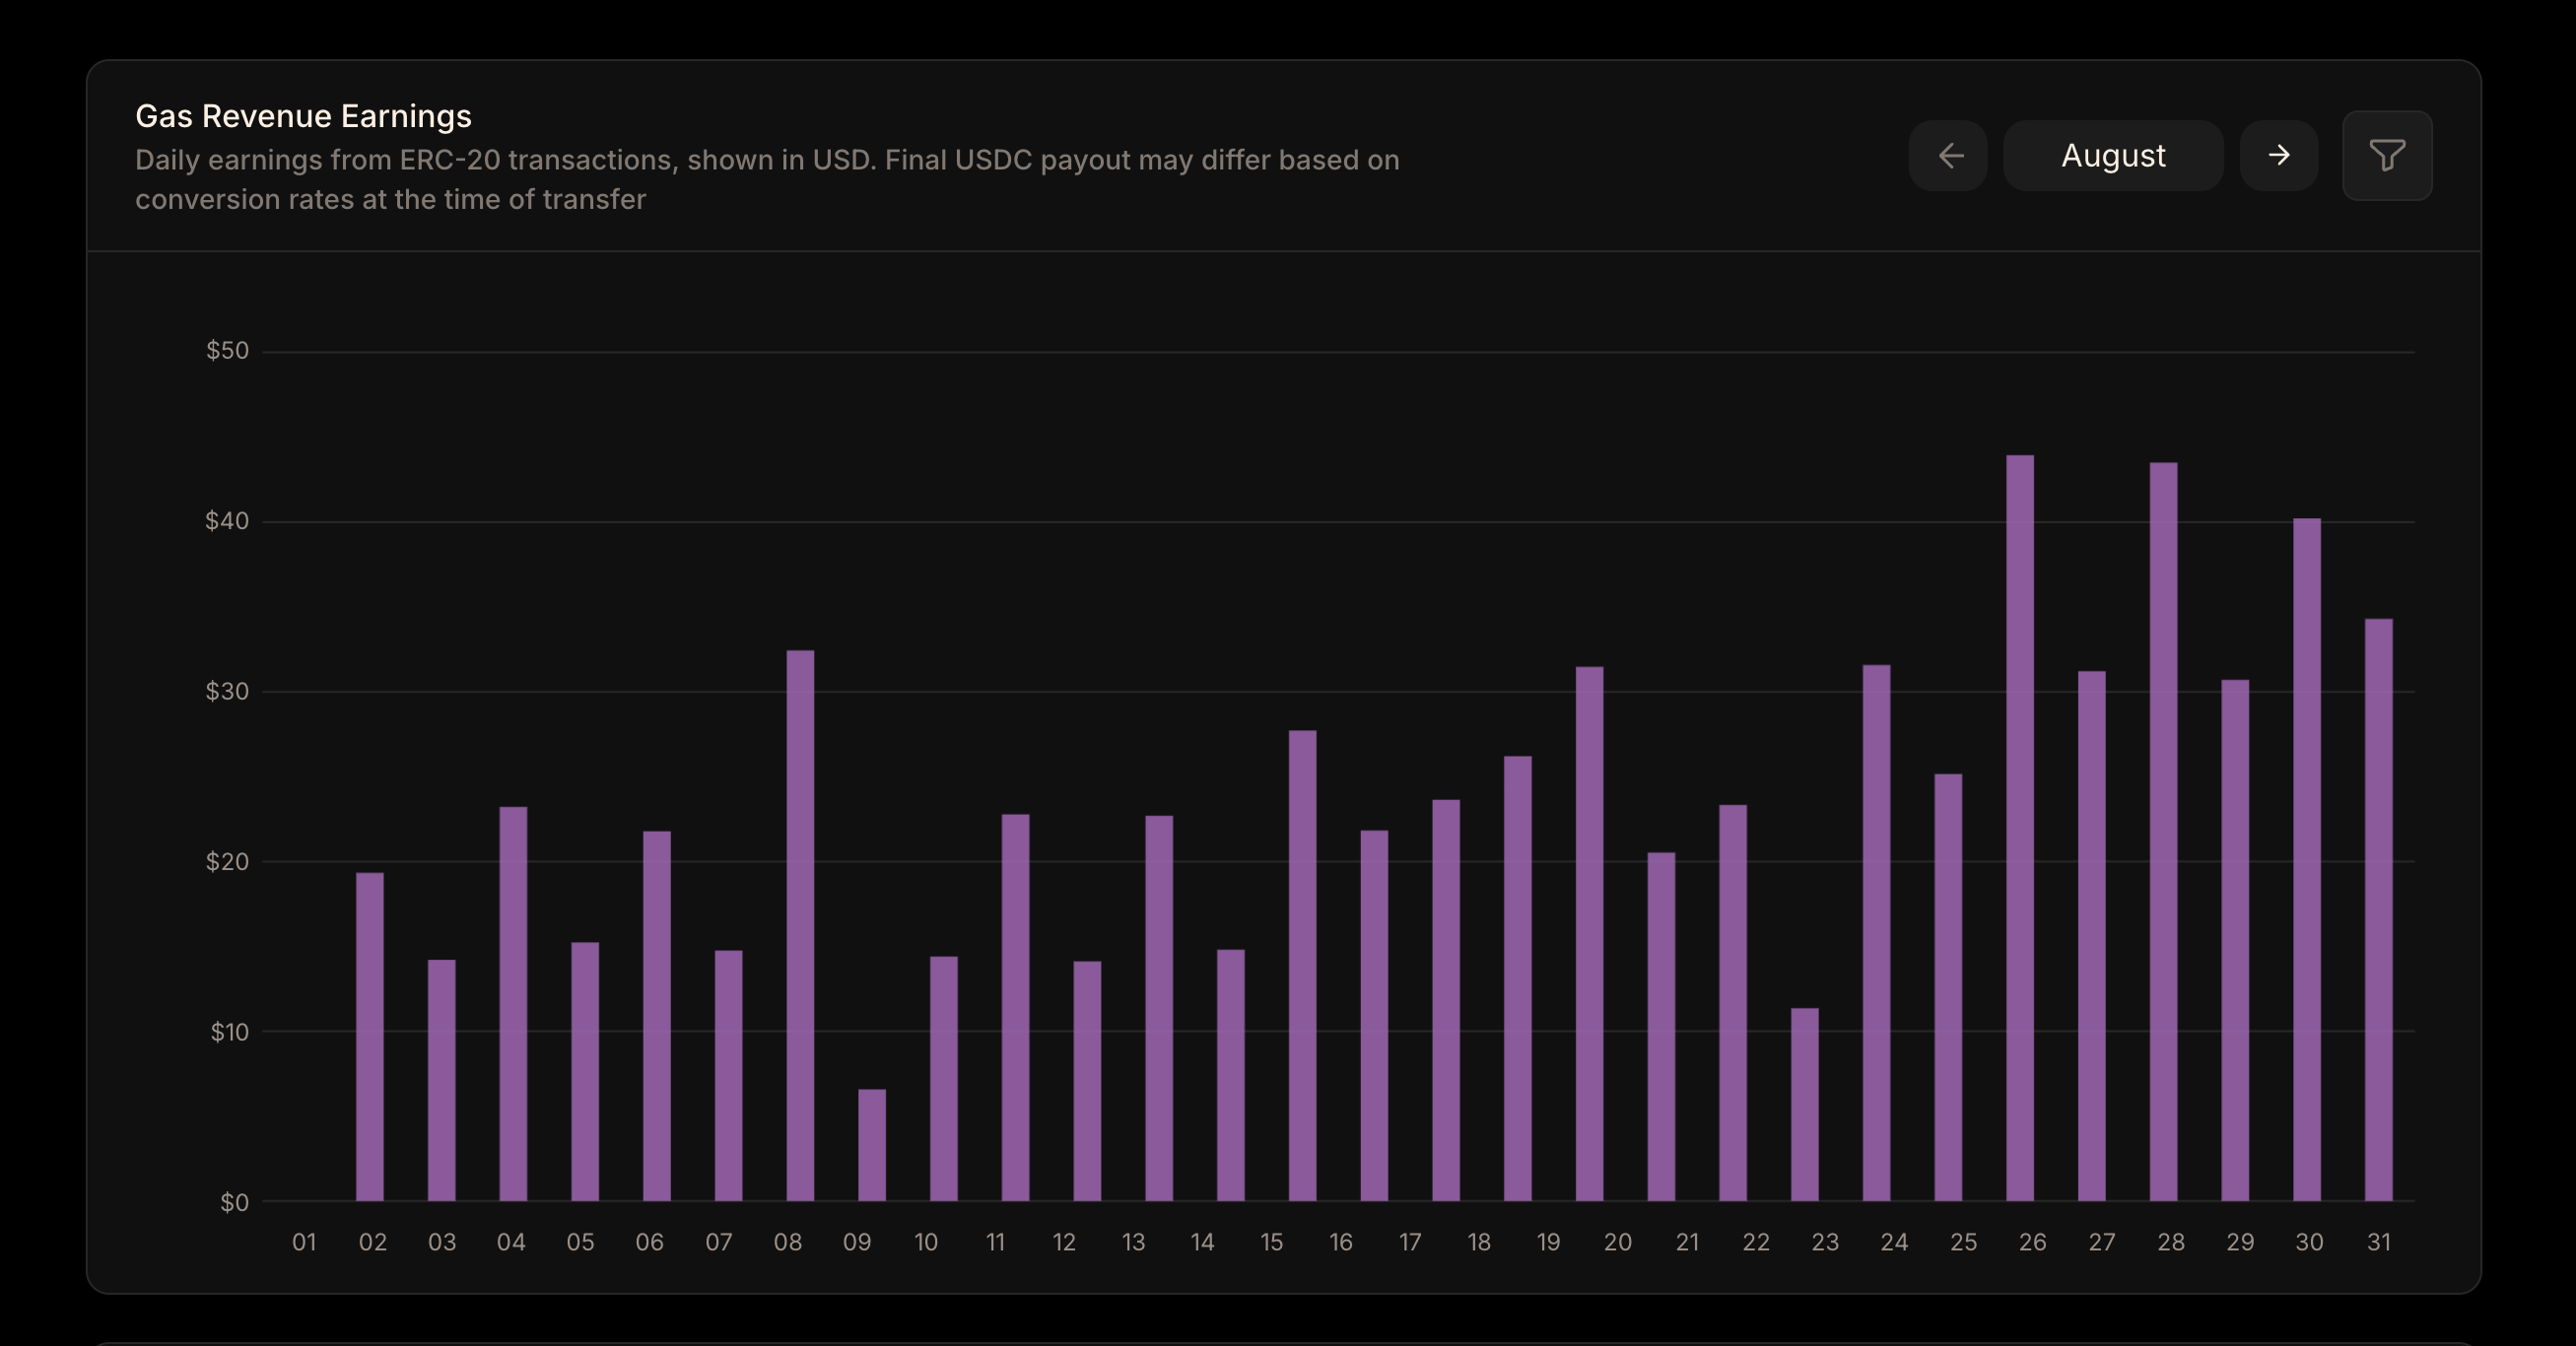
## Monitoring Earnings
Track your earnings in real time under: **Gas Tank → Analytics → Gas Revenue Earnings**
- View daily revenue per chain
- Earnings displayed in USD equivalent using real-time token prices
- For payout details, see **Payouts & Conversion** section below.
## Payouts & Conversion
- **Collection**: Revenue is collected in the ERC-20 tokens users pay with
- **Conversion**: Once per week, Gelato converts accumulated revenue into USDC at the settlement rate
- **Payout**: Converted USDC is automatically deposited into your Gas Tank
- **Variation**: Daily earnings shown in Analytics reflect real-time USD value. Final payouts may vary slightly based on conversion rates
## Supported Networks
Gas Revenue is available on the following chains:
{(() => {
const networksData = [
{ network: "Arbitrum", environment: "Mainnet" },
{ network: "Base", environment: "Mainnet, Sepolia" },
{ network: "Ethereum", environment: "Mainnet, Sepolia" },
{ network: "Ink", environment: "Mainnet" },
];
return (
## Key Benefits
- **Zero code changes** – fully managed from the dashboard
- **Seamless monetization** – earn revenue from ERC-20 flows
- **Weekly USDC payouts** – consistent, automated deposits
- **Flexible configuration** – set margins per chain and update anytime
- **Universal support** – works with all ERC-20 tokens, no restrictions
## How It Works
1. **User pays gas in ERC-20**
- The Paymaster sponsors the transaction, while the user pays for it using any ERC-20 token.
2. **Add a revenue margin**
- Define a percentage margin (e.g., 5%) on top of the actual gas cost.
- Example: If gas costs **1 USD**, and you set a **5%** margin, the total is **1.05 USD**.
- **1 USD** covers the gas
- **0.05 USD** is your revenue
3. **Automated conversion & payout**
- Gelato collects the margin in ERC-20
- Revenue is converted into **USDC weekly**
- Converted USDC is automatically deposited into your **Gas Tank**
## Getting Started
1. Log in to the **[Gelato Cloud Platform](https://app.gelato.cloud/)**
2. Navigate to: **API Key → Policies → Gas Revenue Policy**
3. Select your network
4. Define your gas revenue percentage (e.g., 5%)
5. Save your settings
Your margin is applied immediately, and payouts appear weekly in USDC.
## Monitoring Earnings
Track your earnings in real time under: **Gas Tank → Analytics → Gas Revenue Earnings**
- View daily revenue per chain
- Earnings displayed in USD equivalent using real-time token prices
- For payout details, see **Payouts & Conversion** section below.
## Payouts & Conversion
- **Collection**: Revenue is collected in the ERC-20 tokens users pay with
- **Conversion**: Once per week, Gelato converts accumulated revenue into USDC at the settlement rate
- **Payout**: Converted USDC is automatically deposited into your Gas Tank
- **Variation**: Daily earnings shown in Analytics reflect real-time USD value. Final payouts may vary slightly based on conversion rates
## Supported Networks
Gas Revenue is available on the following chains:
{(() => {
const networksData = [
{ network: "Arbitrum", environment: "Mainnet" },
{ network: "Base", environment: "Mainnet, Sepolia" },
{ network: "Ethereum", environment: "Mainnet, Sepolia" },
{ network: "Ink", environment: "Mainnet" },
];
return (
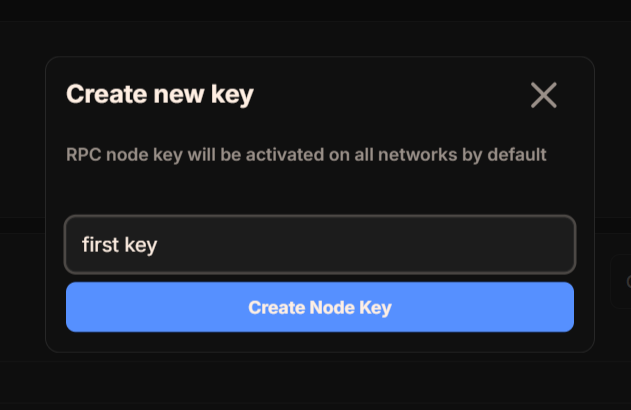
 A dialog box will appear, prompting you to name your new API key.
Choose a descriptive name for your key (e.g., "ProjectName-Mainnet" or
"TestProject-RPC").
After entering the name, click Create to generate the key.
A dialog box will appear, prompting you to name your new API key.
Choose a descriptive name for your key (e.g., "ProjectName-Mainnet" or
"TestProject-RPC").
After entering the name, click Create to generate the key.
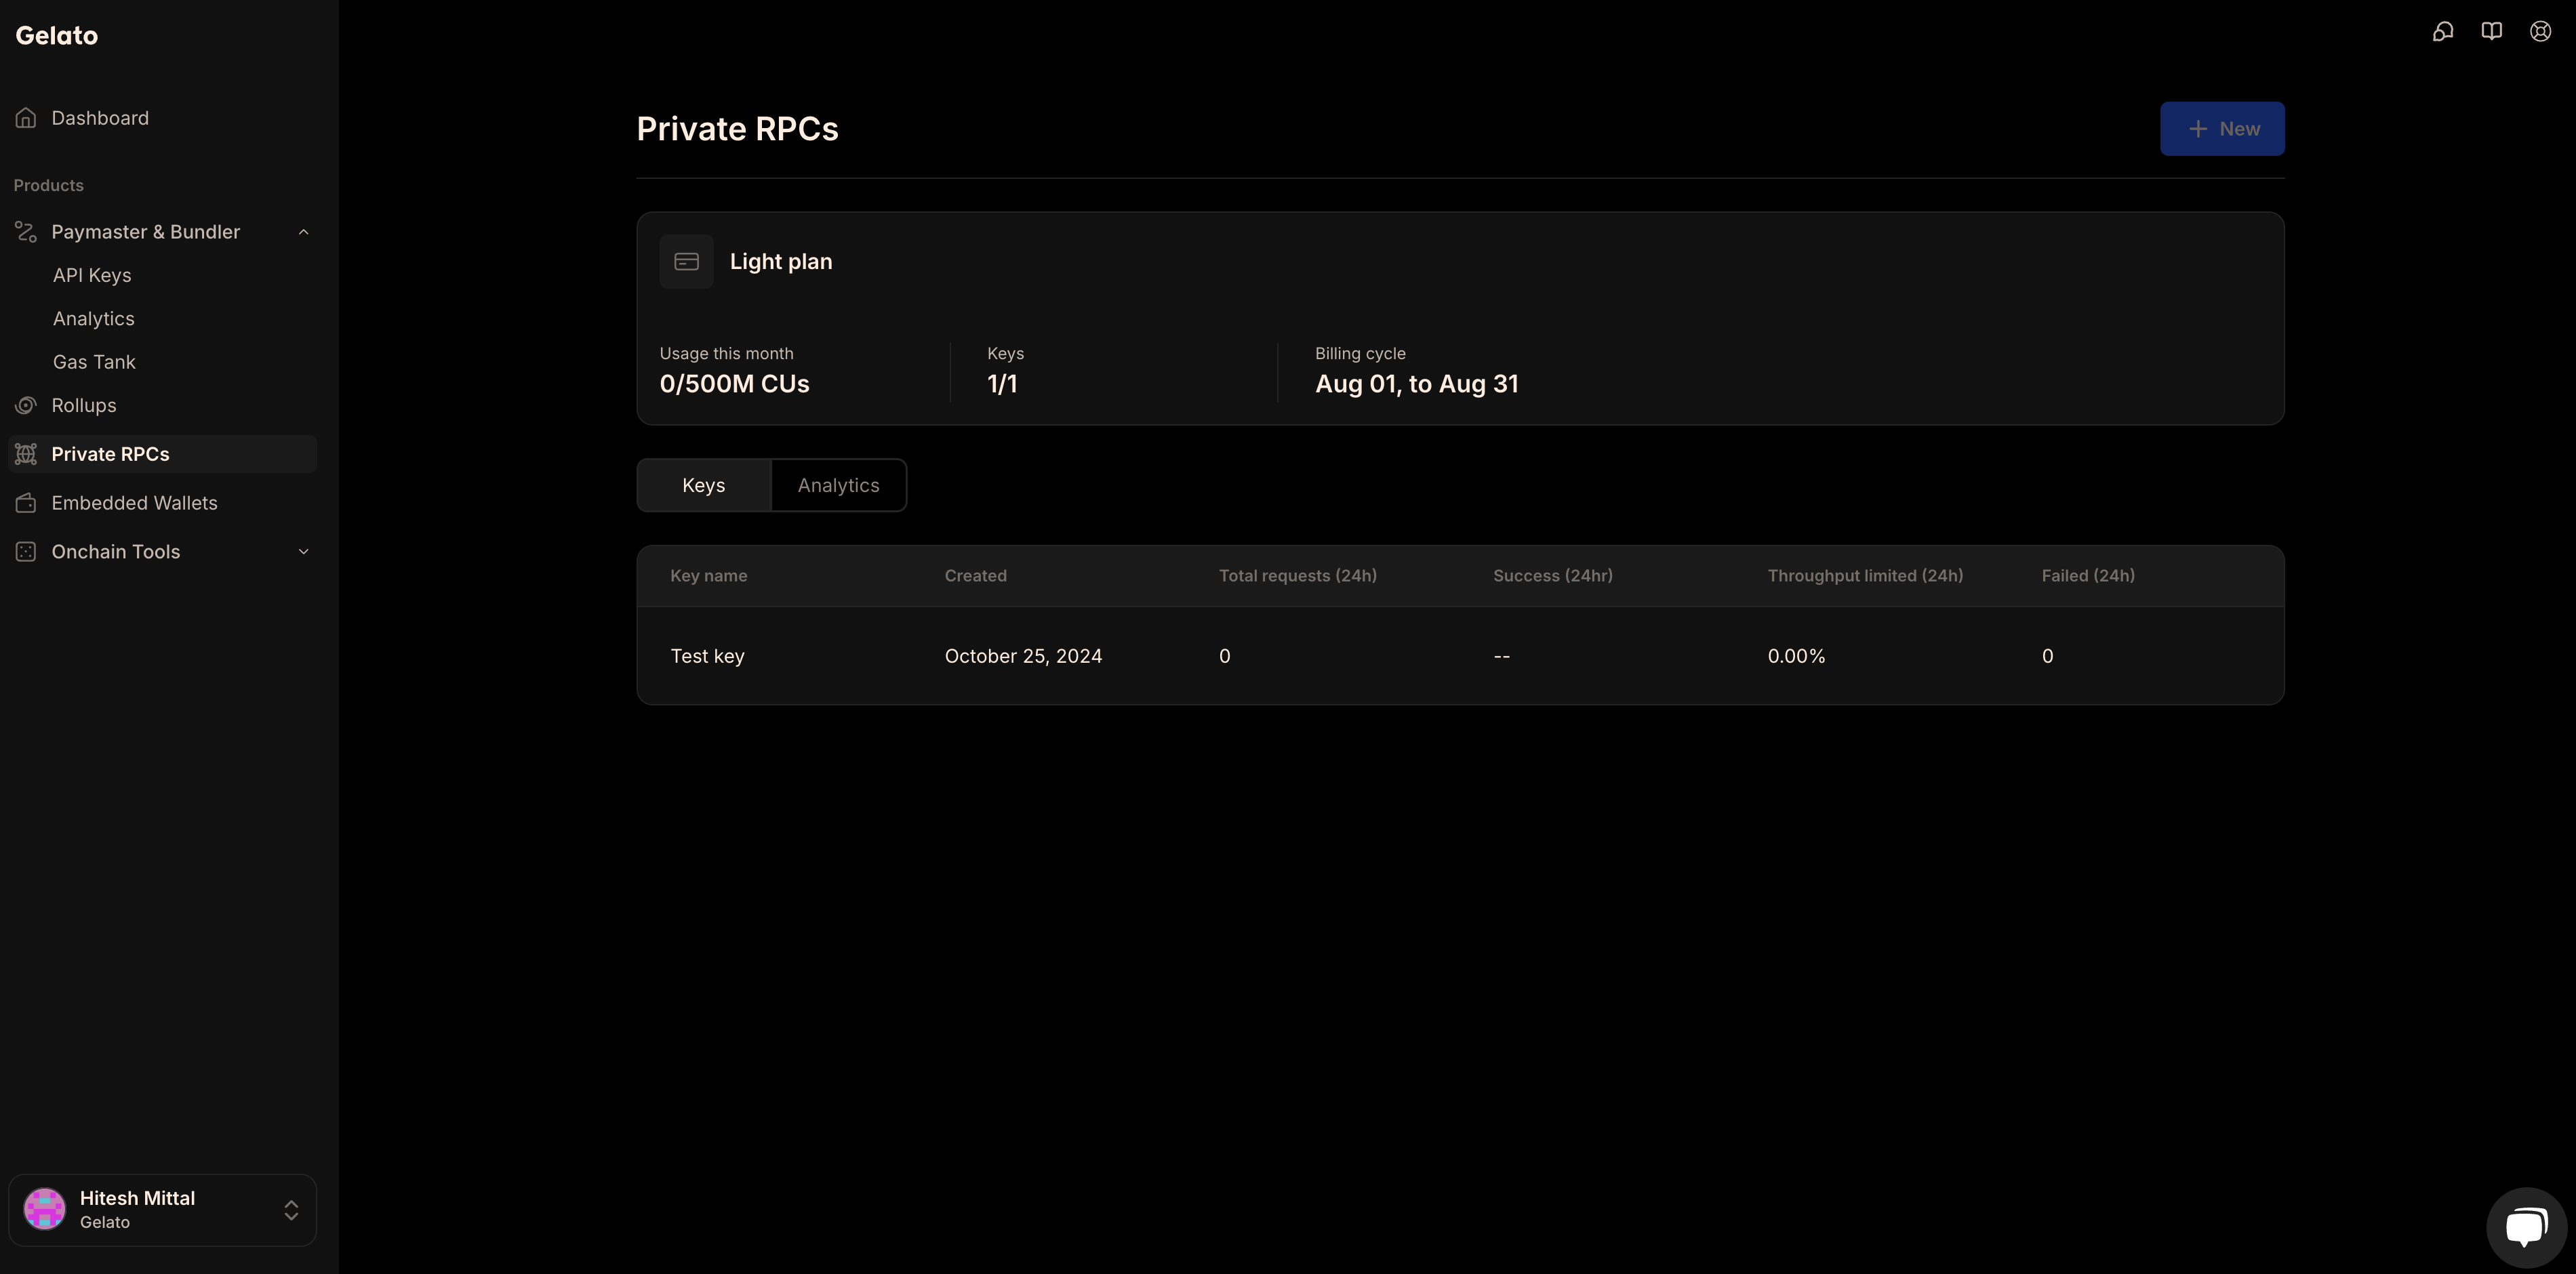
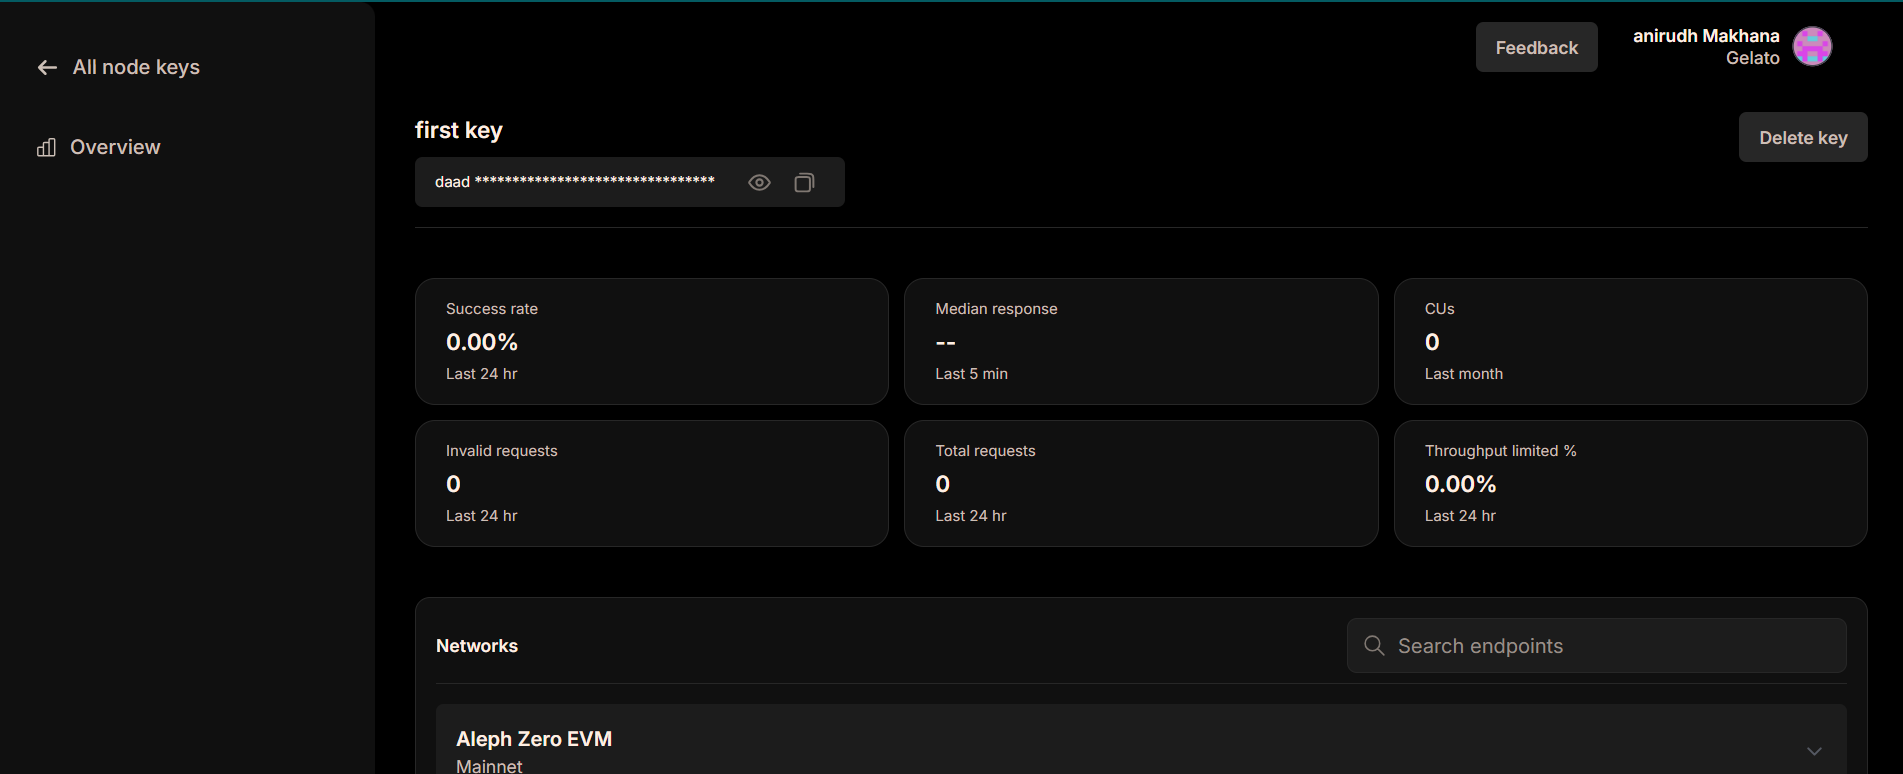
 Your new API key will be listed under the My keys section.
You can now click on the key to view its details, including:
- Success rate (last 24 hours)
- Median response time
- Total requests
- CU usage and more
You'll also see the supported networks (HTTP and WebSocket endpoints) for your key at the bottom of the key details page.
Your new API key will be listed under the My keys section.
You can now click on the key to view its details, including:
- Success rate (last 24 hours)
- Median response time
- Total requests
- CU usage and more
You'll also see the supported networks (HTTP and WebSocket endpoints) for your key at the bottom of the key details page.
 ---
---
 ## Overview of how Gelato Relay works
As requests are submitted to Gelato Relay, a network of decentralised Gelato Executors will execute and get the transactions validated as soon as possible. [EIP-712 signatures](/relay/introduction/what-is-relaying#eip-712-signatures) enforce the integrity of data, while gas fee payments can be handled in any of our supported payment methods. In this way, developers can rely on Gelato's battle-tested blockchain infrastructure improving the UX, costs, security and liveness of their Web3 systems.
## Security Considerations
While Gelato Relay offers very powerful features, improper implementation can introduce vulnerabilities in your contracts. We strongly recommend always using the built-in [ERC-2771](/relay/erc2771-recommended) user signature verification found in our [sponsoredCallERC2771](/relay/erc2771-recommended/sponsoredcall-erc2771) or [callWithSyncFeeERC2771](/relay/erc2771-recommended/callwithsyncfee-erc2771/overview) methods to enhance security.
Please read the [Security Considerations](/relay/security-considerations/overview) section to understand all potential security risks and measures to mitigate them when using a Gelato Relay.
## How can I get started with gasless transactions?
1. Deploy a compatible contract, or use one of ours (see code example links below).
2. Run the code examples found on each SDK method page:
- [sponsoredCallERC2771](/relay/erc2771-recommended/sponsoredcall-erc2771)
- [callWithSyncFeeERC2771](/relay/erc2771-recommended/callwithsyncfee-erc2771/overview)
- [sponsoredCall](/relay/non-erc2771/sponsoredcall)
- [callWithSyncFee](/relay/non-erc2771/callwithsyncfee/overview)
That's all it takes to get started with Gelato Relay and the Gelato Relay SDK!
We hope you have as much fun using Gelato Relay as we did building it! 😄
Any feedback, please [get in touch](https://www.gelato.cloud/contact)!
## API Docs
If your codebase is not JS compatible, you can use the Gelato Relay API directly. Please find the API docs [here](/relay/api-&-feeoracle).
---
## Overview of how Gelato Relay works
As requests are submitted to Gelato Relay, a network of decentralised Gelato Executors will execute and get the transactions validated as soon as possible. [EIP-712 signatures](/relay/introduction/what-is-relaying#eip-712-signatures) enforce the integrity of data, while gas fee payments can be handled in any of our supported payment methods. In this way, developers can rely on Gelato's battle-tested blockchain infrastructure improving the UX, costs, security and liveness of their Web3 systems.
## Security Considerations
While Gelato Relay offers very powerful features, improper implementation can introduce vulnerabilities in your contracts. We strongly recommend always using the built-in [ERC-2771](/relay/erc2771-recommended) user signature verification found in our [sponsoredCallERC2771](/relay/erc2771-recommended/sponsoredcall-erc2771) or [callWithSyncFeeERC2771](/relay/erc2771-recommended/callwithsyncfee-erc2771/overview) methods to enhance security.
Please read the [Security Considerations](/relay/security-considerations/overview) section to understand all potential security risks and measures to mitigate them when using a Gelato Relay.
## How can I get started with gasless transactions?
1. Deploy a compatible contract, or use one of ours (see code example links below).
2. Run the code examples found on each SDK method page:
- [sponsoredCallERC2771](/relay/erc2771-recommended/sponsoredcall-erc2771)
- [callWithSyncFeeERC2771](/relay/erc2771-recommended/callwithsyncfee-erc2771/overview)
- [sponsoredCall](/relay/non-erc2771/sponsoredcall)
- [callWithSyncFee](/relay/non-erc2771/callwithsyncfee/overview)
That's all it takes to get started with Gelato Relay and the Gelato Relay SDK!
We hope you have as much fun using Gelato Relay as we did building it! 😄
Any feedback, please [get in touch](https://www.gelato.cloud/contact)!
## API Docs
If your codebase is not JS compatible, you can use the Gelato Relay API directly. Please find the API docs [here](/relay/api-&-feeoracle).
---
 After creating the relay app, navigate to its dashboard to locate your Sponsor API Key. This key links your Gelato setup with Gas Tank for gas sponsorship.
Gelato Relay now supports API key rotation, allowing users to create and delete API keys. This helps prevent unauthorized usage in case an API key is exposed.
`Activate` your sponsor API key by allowing access to `all contracts` on a network, or restrict it to `specific contracts` or `specific functions`.
Here, you can configure different networks. For each network, you can choose to allow access to all target contracts or limit it to selected contracts or specific functions.
After creating the relay app, navigate to its dashboard to locate your Sponsor API Key. This key links your Gelato setup with Gas Tank for gas sponsorship.
Gelato Relay now supports API key rotation, allowing users to create and delete API keys. This helps prevent unauthorized usage in case an API key is exposed.
`Activate` your sponsor API key by allowing access to `all contracts` on a network, or restrict it to `specific contracts` or `specific functions`.
Here, you can configure different networks. For each network, you can choose to allow access to all target contracts or limit it to selected contracts or specific functions.
 ---
---
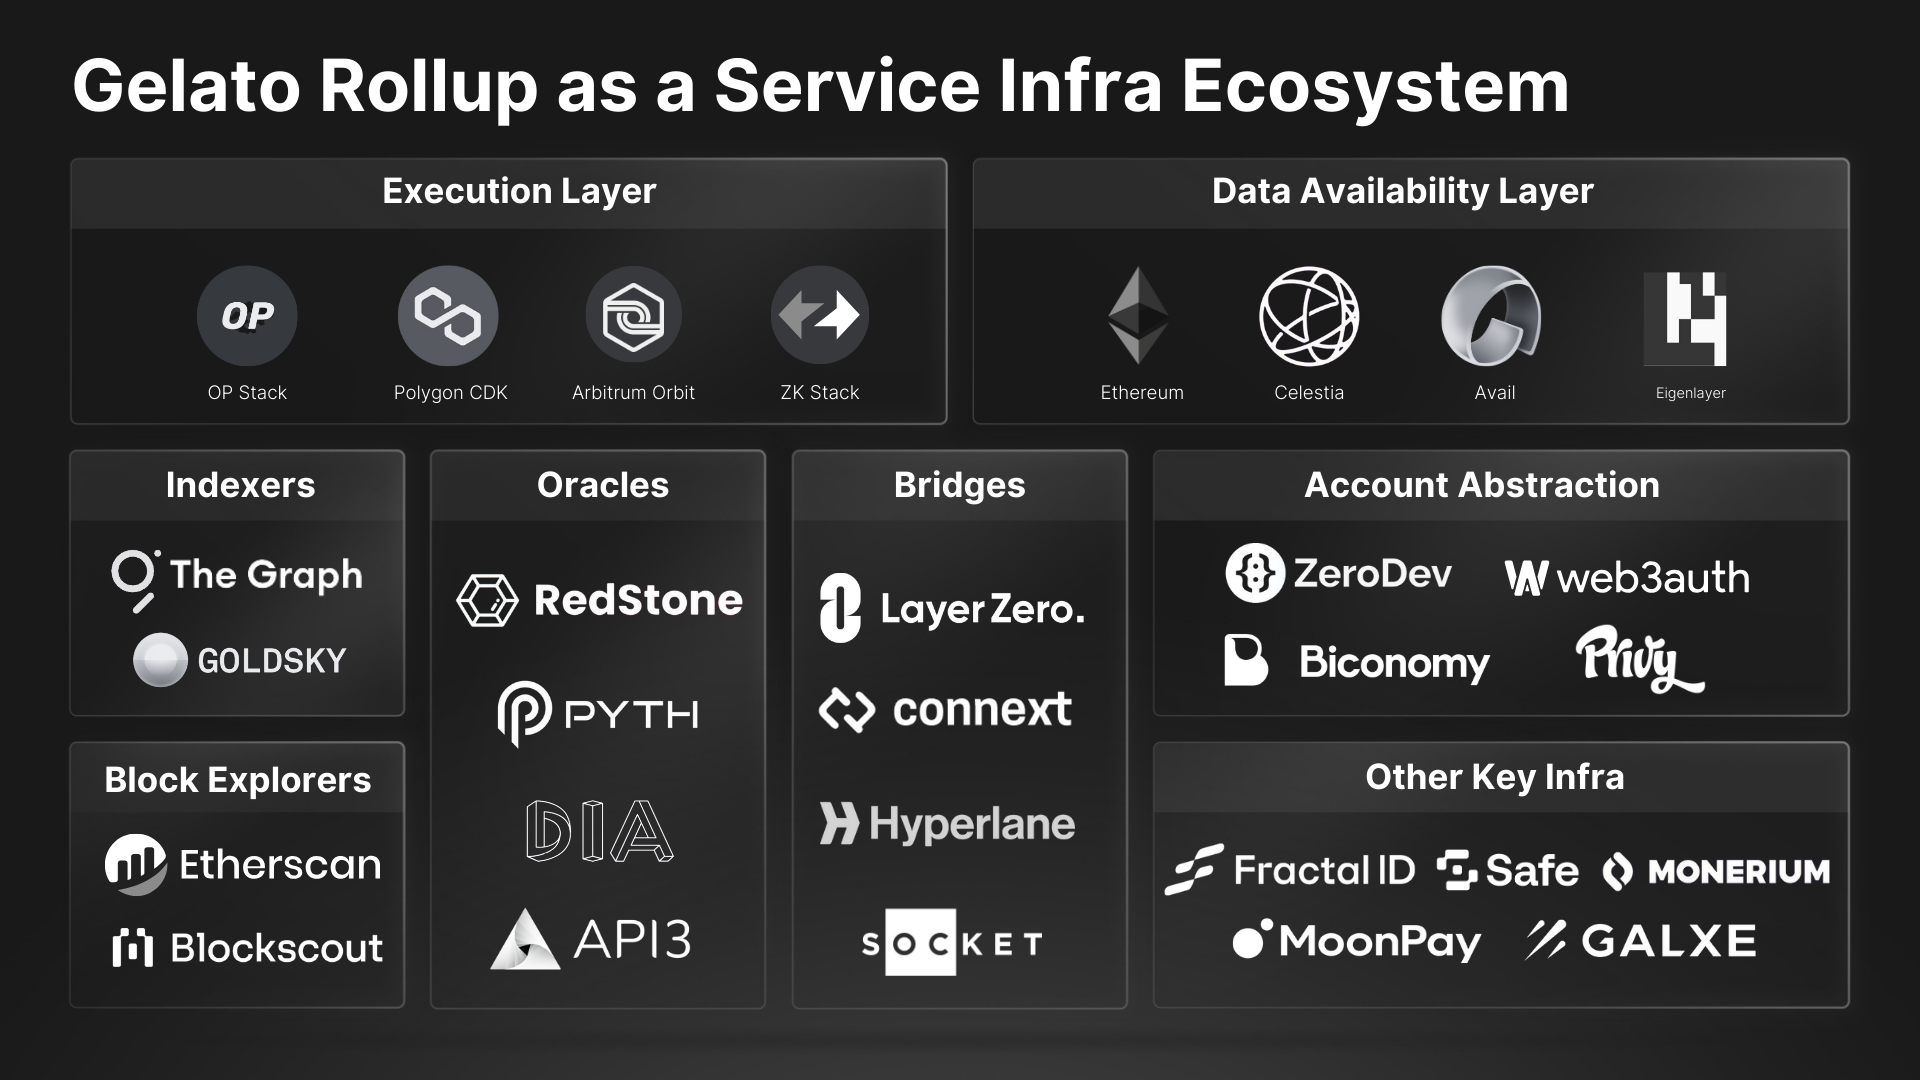 #### High Reliability & Multi-Cloud
Gelato's RaaS provides a multi-cloud, globally distributed infrastructure designed for high availability and fault tolerance, ensuring a resilient and robust setup that mitigates service disruptions.
## Dive Deeper into the Gelato RaaS
Follow our simple guide to launch your Layer-2 / Layer-3 Chains with Gelato.
Learn about available execution and data availability solutions.
Explore our turnkey marketplace offering with more than 25+ integrations.
---
#### High Reliability & Multi-Cloud
Gelato's RaaS provides a multi-cloud, globally distributed infrastructure designed for high availability and fault tolerance, ensuring a resilient and robust setup that mitigates service disruptions.
## Dive Deeper into the Gelato RaaS
Follow our simple guide to launch your Layer-2 / Layer-3 Chains with Gelato.
Learn about available execution and data availability solutions.
Explore our turnkey marketplace offering with more than 25+ integrations.
---
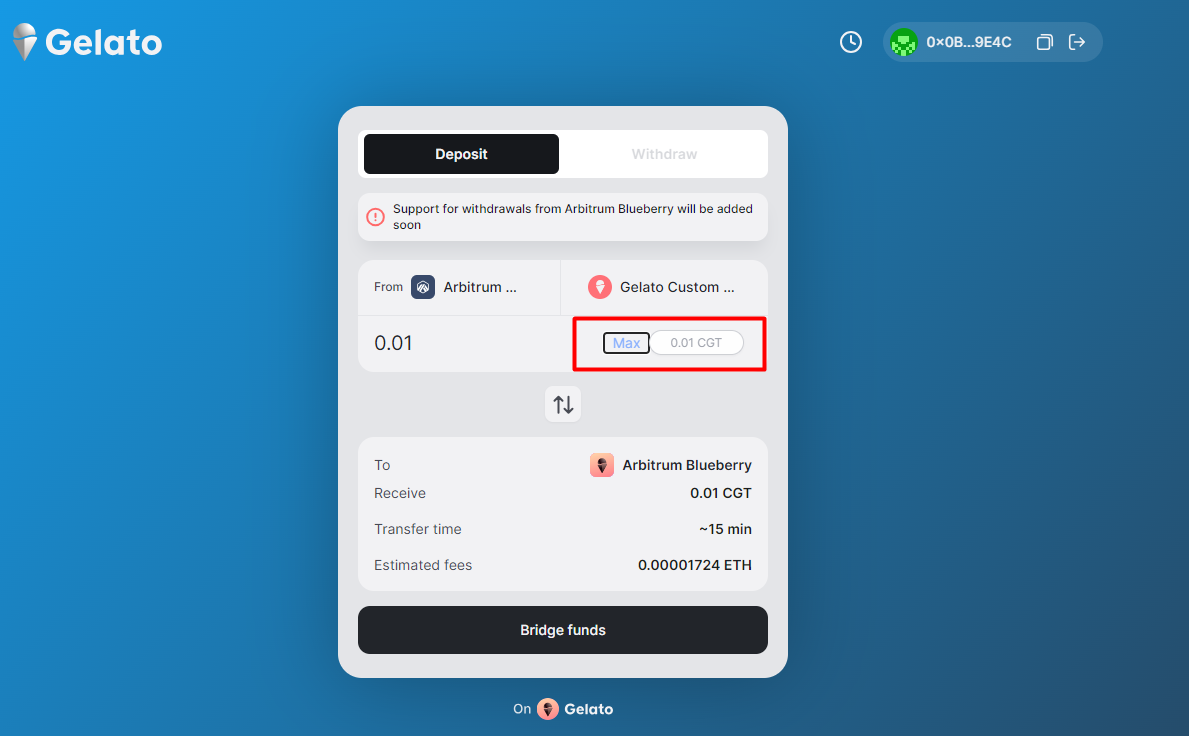
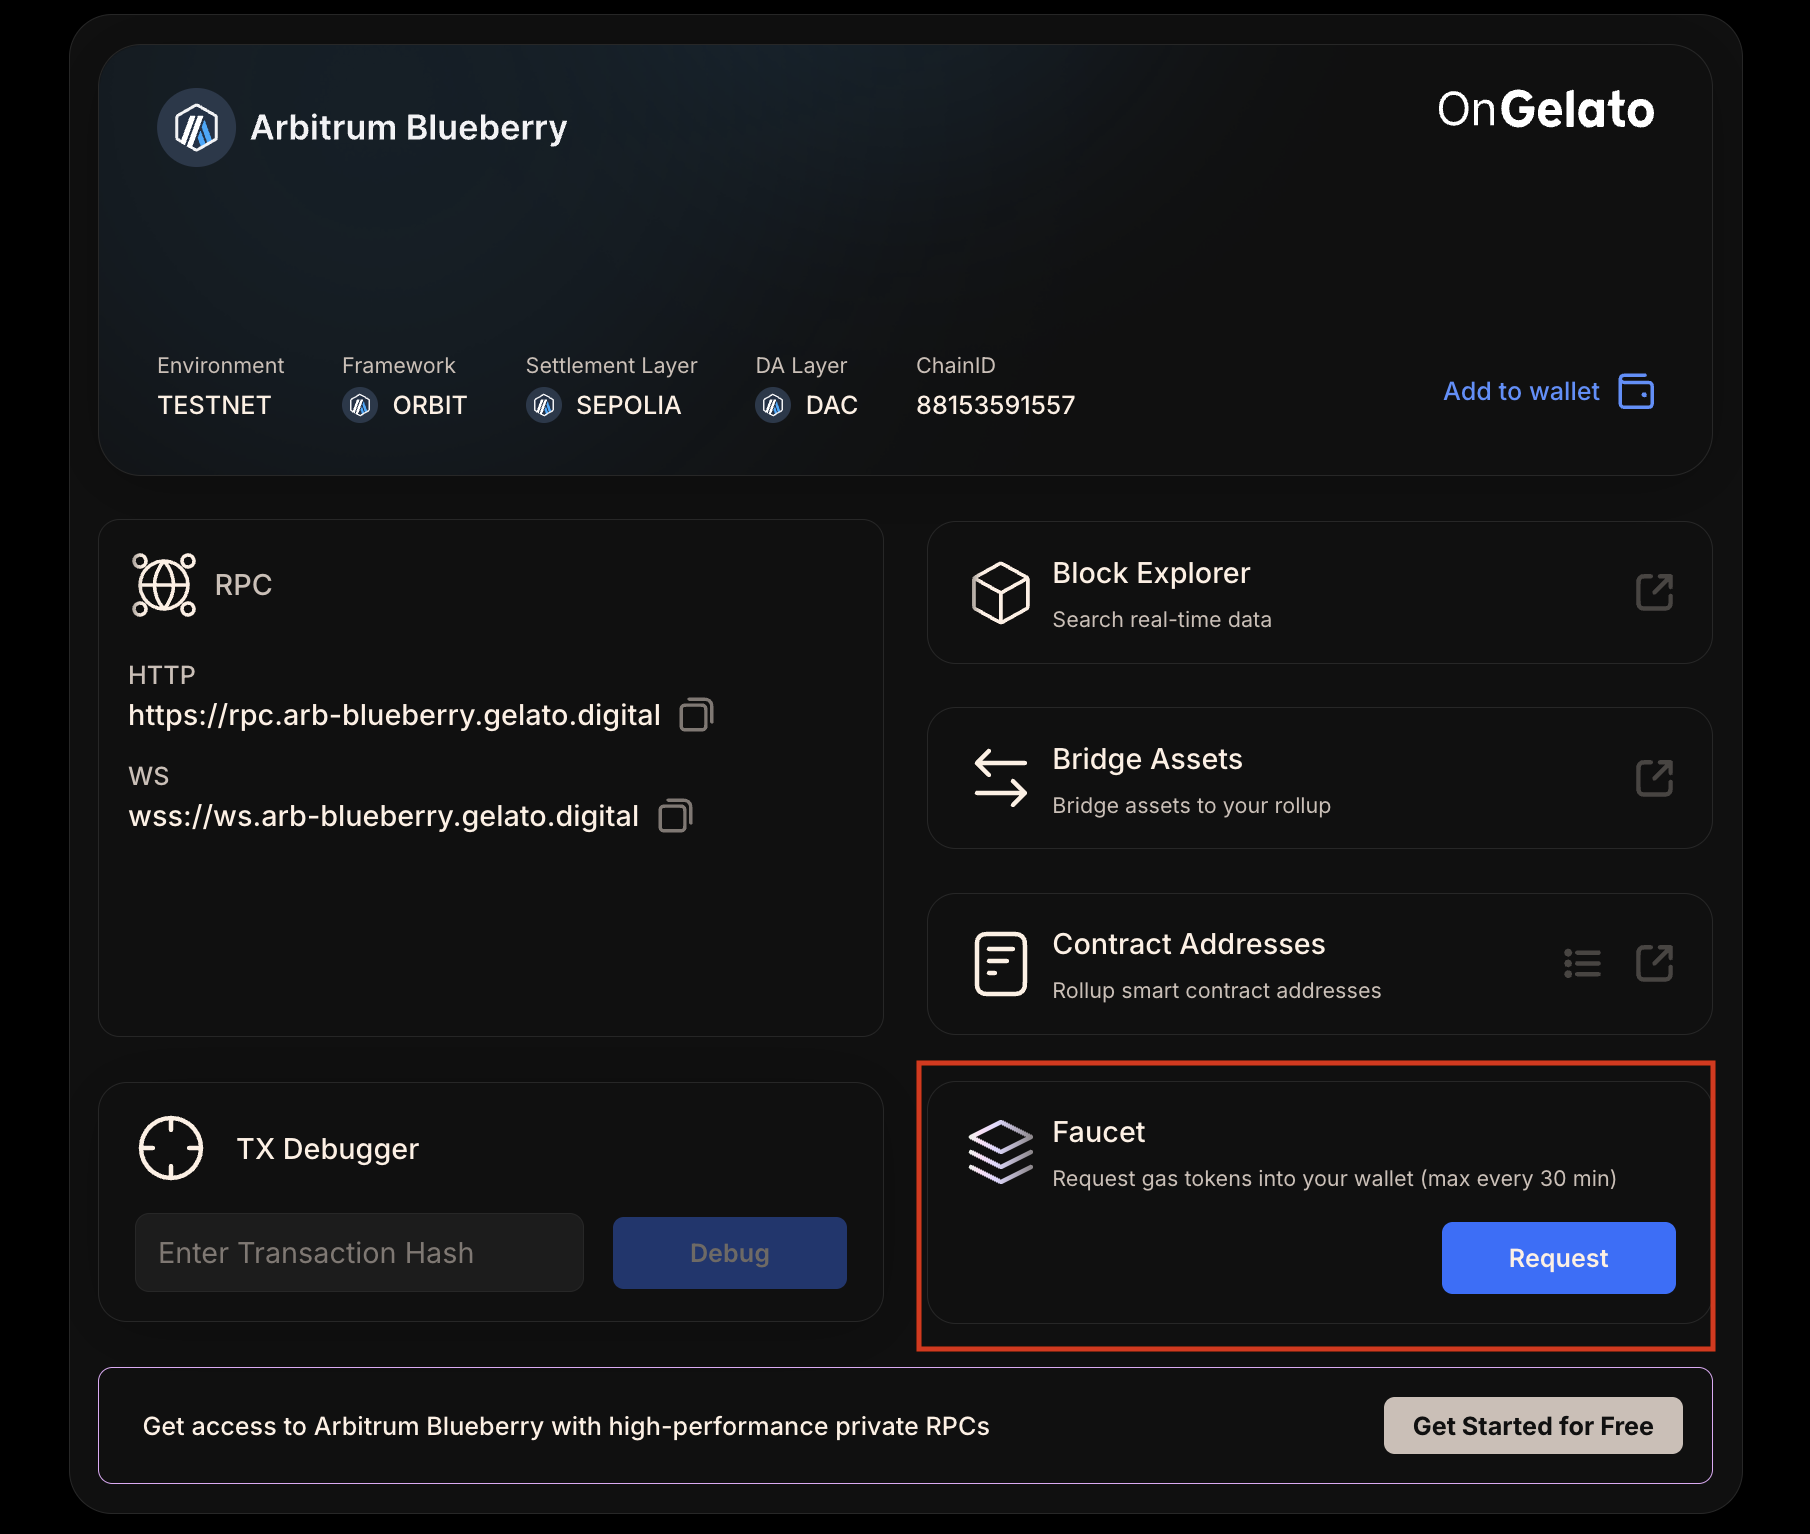 ### 2. Bridging CGT to Arbitrum Blueberry
After minting CGT on Arb Sepolia, the next step involves bridging these tokens to Arbitrum Blueberry. This process is facilitated through [Arbitrum Blueberry](https://bridge.gelato.network/bridge/arb-blueberry) bridge service designed to seamlessly transfer your CGT, enabling you to use it for transaction fees within the Arbitrum Blueberry environment.
### 2. Bridging CGT to Arbitrum Blueberry
After minting CGT on Arb Sepolia, the next step involves bridging these tokens to Arbitrum Blueberry. This process is facilitated through [Arbitrum Blueberry](https://bridge.gelato.network/bridge/arb-blueberry) bridge service designed to seamlessly transfer your CGT, enabling you to use it for transaction fees within the Arbitrum Blueberry environment.
 ---
---
 Provide a unique name for your rollup. Additionally, you can add a custom
preferred chain ID for your rollup.
Provide a unique name for your rollup. Additionally, you can add a custom
preferred chain ID for your rollup.
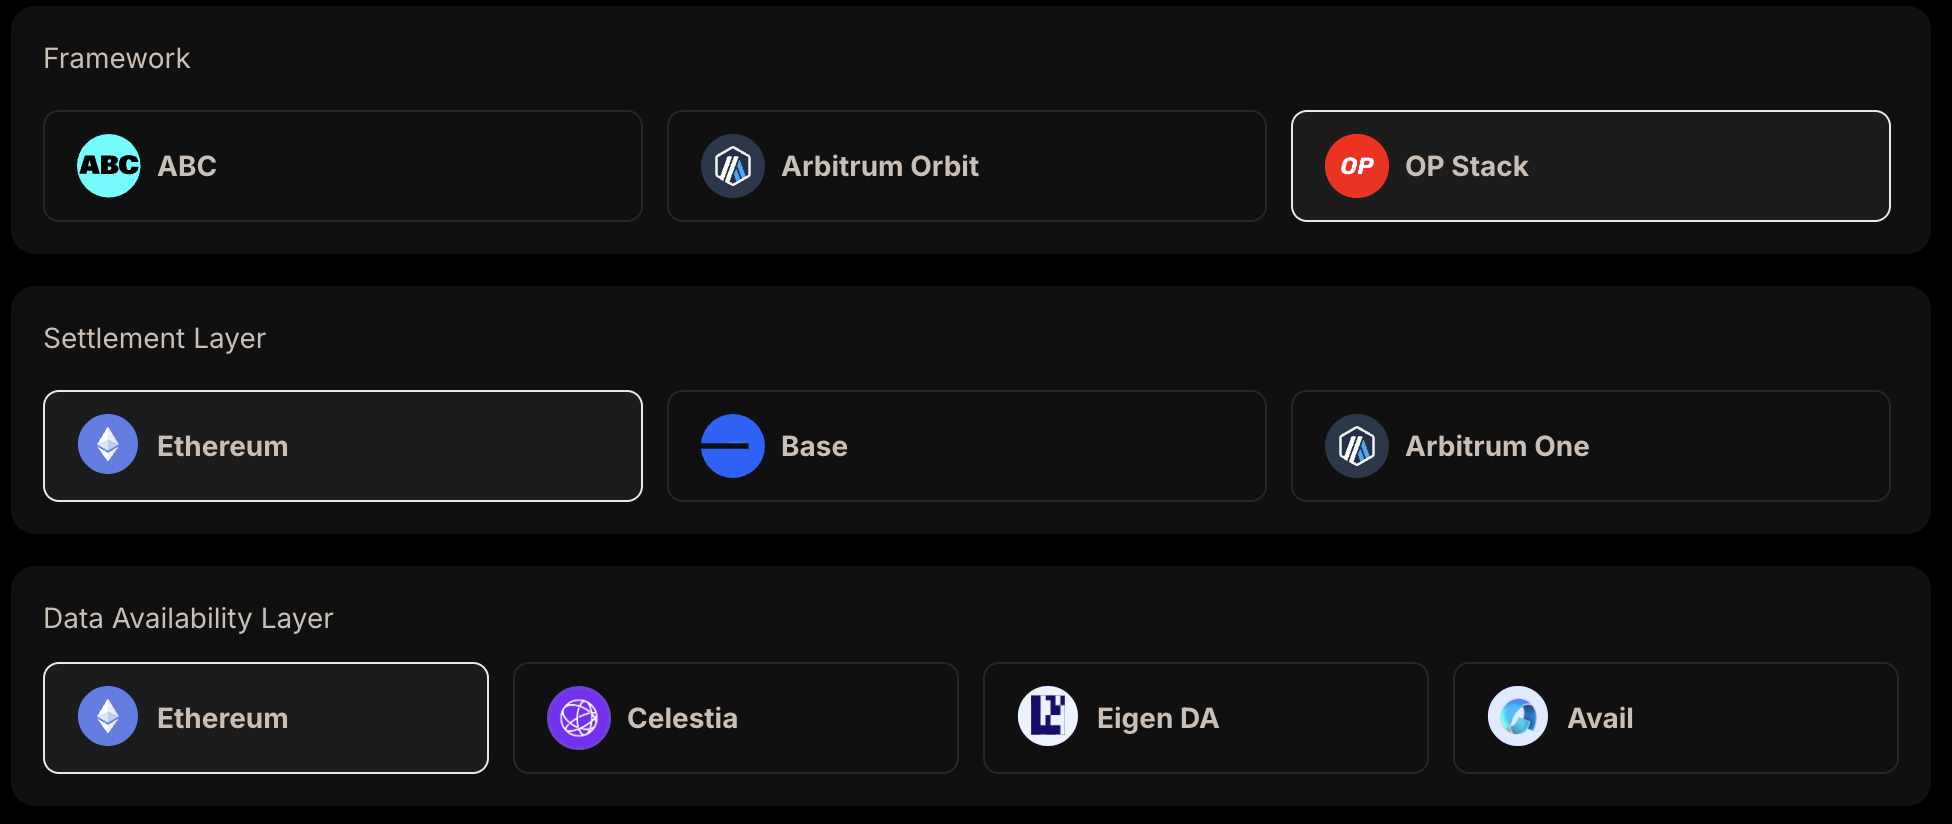
 Choose the rollup stack, settlement layer, and data availability layer for
your rollup.
Choose the rollup stack, settlement layer, and data availability layer for
your rollup.
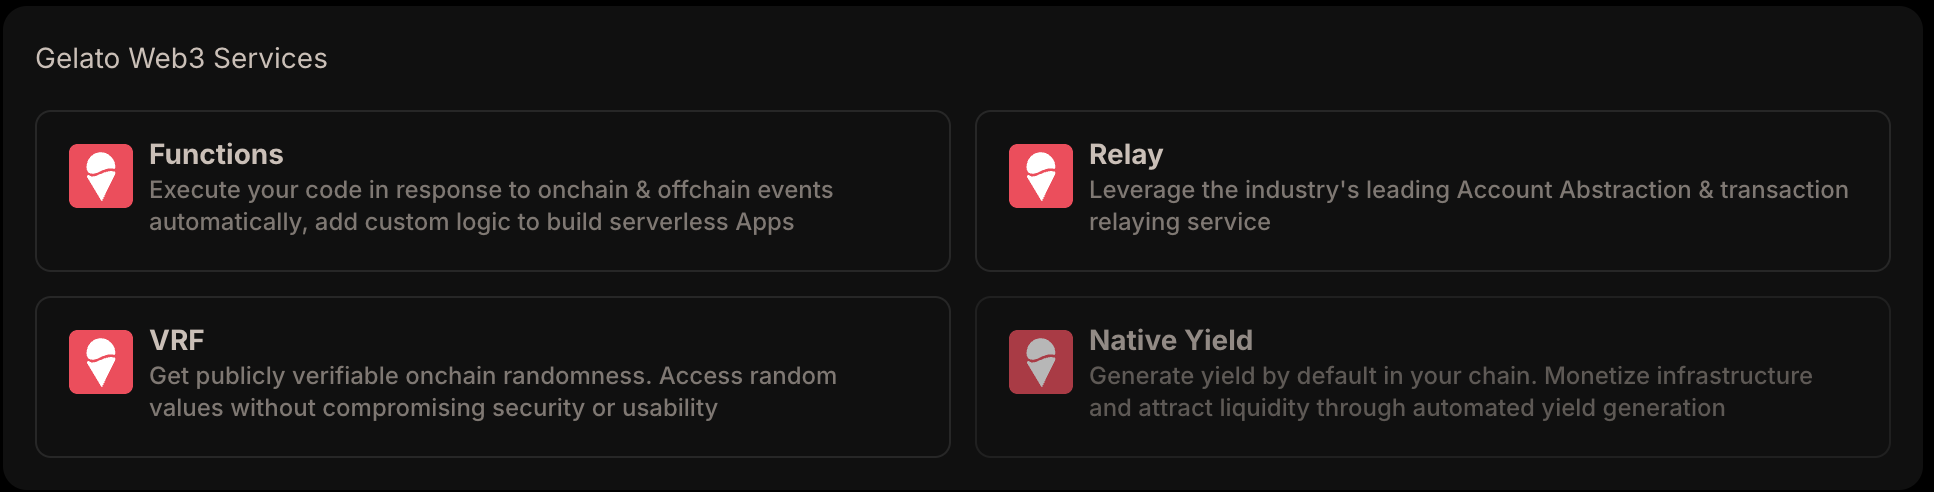
 Configure the web3 services for your rollup.
 Choose the environment you want to deploy your rollup to.
 Review the chain settings and click next and proceed to pay for your rollup.
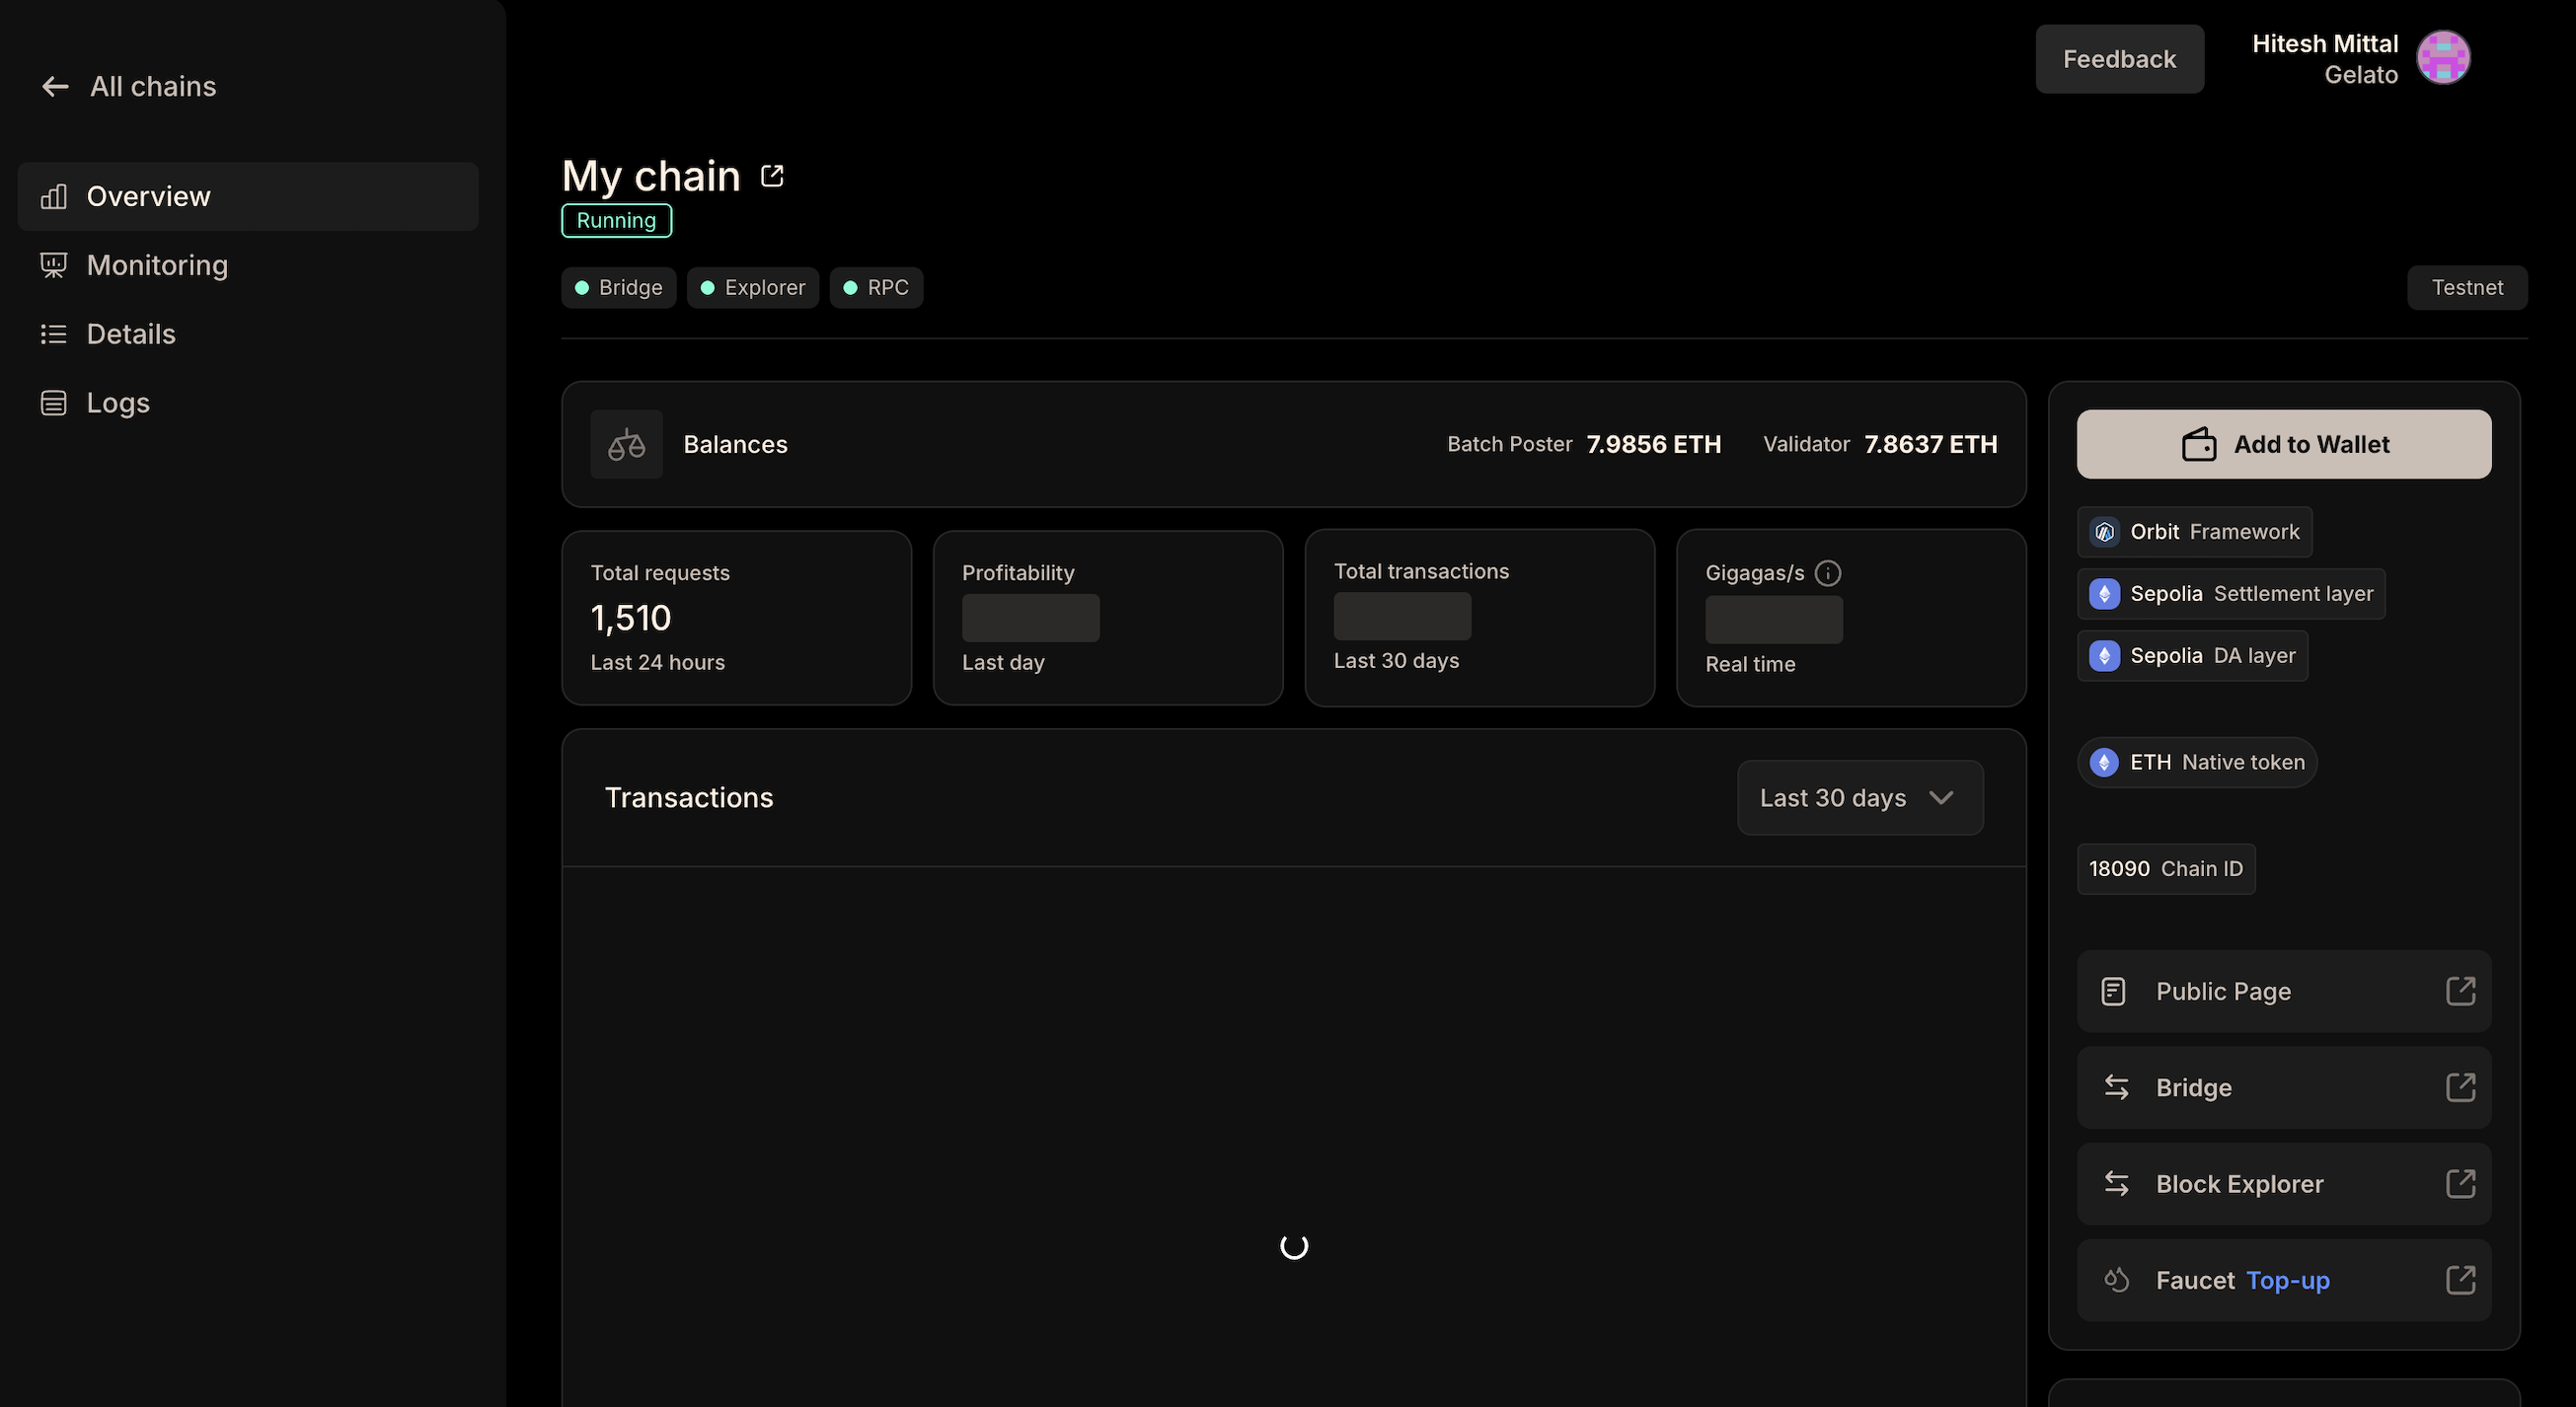
## Dashboard Preview
After deploying, your dashboard should look like the image below. Here, you can access the block explorer, bridge assets, rollup configuration, and more. Users can also check the logs, status, and analytics.
Review the chain settings and click next and proceed to pay for your rollup.
## Dashboard Preview
After deploying, your dashboard should look like the image below. Here, you can access the block explorer, bridge assets, rollup configuration, and more. Users can also check the logs, status, and analytics.
 ---
---
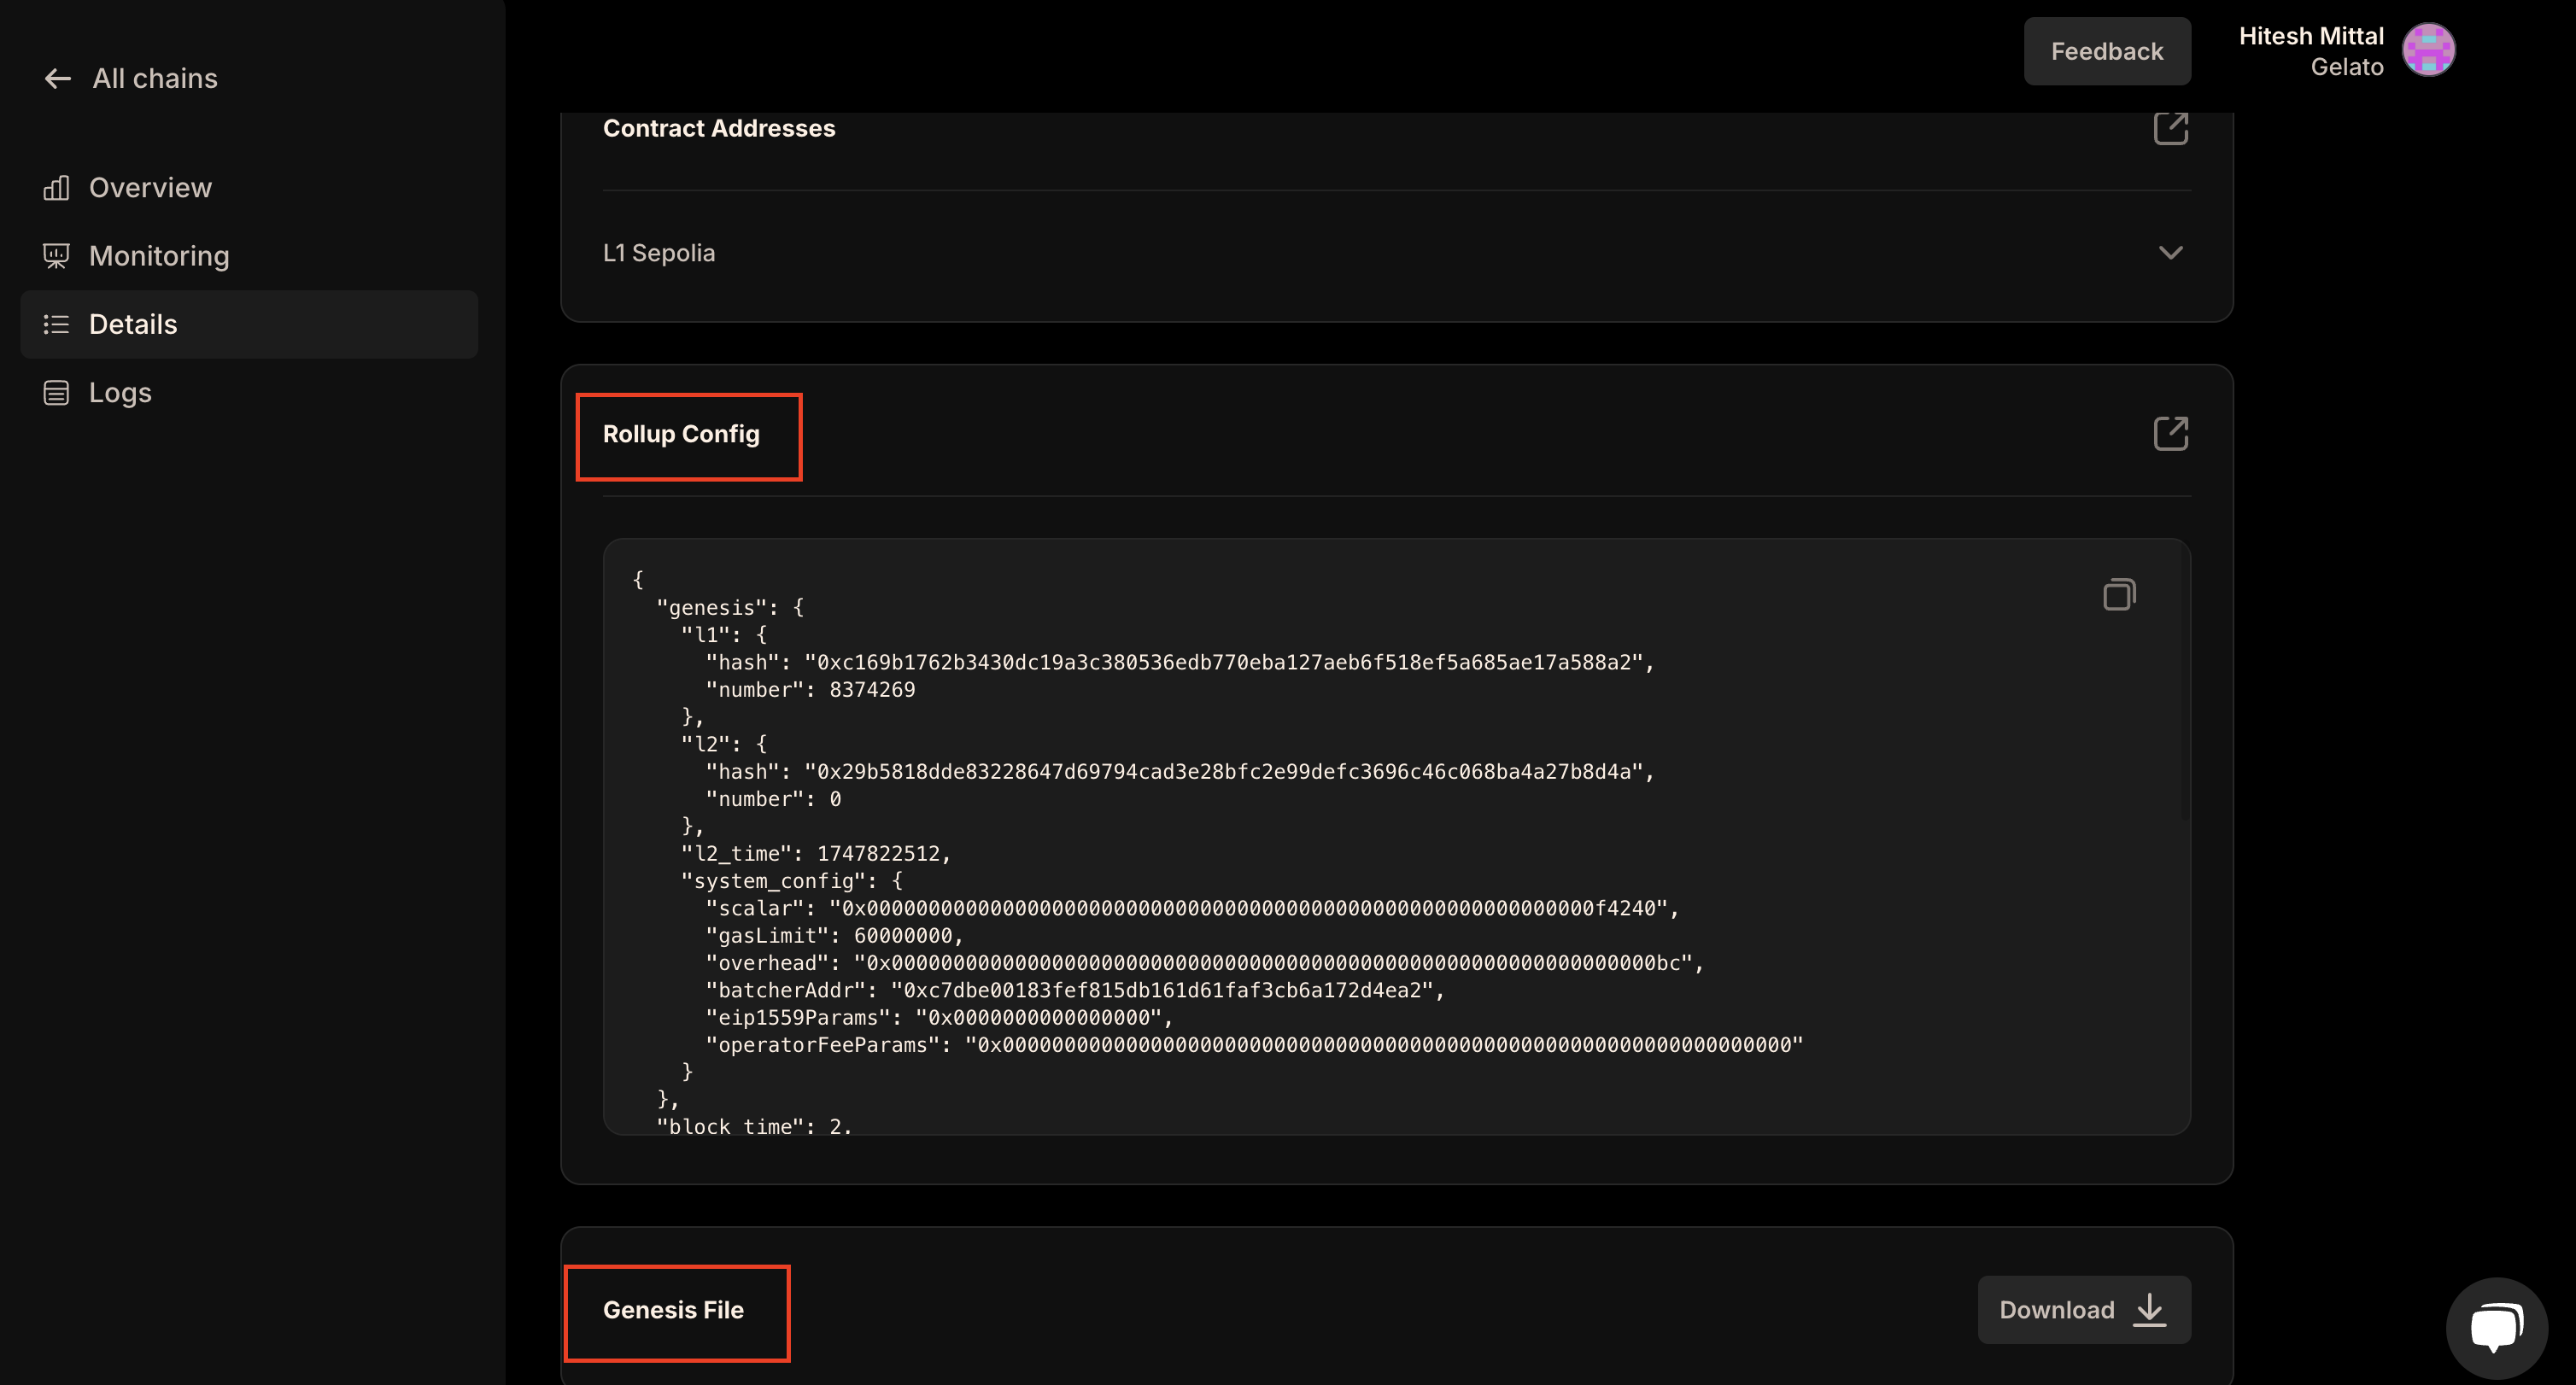 ## Build the Rollup Node
- Clone the Optimism Monorepo
```bash
git clone https://github.com/ethereum-optimism/optimism.git
cd optimism
```
- Check Out the Required Release Tag
```bash
git checkout ddc37daa49558c2fb5c1a92e694eeb7de5942e00
```
- Build op-node
```bash
make build
```
## Build the Execution Client
- Clone op-geth
```bash
git clone https://github.com/ethereum-optimism/op-geth.git
cd op-geth
```
- Check Out the Required Release Tag
```bash
git checkout 7c2819836018bfe0ca07c4e4955754834ffad4e0
```
- Build op-geth
```bash
make geth
```
## Running op-geth
- Create a Data Directory
```bash
cd /path/to/op-rollup-node/op-geth
mkdir data-geth
```
- Create a .env File
Create a `.env` file in the op-geth directory with the following content:
```bash
GENESIS_FILE_PATH=""
SNAPSHOT_FILE_PATH=""
GETH_DATADIR=""
GETH_AUTHRPC_ADDR="0.0.0.0"
GETH_AUTHRPC_PORT=""
GETH_AUTHRPC_JWTSECRET=""
GETH_AUTHRPC_VHOSTS="*"
GETH_METRICS="true"
GETH_METRICS_EXPENSIVE="false"
GETH_METRICS_ADDR="0.0.0.0"
GETH_METRICS_PORT=""
GETH_GCMODE="archive"
GETH_SYNCMODE="full"
GETH_MAXPEERS="0"
GETH_NODISCOVER="true"
GETH_HTTP="true"
GETH_HTTP_ADDR="0.0.0.0"
GETH_HTTP_PORT=""
GETH_HTTP_VHOSTS="*"
GETH_HTTP_CORSDOMAIN="*"
GETH_HTTP_API="web3,debug,eth,txpool,net,engine"
GETH_WS="true"
GETH_WS_ADDR="0.0.0.0"
GETH_WS_PORT=""
GETH_WS_ORIGINS="*"
GETH_WS_API="debug,eth,txpool,net,engine"
GETH_RPC_ALLOW_UNPROTECTED_TXS="false"
```
### Initialize op-geth
Feel free to customize the base configurations provided in the Optimism
documentation to suit your specific requirements. While we will use the
recommended configurations for this guide, you can explore and add additional
flags as needed. Detailed information about execution layer configurations can
be found
[here](https://docs.optimism.io/builders/node-operators/configuration/base-config#working-base-configuration).
Create `init-geth.sh`:
```bash
cd /path/to/op-rollup-node/op-geth
nano init-geth.sh
```
```bash
#!/bin/bash
# Set environment variables
source .env
# Create data directory if it doesn't exist
mkdir -p $DATADIR_PATH
# Initialize geth with the genesis file
echo "Initializing geth with genesis file..."
./build/bin/geth --datadir=$DATADIR_PATH init $GENESIS_PATH
# Generate JWT secret if it doesn't exist
if [ ! -f "$JWT_SECRET_PATH" ]; then
echo "Generating JWT secret..."
openssl rand -hex 32 > $JWT_SECRET_PATH
fi
```
### Run the geth Node
```bash
cd /path/to/op-rollup-node/op-geth
# Load environment variables from the .env file in the root directory
source .env
# Initialize geth
./init-geth.sh
# Run the geth command with the environment variables
./build/bin/geth
```
### Testing the Running Geth Instance
After starting your geth instance, you can test if it's running and confirm the chain ID:
```bash
curl -X POST http://127.0.0.1:8545 \
-H "Content-Type: application/json" \
--data '{"method":"eth_chainId","params":[],"id":1,"jsonrpc":"2.0"}'
```
You should see a response similar to this:
```json
{
"jsonrpc": "2.0",
"id": 1,
"result": "0x2a88" // This is your chain id in hex, in this case its 10888
}
```
## Running op-node
We will utilize the base configurations provided in the Optimism documentation
for the consensus layer. However, you can adjust and expand these
configurations to fit your specific requirements. For a comprehensive
understanding of all available configurations, refer to the detailed
documentation on consensus layer configurations
[here](https://docs.optimism.io/builders/node-operators/configuration/base-config#working-base-configuration-1).
### Create a .env File
Create a `.env` file in the optimism directory with the following content:
```bash
OP_NODE_L1_ETH_RPC=""
OP_NODE_L1_RPC_KIND="standard"
OP_NODE_L2_ENGINE_AUTH=""
OP_NODE_ROLLUP_LOAD_PROTOCOL_VERSIONS="true"
OP_NODE_ROLLUP_HALT="major"
OP_NODE_ROLLUP_CONFIG=""
OP_NODE_SEQUENCER_ENABLED="false"
OP_NODE_SEQUENCER_L1_CONFS="5"
OP_NODE_VERIFIER_L1_CONFS="4"
OP_NODE_LOG_FORMAT="json"
OP_NODE_LOG_LEVEL="info"
OP_NODE_P2P_DISABLE="false"
OP_NODE_P2P_LISTEN_IP="0.0.0.0"
OP_NODE_P2P_LISTEN_TCP_PORT=""
OP_NODE_P2P_LISTEN_UDP_PORT=""
OP_NODE_P2P_PEER_SCORING="none"
OP_NODE_P2P_PEER_BANNING="false"
OP_NODE_P2P_PEER_BANNING_DURATION="0h1m0s"
OP_NODE_P2P_BOOTNODES=""
OP_NODE_P2P_ADVERTISE_TCP=""
OP_NODE_P2P_ADVERTISE_UDP=""
OP_NODE_P2P_ADVERTISE_IP=""
OP_NODE_P2P_SYNC_REQ_RESP="true"
OP_NODE_P2P_STATIC=""
OP_NODE_P2P_PRIV_RAW=""
OP_NODE_RPC_ADDR="0.0.0.0"
OP_NODE_RPC_PORT=""
OP_NODE_RPC_ENABLE_ADMIN="true"
OP_NODE_SNAPSHOT_LOG=""
OP_NODE_METRICS_ENABLED="true"
OP_NODE_METRICS_ADDR="0.0.0.0"
OP_NODE_METRICS_PORT=""
OP_NODE_PPROF_ENABLED="true"
OP_NODE_L1_BEACON=""
OP_NODE_L2_ENGINE_RPC=""
```
Ensure that op-node P2P ports (`` and ``) are accessible externally via ``. This allows the node to communicate with other peers on the network.
Add the sequencer node's multiaddr to `` in your configuration. This helps establish a direct connection with the sequencer, ensuring smooth operation and synchronization.
### Run the op-node
```bash
cd /path/to/op-rollup-node/optimism
# Load environment variables from the .env file in the root directory
source .env
# Run the op-node command with the environment variables
./op-node/bin/op-node
```
---
## Build the Rollup Node
- Clone the Optimism Monorepo
```bash
git clone https://github.com/ethereum-optimism/optimism.git
cd optimism
```
- Check Out the Required Release Tag
```bash
git checkout ddc37daa49558c2fb5c1a92e694eeb7de5942e00
```
- Build op-node
```bash
make build
```
## Build the Execution Client
- Clone op-geth
```bash
git clone https://github.com/ethereum-optimism/op-geth.git
cd op-geth
```
- Check Out the Required Release Tag
```bash
git checkout 7c2819836018bfe0ca07c4e4955754834ffad4e0
```
- Build op-geth
```bash
make geth
```
## Running op-geth
- Create a Data Directory
```bash
cd /path/to/op-rollup-node/op-geth
mkdir data-geth
```
- Create a .env File
Create a `.env` file in the op-geth directory with the following content:
```bash
GENESIS_FILE_PATH=""
SNAPSHOT_FILE_PATH=""
GETH_DATADIR=""
GETH_AUTHRPC_ADDR="0.0.0.0"
GETH_AUTHRPC_PORT=""
GETH_AUTHRPC_JWTSECRET=""
GETH_AUTHRPC_VHOSTS="*"
GETH_METRICS="true"
GETH_METRICS_EXPENSIVE="false"
GETH_METRICS_ADDR="0.0.0.0"
GETH_METRICS_PORT=""
GETH_GCMODE="archive"
GETH_SYNCMODE="full"
GETH_MAXPEERS="0"
GETH_NODISCOVER="true"
GETH_HTTP="true"
GETH_HTTP_ADDR="0.0.0.0"
GETH_HTTP_PORT=""
GETH_HTTP_VHOSTS="*"
GETH_HTTP_CORSDOMAIN="*"
GETH_HTTP_API="web3,debug,eth,txpool,net,engine"
GETH_WS="true"
GETH_WS_ADDR="0.0.0.0"
GETH_WS_PORT=""
GETH_WS_ORIGINS="*"
GETH_WS_API="debug,eth,txpool,net,engine"
GETH_RPC_ALLOW_UNPROTECTED_TXS="false"
```
### Initialize op-geth
Feel free to customize the base configurations provided in the Optimism
documentation to suit your specific requirements. While we will use the
recommended configurations for this guide, you can explore and add additional
flags as needed. Detailed information about execution layer configurations can
be found
[here](https://docs.optimism.io/builders/node-operators/configuration/base-config#working-base-configuration).
Create `init-geth.sh`:
```bash
cd /path/to/op-rollup-node/op-geth
nano init-geth.sh
```
```bash
#!/bin/bash
# Set environment variables
source .env
# Create data directory if it doesn't exist
mkdir -p $DATADIR_PATH
# Initialize geth with the genesis file
echo "Initializing geth with genesis file..."
./build/bin/geth --datadir=$DATADIR_PATH init $GENESIS_PATH
# Generate JWT secret if it doesn't exist
if [ ! -f "$JWT_SECRET_PATH" ]; then
echo "Generating JWT secret..."
openssl rand -hex 32 > $JWT_SECRET_PATH
fi
```
### Run the geth Node
```bash
cd /path/to/op-rollup-node/op-geth
# Load environment variables from the .env file in the root directory
source .env
# Initialize geth
./init-geth.sh
# Run the geth command with the environment variables
./build/bin/geth
```
### Testing the Running Geth Instance
After starting your geth instance, you can test if it's running and confirm the chain ID:
```bash
curl -X POST http://127.0.0.1:8545 \
-H "Content-Type: application/json" \
--data '{"method":"eth_chainId","params":[],"id":1,"jsonrpc":"2.0"}'
```
You should see a response similar to this:
```json
{
"jsonrpc": "2.0",
"id": 1,
"result": "0x2a88" // This is your chain id in hex, in this case its 10888
}
```
## Running op-node
We will utilize the base configurations provided in the Optimism documentation
for the consensus layer. However, you can adjust and expand these
configurations to fit your specific requirements. For a comprehensive
understanding of all available configurations, refer to the detailed
documentation on consensus layer configurations
[here](https://docs.optimism.io/builders/node-operators/configuration/base-config#working-base-configuration-1).
### Create a .env File
Create a `.env` file in the optimism directory with the following content:
```bash
OP_NODE_L1_ETH_RPC=""
OP_NODE_L1_RPC_KIND="standard"
OP_NODE_L2_ENGINE_AUTH=""
OP_NODE_ROLLUP_LOAD_PROTOCOL_VERSIONS="true"
OP_NODE_ROLLUP_HALT="major"
OP_NODE_ROLLUP_CONFIG=""
OP_NODE_SEQUENCER_ENABLED="false"
OP_NODE_SEQUENCER_L1_CONFS="5"
OP_NODE_VERIFIER_L1_CONFS="4"
OP_NODE_LOG_FORMAT="json"
OP_NODE_LOG_LEVEL="info"
OP_NODE_P2P_DISABLE="false"
OP_NODE_P2P_LISTEN_IP="0.0.0.0"
OP_NODE_P2P_LISTEN_TCP_PORT=""
OP_NODE_P2P_LISTEN_UDP_PORT=""
OP_NODE_P2P_PEER_SCORING="none"
OP_NODE_P2P_PEER_BANNING="false"
OP_NODE_P2P_PEER_BANNING_DURATION="0h1m0s"
OP_NODE_P2P_BOOTNODES=""
OP_NODE_P2P_ADVERTISE_TCP=""
OP_NODE_P2P_ADVERTISE_UDP=""
OP_NODE_P2P_ADVERTISE_IP=""
OP_NODE_P2P_SYNC_REQ_RESP="true"
OP_NODE_P2P_STATIC=""
OP_NODE_P2P_PRIV_RAW=""
OP_NODE_RPC_ADDR="0.0.0.0"
OP_NODE_RPC_PORT=""
OP_NODE_RPC_ENABLE_ADMIN="true"
OP_NODE_SNAPSHOT_LOG=""
OP_NODE_METRICS_ENABLED="true"
OP_NODE_METRICS_ADDR="0.0.0.0"
OP_NODE_METRICS_PORT=""
OP_NODE_PPROF_ENABLED="true"
OP_NODE_L1_BEACON=""
OP_NODE_L2_ENGINE_RPC=""
```
Ensure that op-node P2P ports (`` and ``) are accessible externally via ``. This allows the node to communicate with other peers on the network.
Add the sequencer node's multiaddr to `` in your configuration. This helps establish a direct connection with the sequencer, ensuring smooth operation and synchronization.
### Run the op-node
```bash
cd /path/to/op-rollup-node/optimism
# Load environment variables from the .env file in the root directory
source .env
# Run the op-node command with the environment variables
./op-node/bin/op-node
```
---
 After creating the Wallet Project, navigate to its dashboard to find your Environment ID.
Click on View Config, then either copy the Dynamic's Environment ID or the entire configuration code, depending on your needs.
Keep your Environment ID secure as it's essential for configuring wallet providers in your application.
After creating the Wallet Project, navigate to its dashboard to find your Environment ID.
Click on View Config, then either copy the Dynamic's Environment ID or the entire configuration code, depending on your needs.
Keep your Environment ID secure as it's essential for configuring wallet providers in your application.
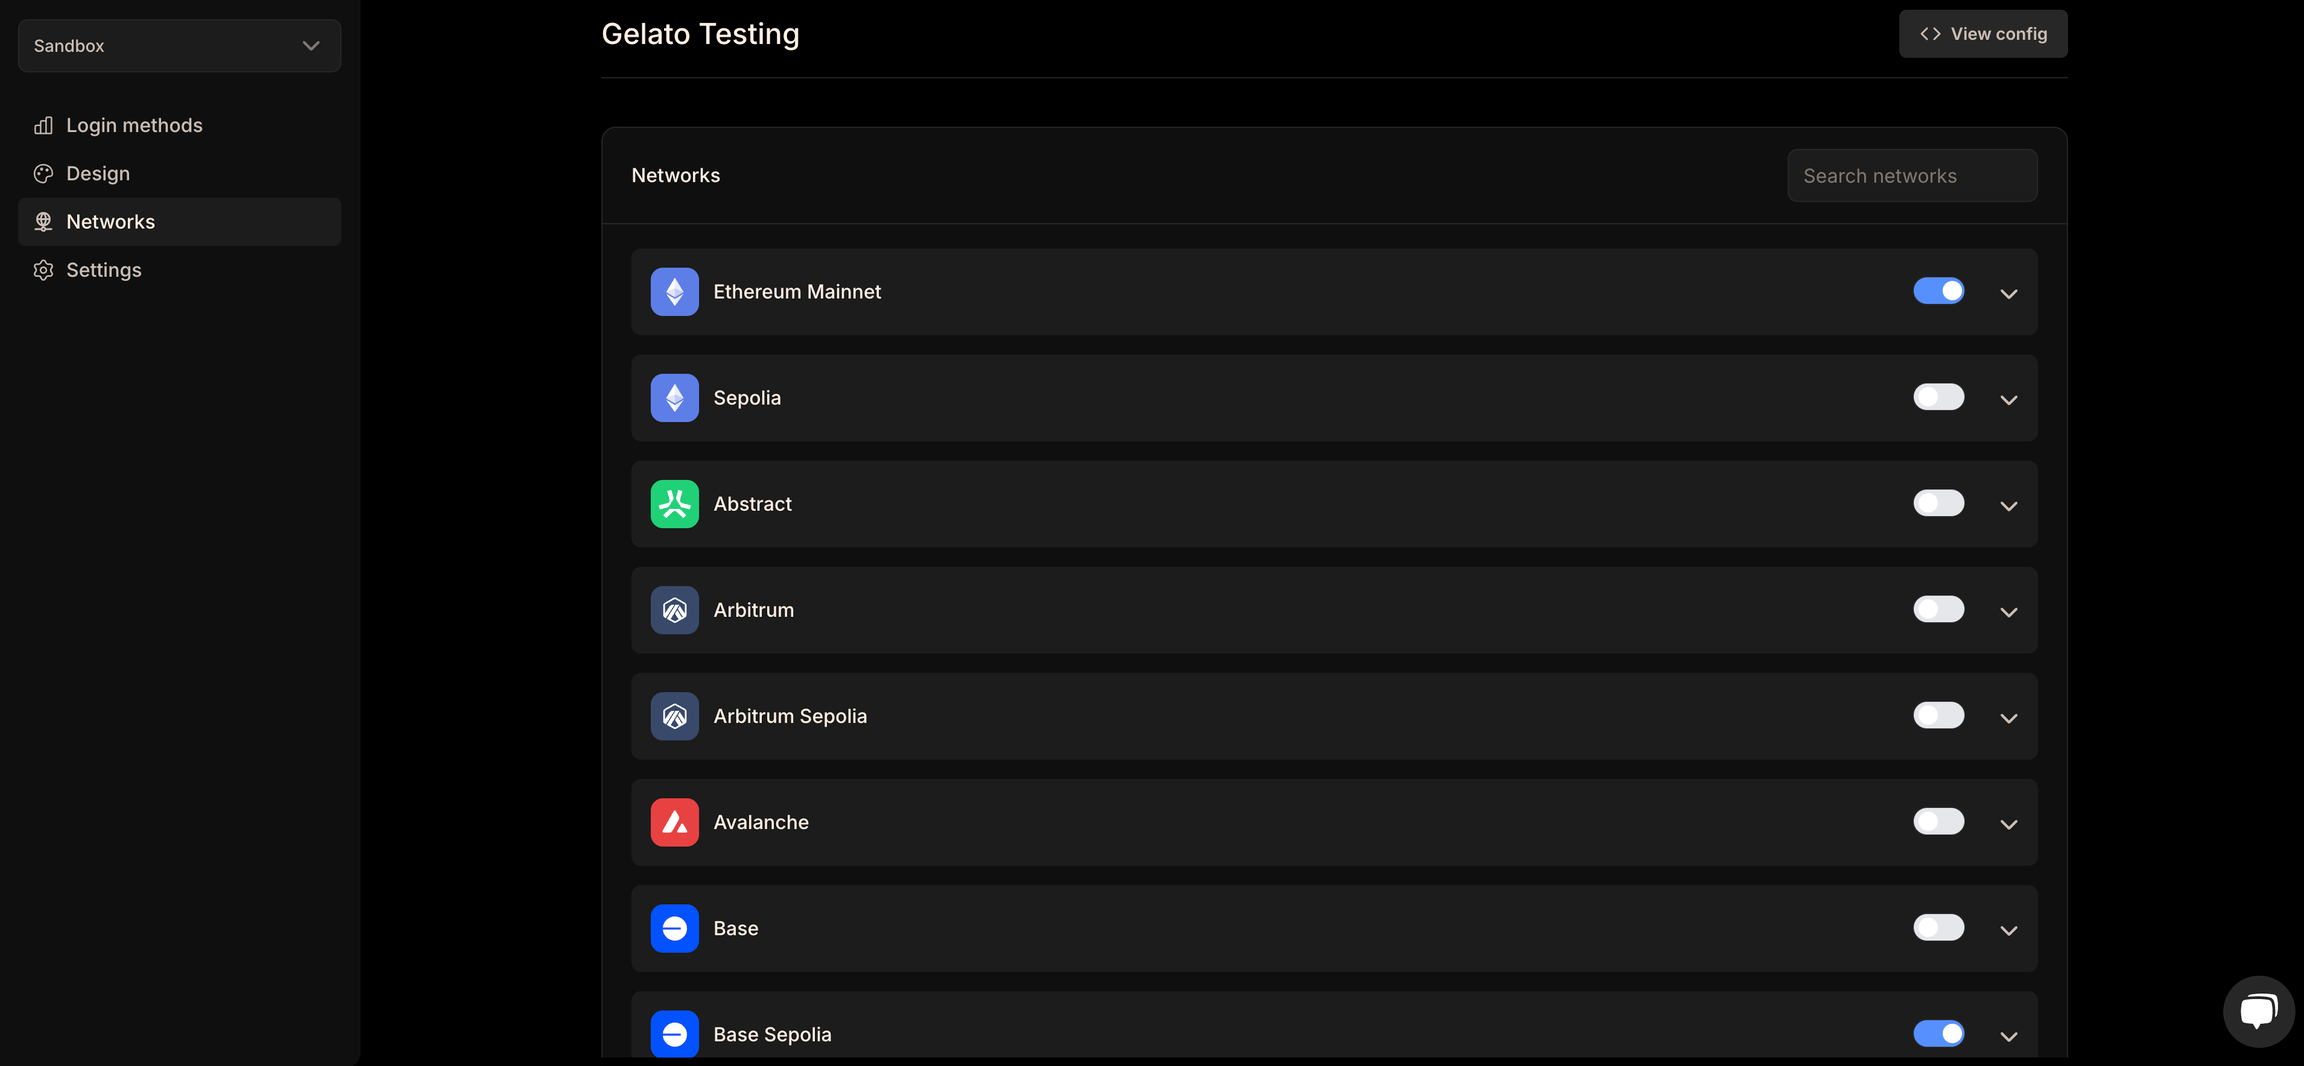
 By default, Ethereum Mainnet is selected as the network. However, you can specify multiple networks in the Network section based on your requirements.
You can check the list of supported networks [here](/smart-wallet-sdk/additional-resources/supported-networks).
By default, Ethereum Mainnet is selected as the network. However, you can specify multiple networks in the Network section based on your requirements.
You can check the list of supported networks [here](/smart-wallet-sdk/additional-resources/supported-networks).
 ## Next Steps
Now that you've created your Environment ID, you can proceed to integrate it into your code to configure wallet providers in your application. Learn how to use Dynamic as a wallet provider [here](/smart-wallet-sdk/embedded-wallets/use-dynamic-signers).
---
## Next Steps
Now that you've created your Environment ID, you can proceed to integrate it into your code to configure wallet providers in your application. Learn how to use Dynamic as a wallet provider [here](/smart-wallet-sdk/embedded-wallets/use-dynamic-signers).
---
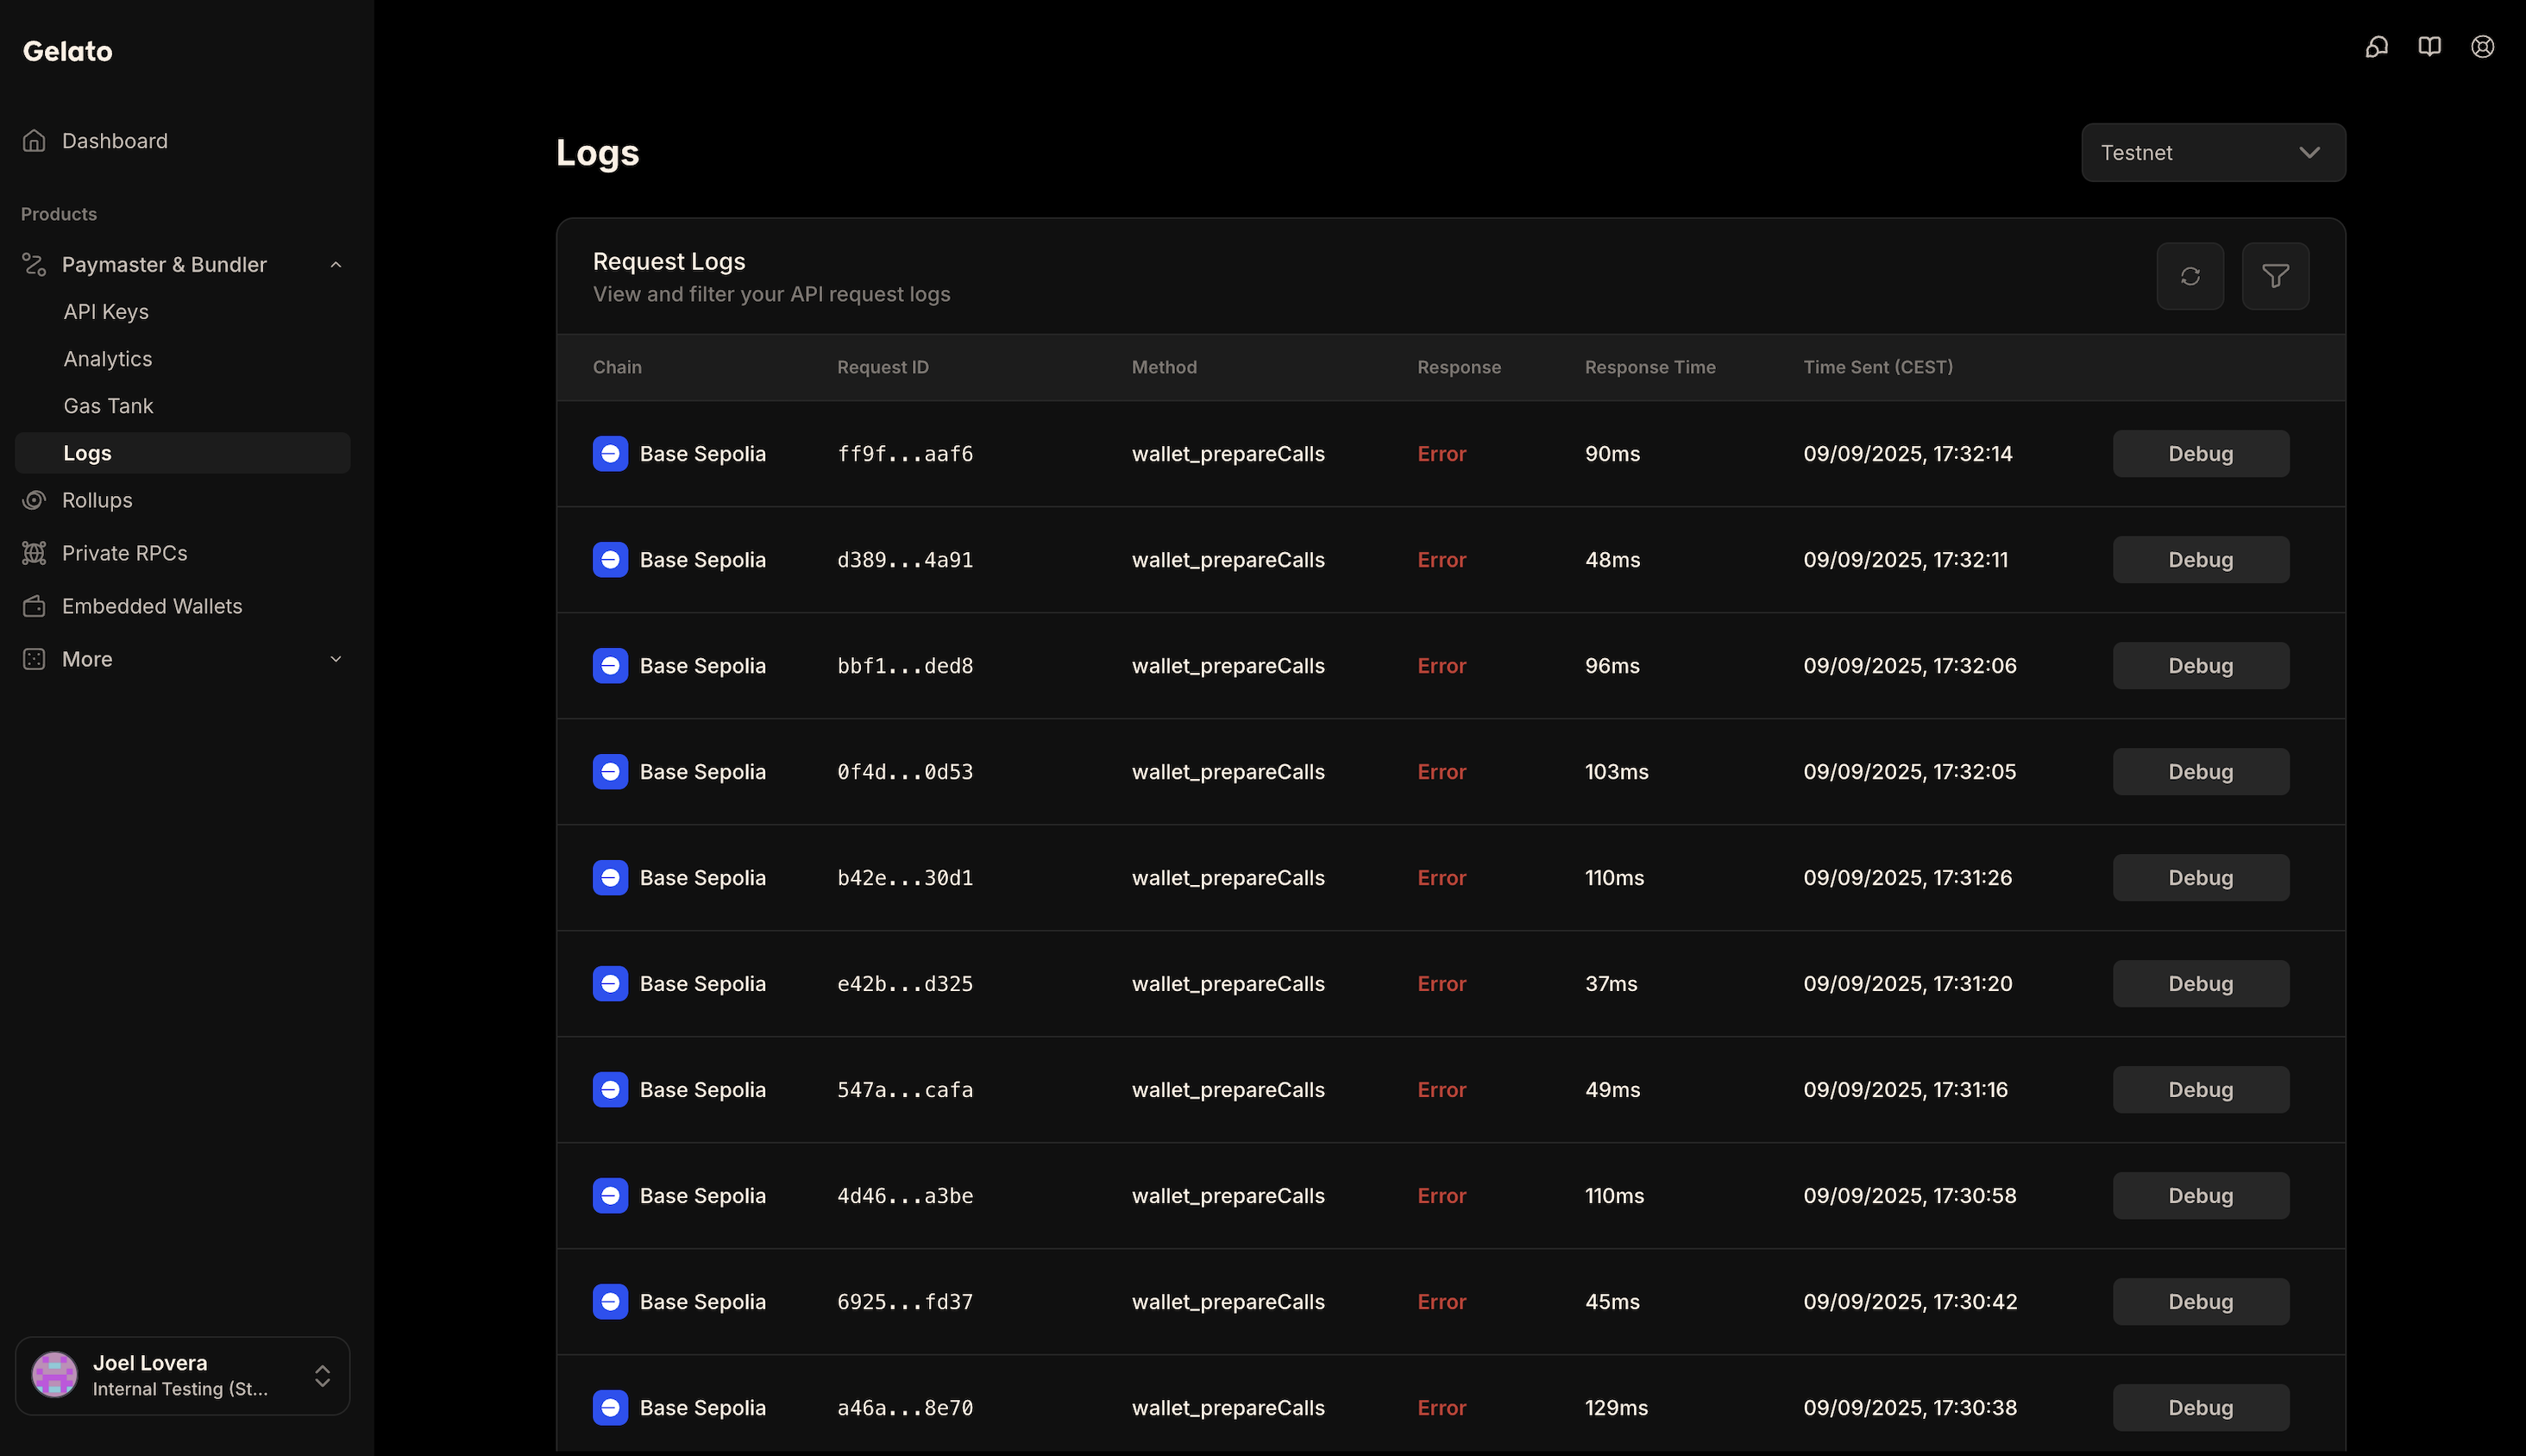 This debug feature is currently available only for `wallet_preparedCalls` endpoint of Gasless SDK.
### Steps to Debug
1. Go to the **logs** section and locate your failed `wallet_preparedCalls` request.
2. On the right side of the log entry, click the **Debug** button.
3. A new option, **View Debug**, will appear. Click it.
4. This will open a **Tenderly simulation**, which you can use to analyze and debug the failed request.
## Using Status API
In any of the payment methods, when using `Gasless SDK`, if you call the `wallet_sendPreparedCalls` API endpoint, the returned `Id` can also be used to track the status of the request through Gelato’s infrastructure like this:
```bash
curl -X GET https://api.gelato.digital/tasks/status/{Id}
```
Additionally, you can debug the request using the `status` API on Tenderly like this:
You can make use of the debug endpoint by adding the following parameters:
- `tenderlyUsername`
- `tenderlyProjectName`
The request URL should look like this:
```bash
curl -X GET https://api.gelato.digital/tasks/status/{Id}/debug?tenderlyUsername={yourUserName}&tenderlyProjectName={yourProjectName}
```
After running the above command, you can use the link of tenderly simulation in the response to debug the UserOperation.
## Using WebSocket API
Additionally, you can also use the `WebSocket` API to subscribe to the status updates of the request like this:
You can interact with the websocket API directly by connecting to this endpoint:
```
wss://api.gelato.digital/tasks/ws/status
```
Once connected, you can subscribe to updates using Id of your submitted requests by sending messages like this:
```json
{
"action": "subscribe",
"taskId": "0x..." // paste your Id here
}
```
To unsubscribe from updates:
```json
{
"action": "unsubscribe",
"taskId": "0x..." // paste your Id here
}
```
---
This debug feature is currently available only for `wallet_preparedCalls` endpoint of Gasless SDK.
### Steps to Debug
1. Go to the **logs** section and locate your failed `wallet_preparedCalls` request.
2. On the right side of the log entry, click the **Debug** button.
3. A new option, **View Debug**, will appear. Click it.
4. This will open a **Tenderly simulation**, which you can use to analyze and debug the failed request.
## Using Status API
In any of the payment methods, when using `Gasless SDK`, if you call the `wallet_sendPreparedCalls` API endpoint, the returned `Id` can also be used to track the status of the request through Gelato’s infrastructure like this:
```bash
curl -X GET https://api.gelato.digital/tasks/status/{Id}
```
Additionally, you can debug the request using the `status` API on Tenderly like this:
You can make use of the debug endpoint by adding the following parameters:
- `tenderlyUsername`
- `tenderlyProjectName`
The request URL should look like this:
```bash
curl -X GET https://api.gelato.digital/tasks/status/{Id}/debug?tenderlyUsername={yourUserName}&tenderlyProjectName={yourProjectName}
```
After running the above command, you can use the link of tenderly simulation in the response to debug the UserOperation.
## Using WebSocket API
Additionally, you can also use the `WebSocket` API to subscribe to the status updates of the request like this:
You can interact with the websocket API directly by connecting to this endpoint:
```
wss://api.gelato.digital/tasks/ws/status
```
Once connected, you can subscribe to updates using Id of your submitted requests by sending messages like this:
```json
{
"action": "subscribe",
"taskId": "0x..." // paste your Id here
}
```
To unsubscribe from updates:
```json
{
"action": "unsubscribe",
"taskId": "0x..." // paste your Id here
}
```
---
 ### Code Snippet
Embed the following setup within your app to configure the provider:
```typescript
{children}
```
This context enables smart wallet access throughout your app, setting up:
- Wallet creation and session
- Transaction preparation and sending
- Provider availability across your components
```typescript
const { gelato: { client }, logout} = useGelatoSmartWalletProviderContext();
```
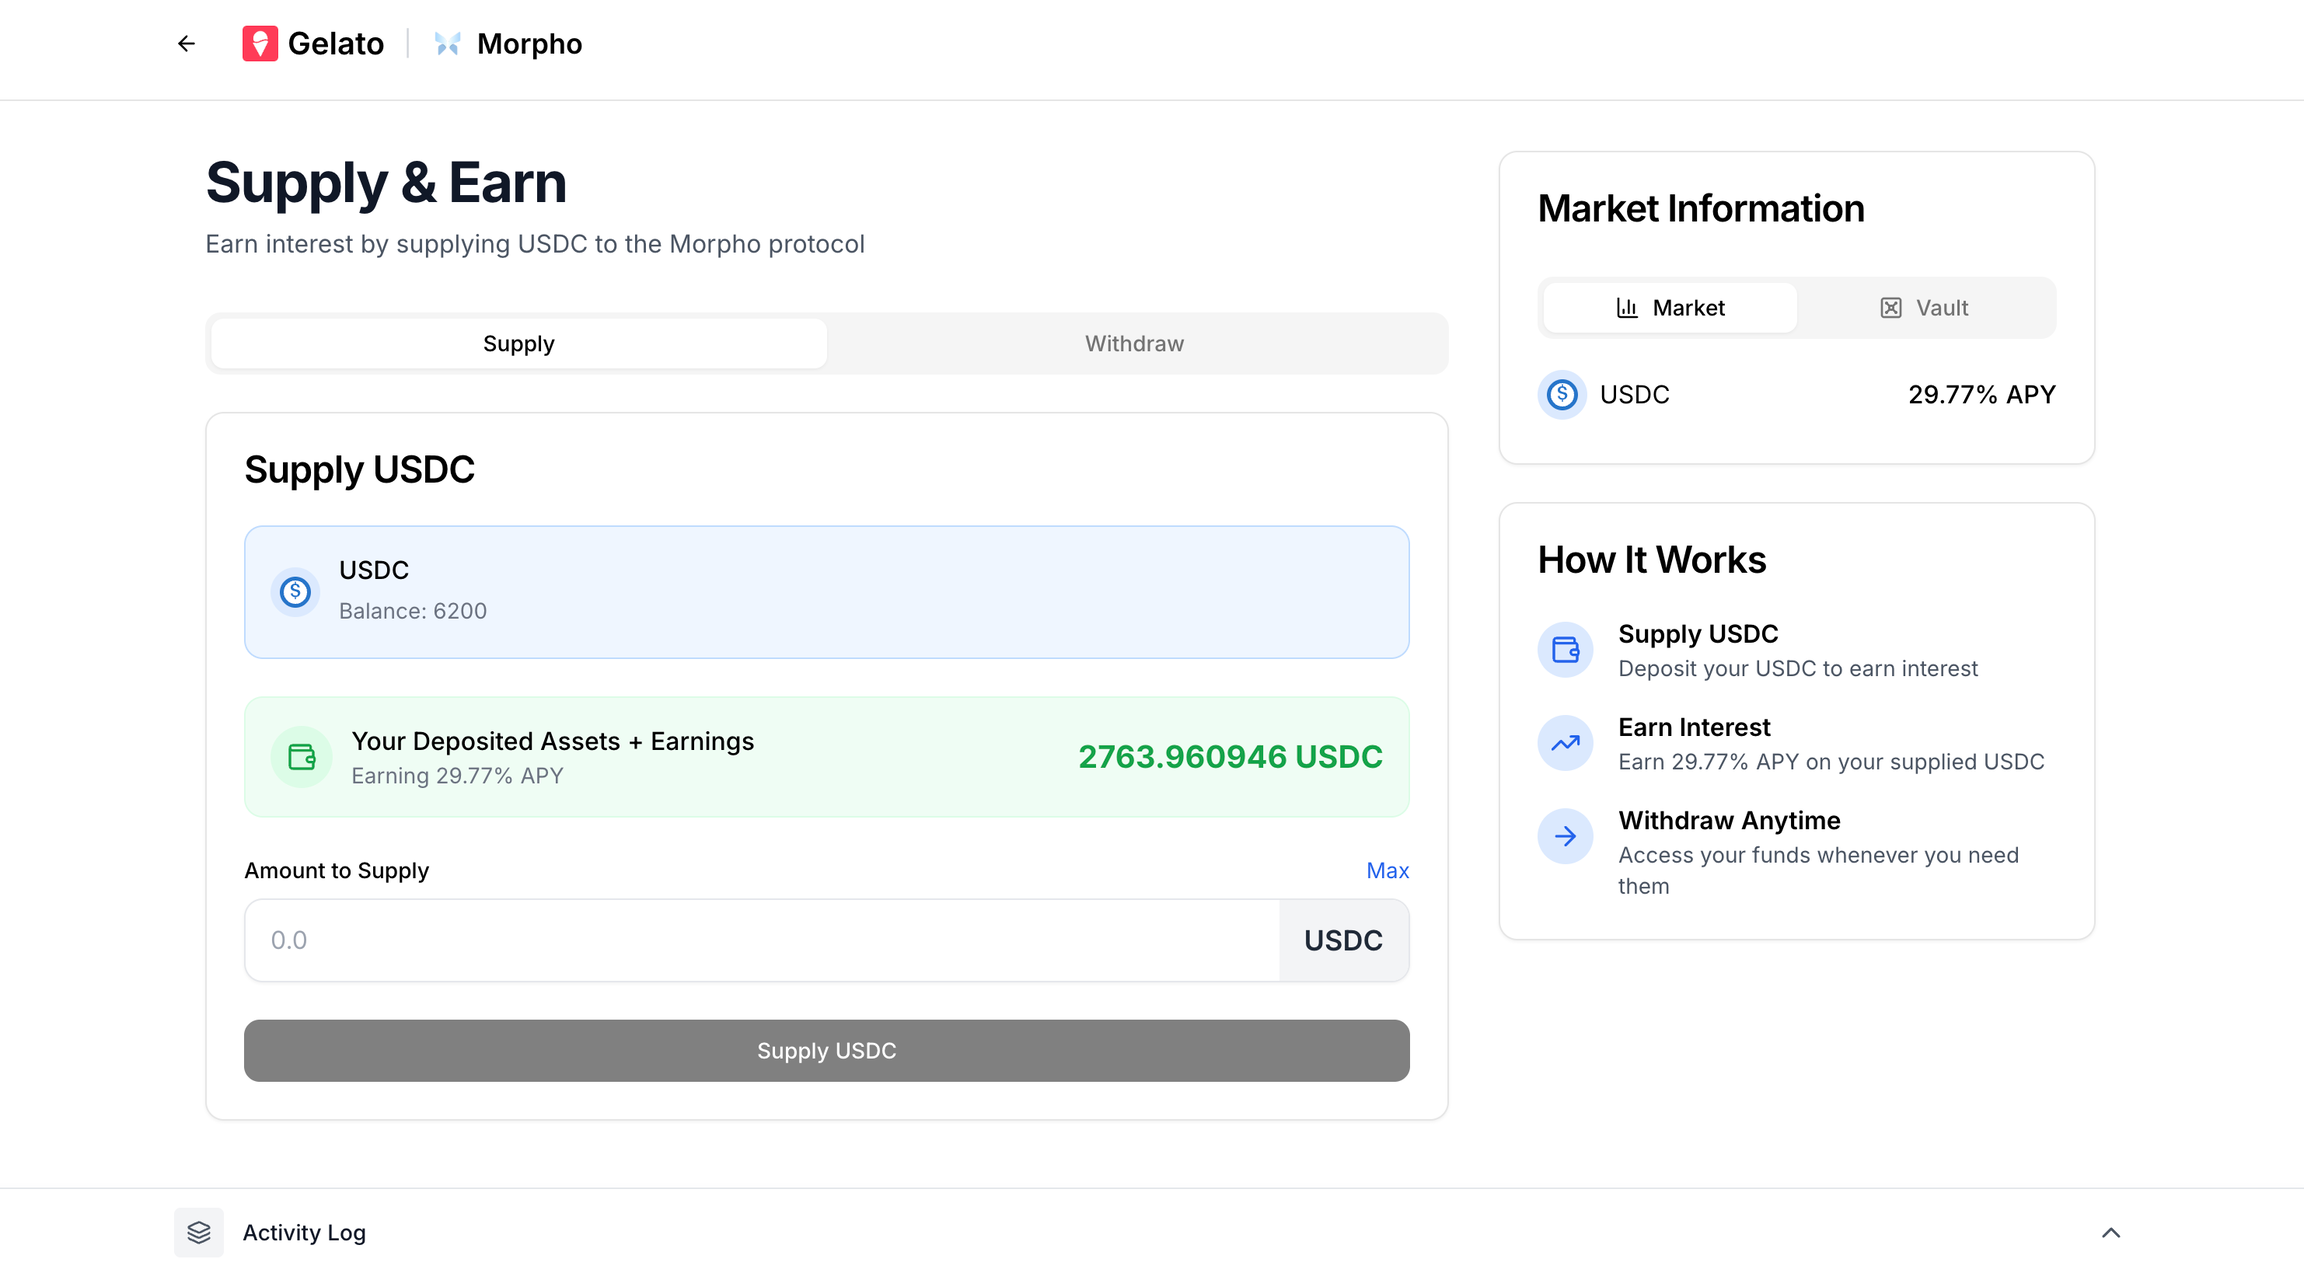
## Part 1: Supply & Earn
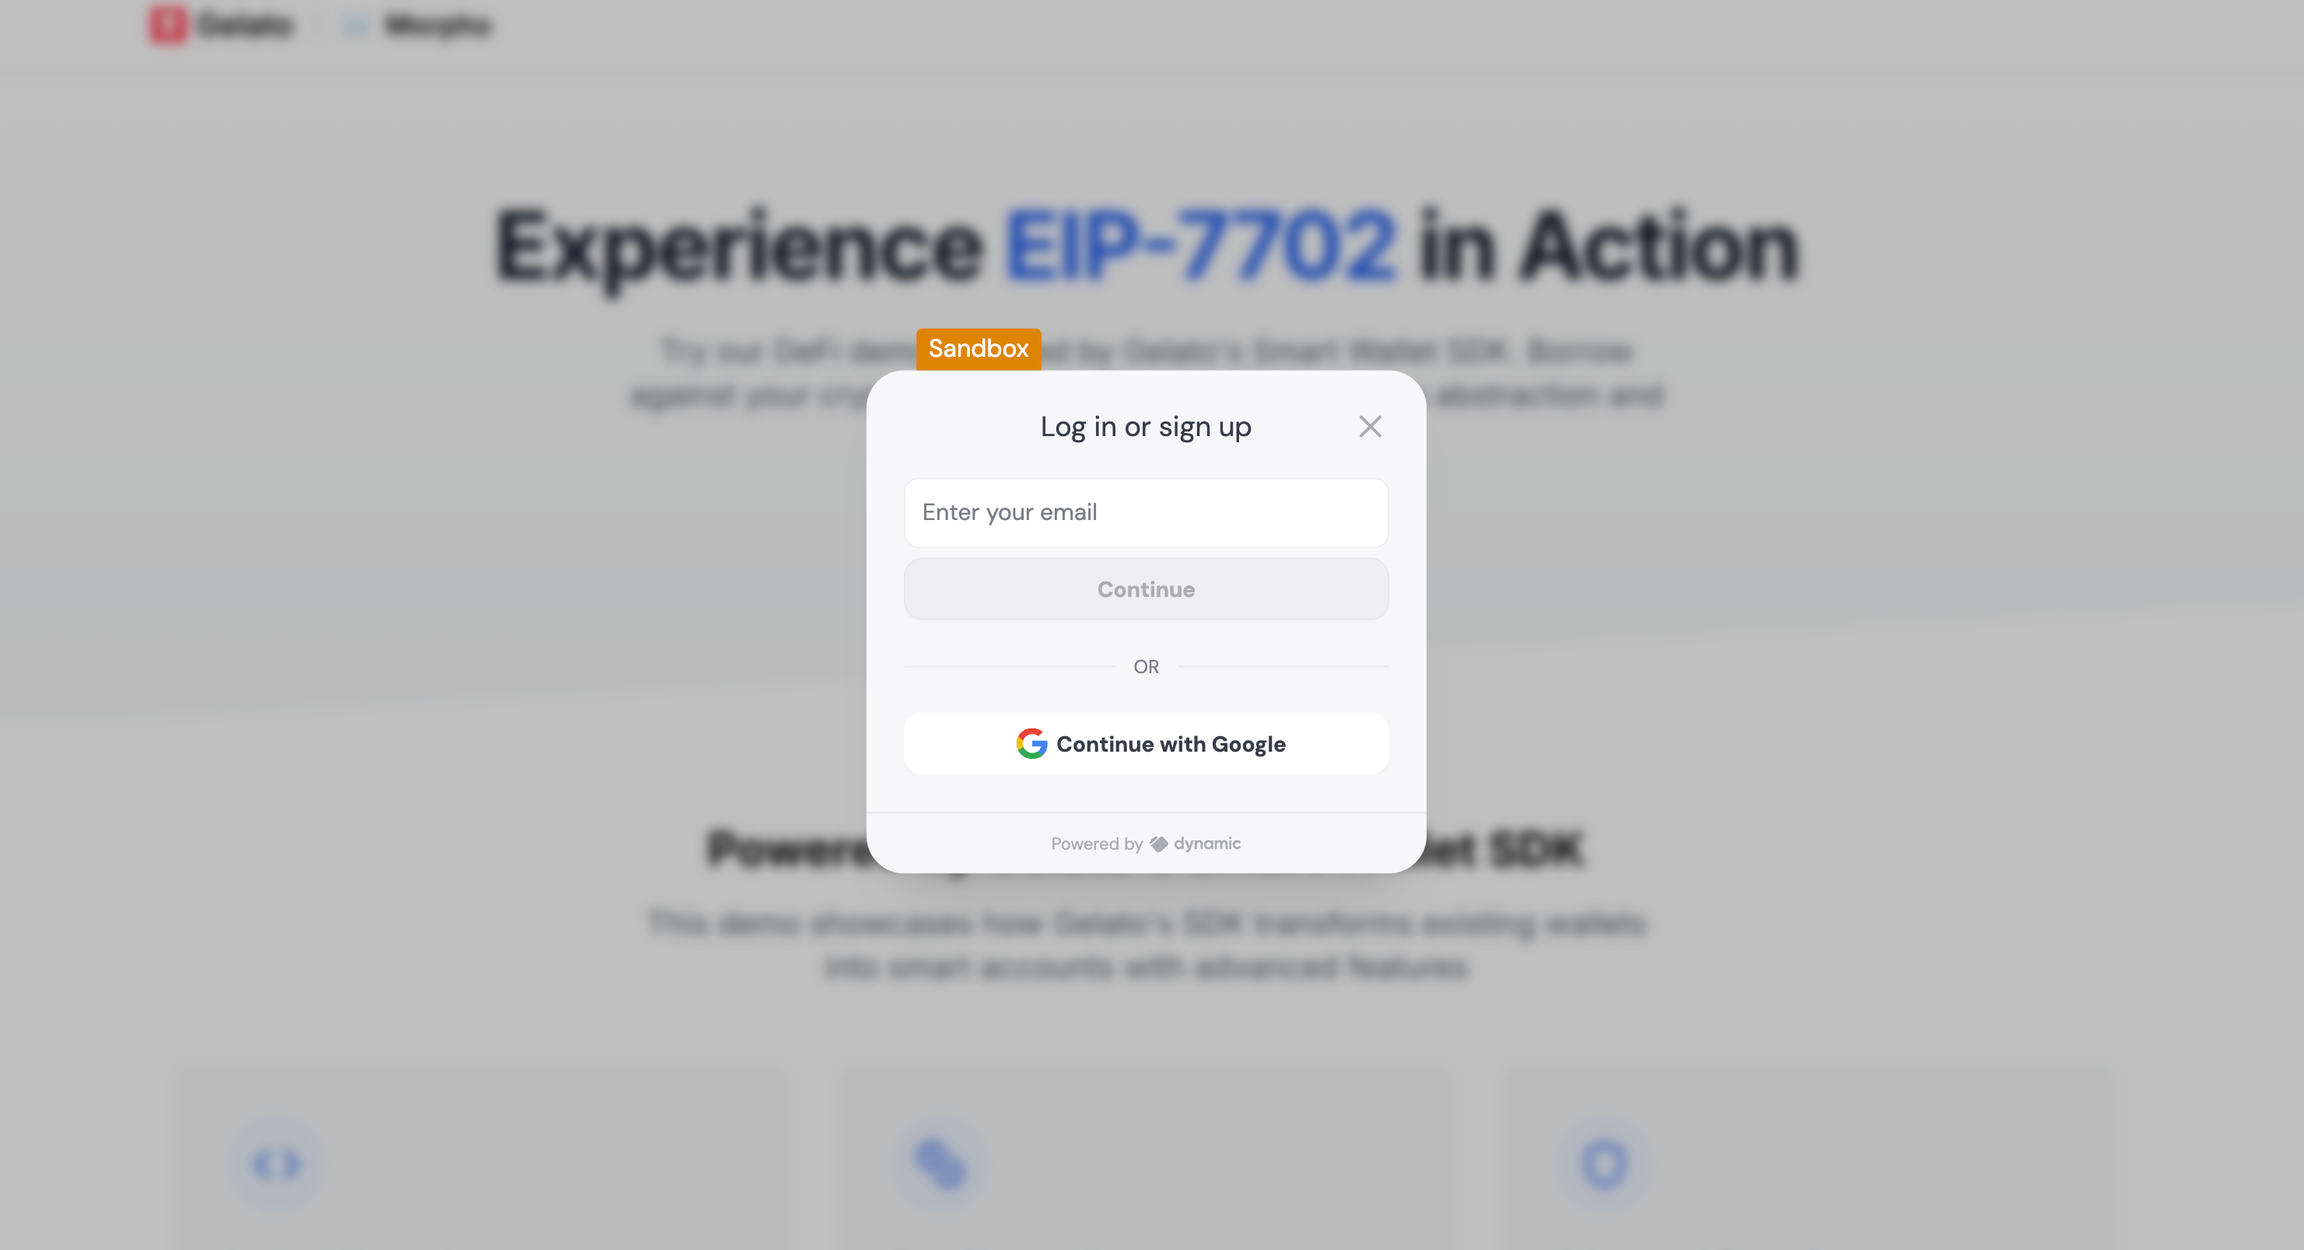
Allow users to supply assets (e.g., USDC) and earn yield in Morpho’s vaults — fully onchain, without user signatures or gas fees.
### Flow Overview
- Approve vault to spend USDC
- Deposit USDC to Morpho vault
- Optionally, record stats to external tracking contract
### Code Snippet
Embed the following setup within your app to configure the provider:
```typescript
{children}
```
This context enables smart wallet access throughout your app, setting up:
- Wallet creation and session
- Transaction preparation and sending
- Provider availability across your components
```typescript
const { gelato: { client }, logout} = useGelatoSmartWalletProviderContext();
```
## Part 1: Supply & Earn
Allow users to supply assets (e.g., USDC) and earn yield in Morpho’s vaults — fully onchain, without user signatures or gas fees.
### Flow Overview
- Approve vault to spend USDC
- Deposit USDC to Morpho vault
- Optionally, record stats to external tracking contract
 ### Code Snippet
```typescript
const calls = [
{
to: USDC_ADDRESS,
data: encodeFunctionData({
abi: tokenABI,
functionName: "approve",
args: [MORPHO_VAULT_ADDRESS, parseUnits(amount, 6)],
}),
},
{
to: MORPHO_VAULT_ADDRESS,
data: encodeFunctionData({
abi: morphoVaultABI,
functionName: "deposit",
args: [parseUnits(amount, 6), smartWallet.address],
}),
},
{
to: VAULT_STATS_ADDRESS,
data: encodeFunctionData({
abi: vaultStatsABI,
functionName: "deposit",
args: [parseUnits(amount, 6), userAssets, totalAssets],
}),
},
];
const response = await smartWalletClient.execute({
payment: sponsored(GELATO_API_KEY),
calls,
});
console.log("userOp Hash", response.id);
const txHash = await response.wait();
```
Users never sign a transaction or pay gas. All logic executes onchain using their smart account.
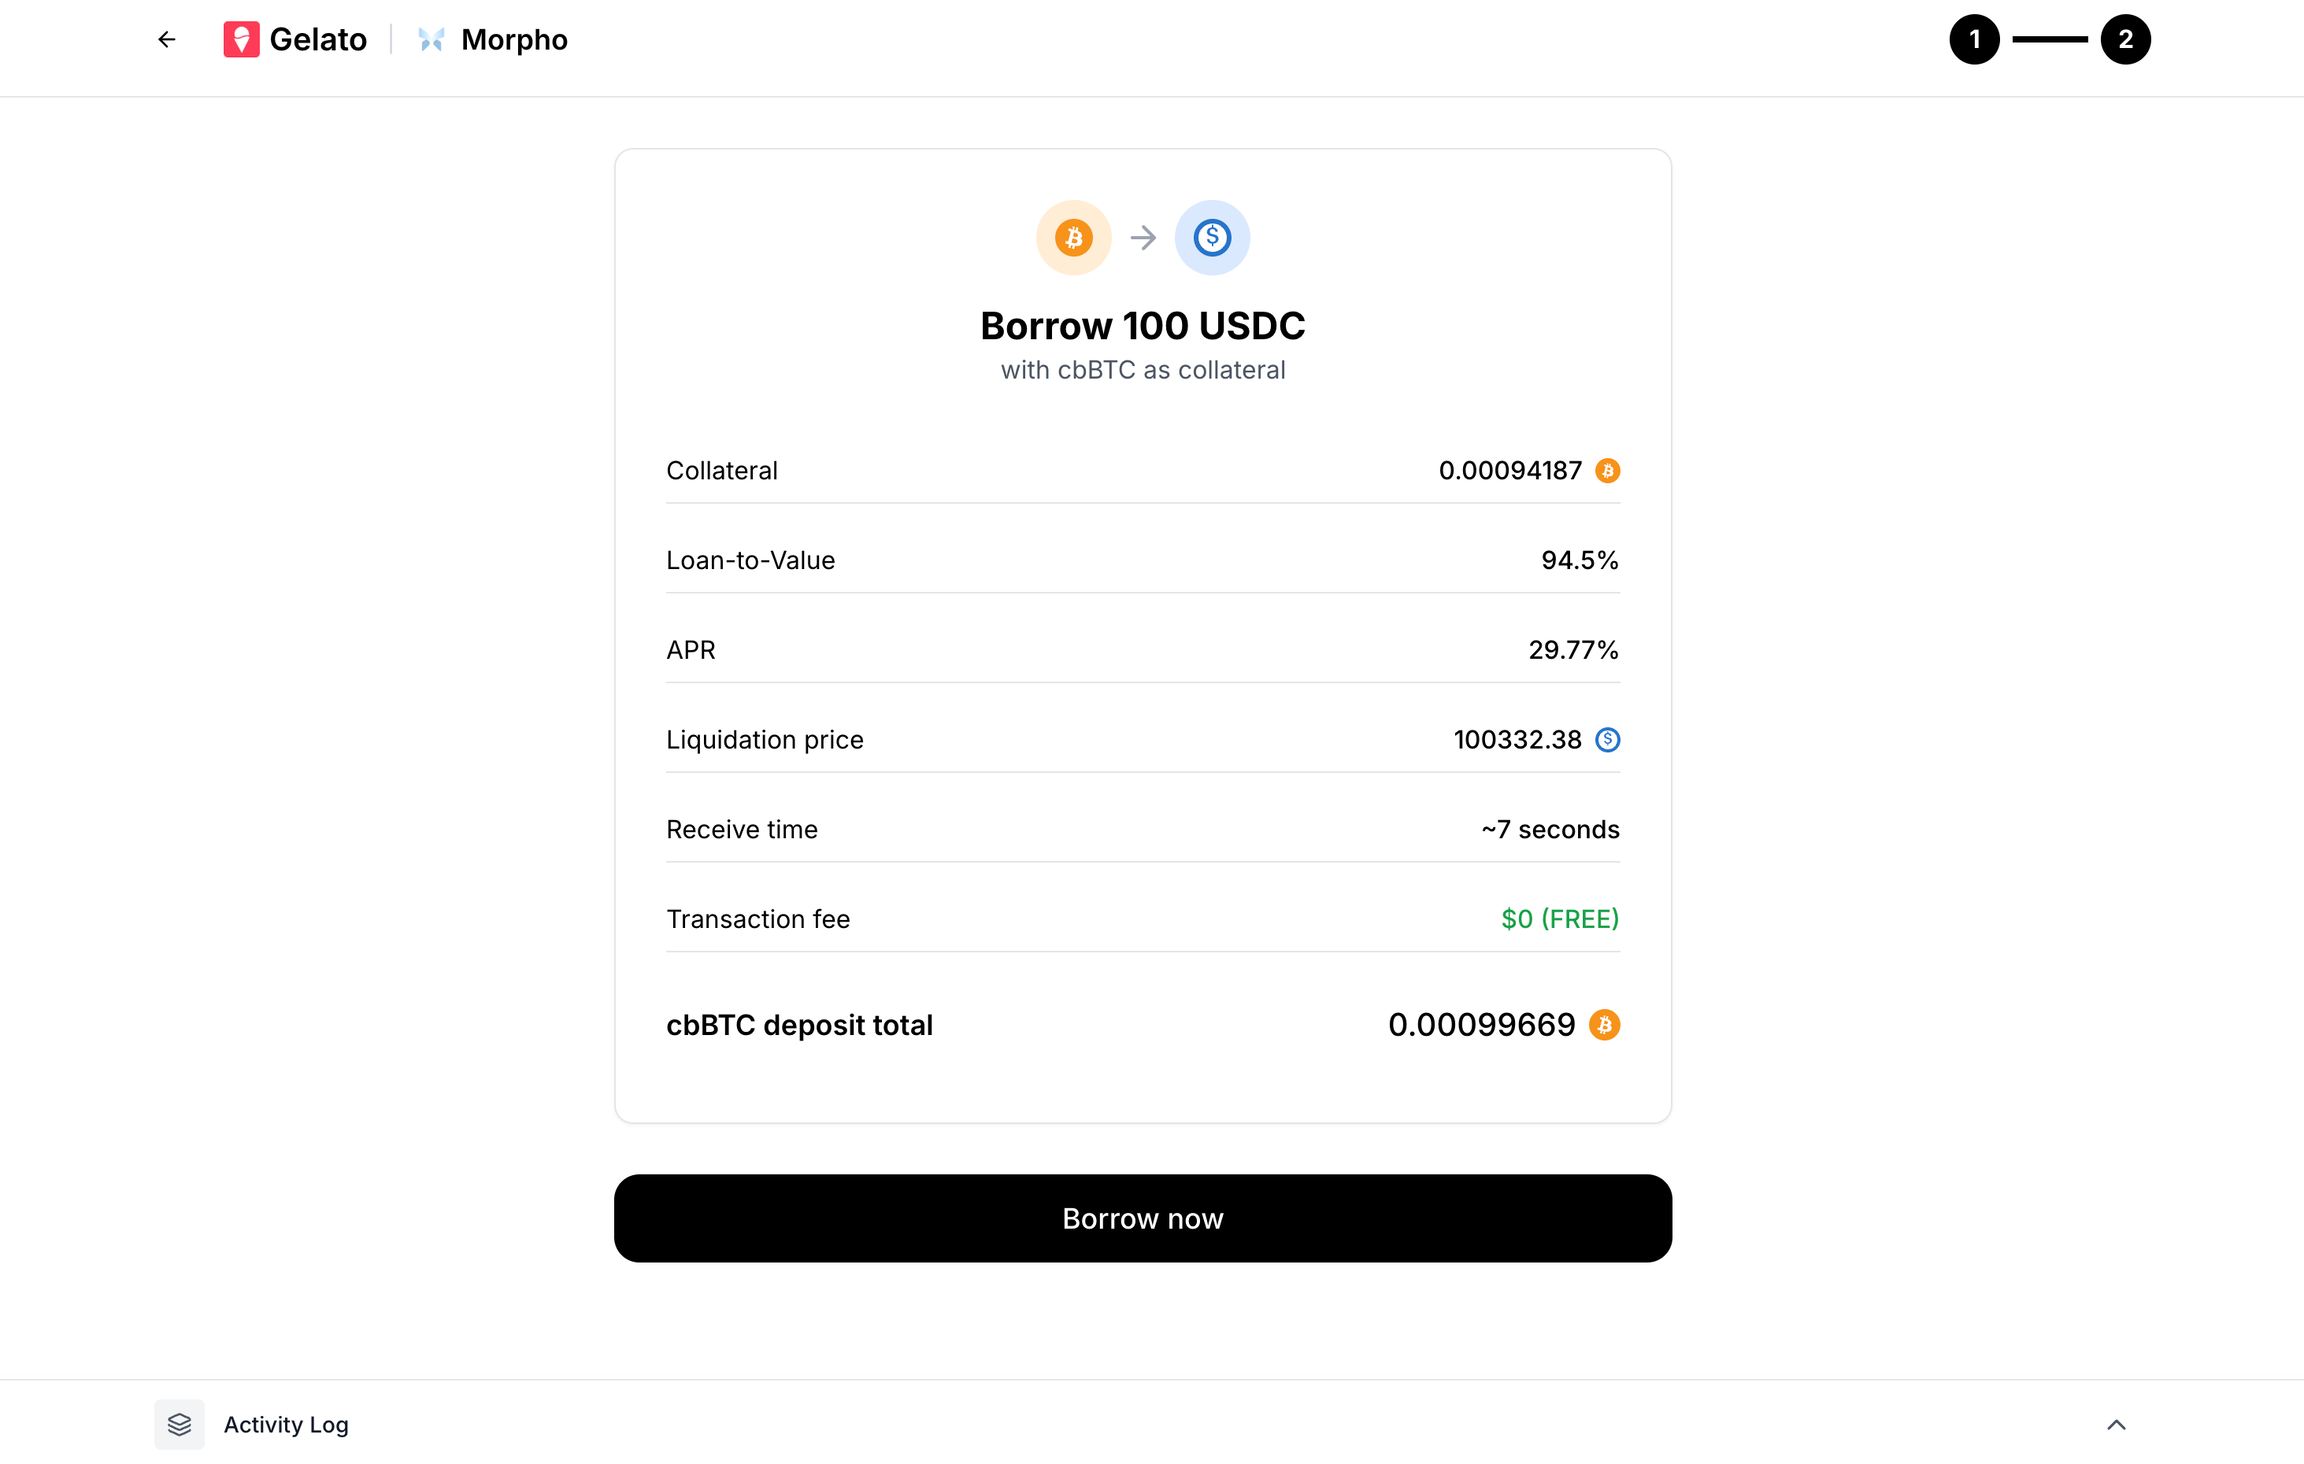
## Part 2: Borrow
Let users borrow stablecoins (like USDC) using crypto collateral (cbBTC) — trustless, non-custodial, and instant.
### Flow Overview
- Approve Morpho to move collateral
- Supply collateral to Morpho
- Borrow USDC
### Code Snippet
```typescript
const calls = [
{
to: USDC_ADDRESS,
data: encodeFunctionData({
abi: tokenABI,
functionName: "approve",
args: [MORPHO_VAULT_ADDRESS, parseUnits(amount, 6)],
}),
},
{
to: MORPHO_VAULT_ADDRESS,
data: encodeFunctionData({
abi: morphoVaultABI,
functionName: "deposit",
args: [parseUnits(amount, 6), smartWallet.address],
}),
},
{
to: VAULT_STATS_ADDRESS,
data: encodeFunctionData({
abi: vaultStatsABI,
functionName: "deposit",
args: [parseUnits(amount, 6), userAssets, totalAssets],
}),
},
];
const response = await smartWalletClient.execute({
payment: sponsored(GELATO_API_KEY),
calls,
});
console.log("userOp Hash", response.id);
const txHash = await response.wait();
```
Users never sign a transaction or pay gas. All logic executes onchain using their smart account.
## Part 2: Borrow
Let users borrow stablecoins (like USDC) using crypto collateral (cbBTC) — trustless, non-custodial, and instant.
### Flow Overview
- Approve Morpho to move collateral
- Supply collateral to Morpho
- Borrow USDC
 ### Code Snippet
```typescript
const approveCall = {
to: COLLATERAL_TOKEN_ADDRESS,
data: encodeFunctionData({
abi: tokenABI,
functionName: "approve",
args: [MORPHO_MARKET_ADDRESS, collateralAmount],
}),
};
const supplyCollateralCall = {
to: MORPHO_MARKET_ADDRESS,
data: encodeFunctionData({
abi: morphoABI,
functionName: "supplyCollateral",
args: [marketParams, collateralAmount, smartWallet.address, "0x"],
}),
};
const borrowCall = {
to: MORPHO_MARKET_ADDRESS,
data: encodeFunctionData({
abi: morphoABI,
functionName: "borrow",
args: [
marketParams,
borrowAmount,
BigInt(0),
smartWallet.address,
smartWallet.address,
],
}),
};
const response = await smartWalletClient.execute({
payment: sponsored(GELATO_API_KEY),
calls: [approveCall, supplyCollateralCall, borrowCall]
});
console.log("userOp Hash", response.id);
const txHash = await response.wait();
```
## Summary
{(() => {
const featuresData = [
{
feature: "Smart wallet onboarding (social/email)",
available: "Yes"
},
{
feature: "Embedded supply to Morpho vaults",
available: "Yes"
},
{
feature: "Embedded borrow against crypto",
available: "Yes"
},
{
feature: "Gasless transactions via Gelato",
available: "Yes"
},
{
feature: "Fully onchain, no custody",
available: "Yes"
}
];
return (
### Code Snippet
```typescript
const approveCall = {
to: COLLATERAL_TOKEN_ADDRESS,
data: encodeFunctionData({
abi: tokenABI,
functionName: "approve",
args: [MORPHO_MARKET_ADDRESS, collateralAmount],
}),
};
const supplyCollateralCall = {
to: MORPHO_MARKET_ADDRESS,
data: encodeFunctionData({
abi: morphoABI,
functionName: "supplyCollateral",
args: [marketParams, collateralAmount, smartWallet.address, "0x"],
}),
};
const borrowCall = {
to: MORPHO_MARKET_ADDRESS,
data: encodeFunctionData({
abi: morphoABI,
functionName: "borrow",
args: [
marketParams,
borrowAmount,
BigInt(0),
smartWallet.address,
smartWallet.address,
],
}),
};
const response = await smartWalletClient.execute({
payment: sponsored(GELATO_API_KEY),
calls: [approveCall, supplyCollateralCall, borrowCall]
});
console.log("userOp Hash", response.id);
const txHash = await response.wait();
```
## Summary
{(() => {
const featuresData = [
{
feature: "Smart wallet onboarding (social/email)",
available: "Yes"
},
{
feature: "Embedded supply to Morpho vaults",
available: "Yes"
},
{
feature: "Embedded borrow against crypto",
available: "Yes"
},
{
feature: "Gasless transactions via Gelato",
available: "Yes"
},
{
feature: "Fully onchain, no custody",
available: "Yes"
}
];
return (
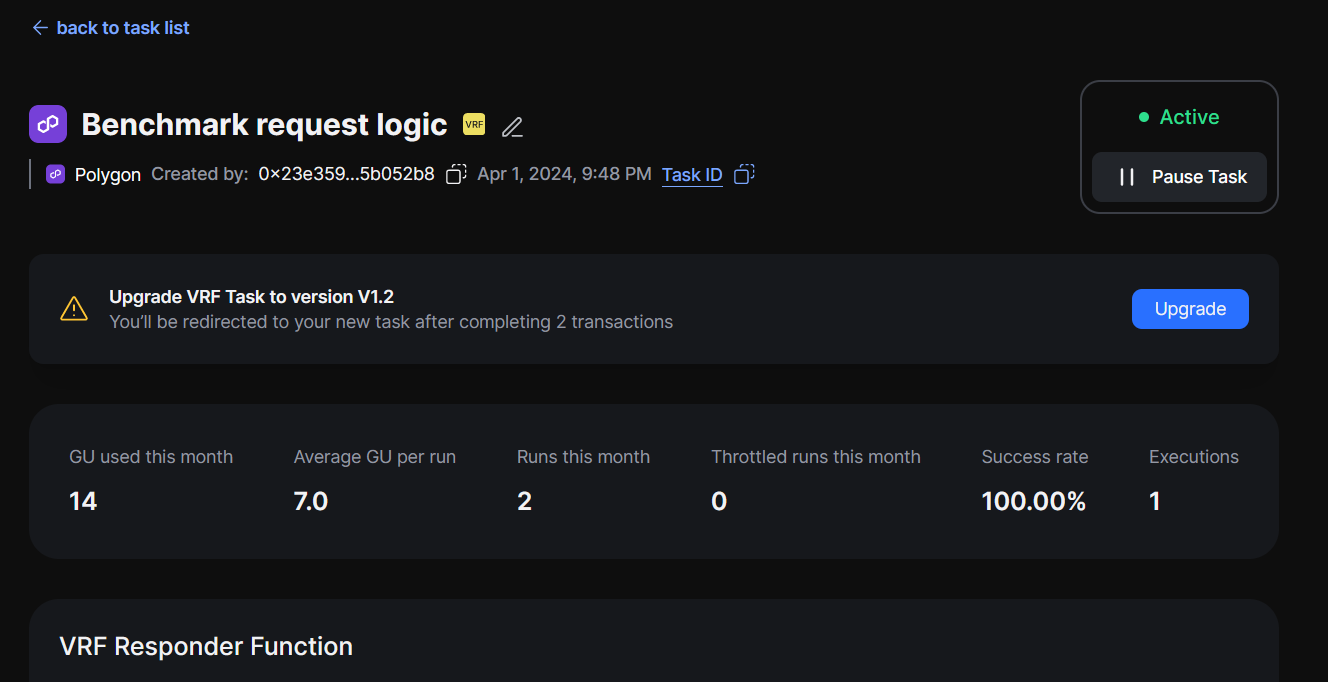 2. A transaction prompt will appear asking you to confirm the upgrade. This process will create a new task and simultaneously pause the old one.
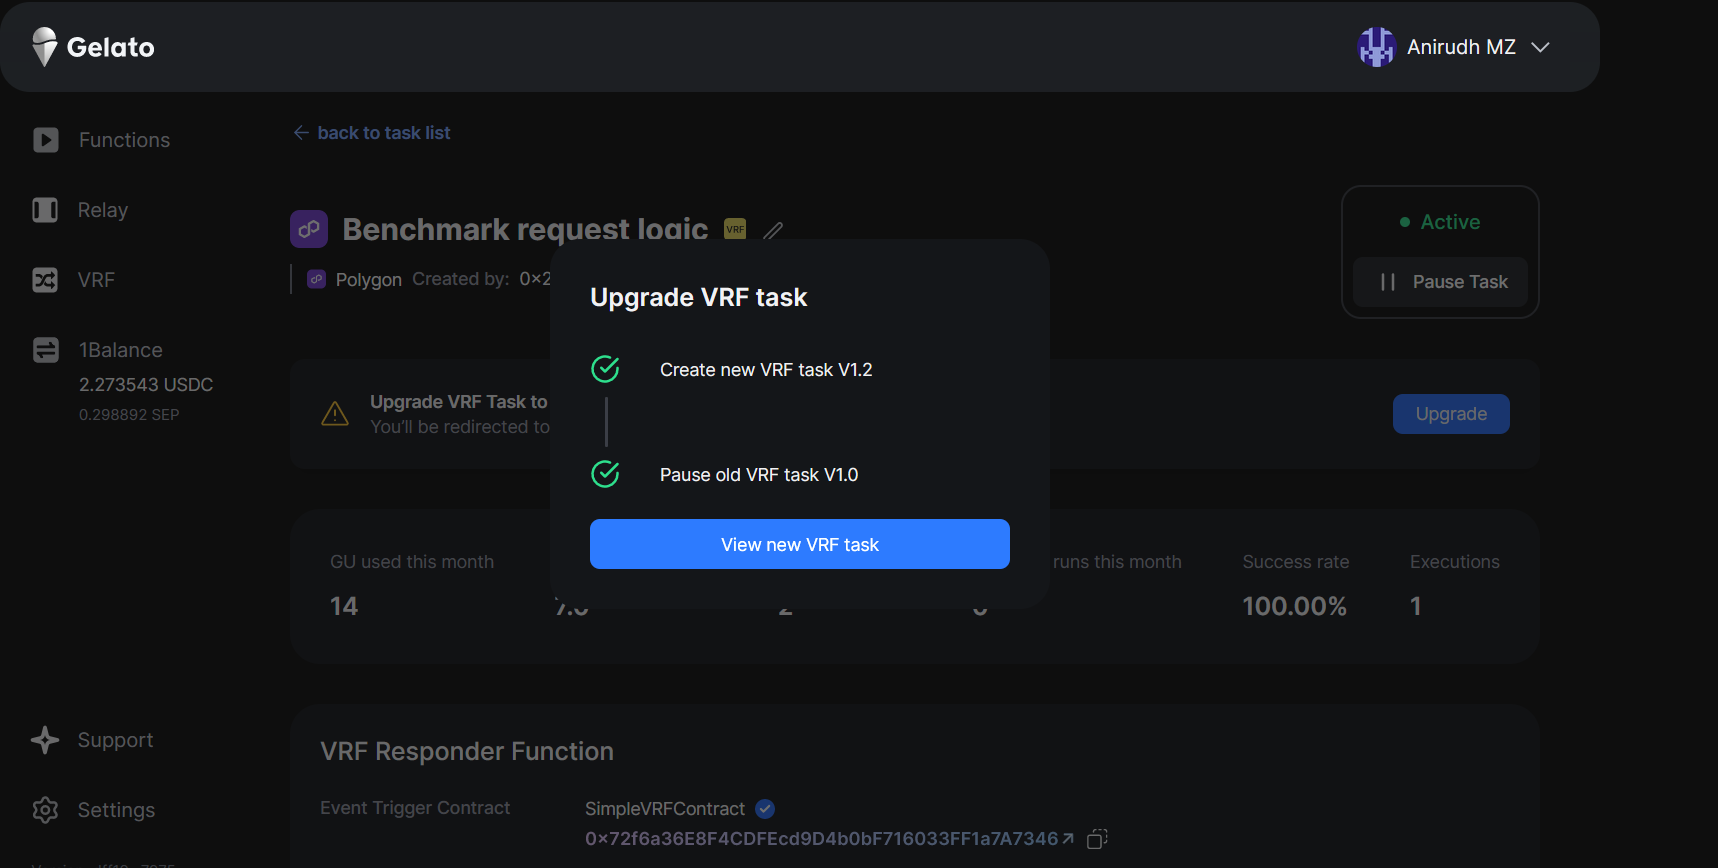 3. After confirming the transaction, you will notice that the task label updates to "VRF v1.2," indicating that the upgrade is complete.
 ## 1. Gather Necessary Addresses
Before you begin, make sure you have the address of your requester contract at hand. This will be essential for the deployment process.
Head over to the [VRF Quick Start guide](/vrf/how-to-guides/deploy-your-contract-inheriting-gelato-vrf) to learn how to prepare your contract for requesting randomness.
## 2. Access the VRF Deployment Portal
Navigate to the [Gelato app](https://app.gelato.cloud).
## 3. Choose your VRF Type
When prompted to select the VRF type, opt for "Gelato VRF". If you previously deployed a Chainlink consumer contract and wish to transition, refer to the [Migrate from Chainlink VRF](/vrf/how-to-guides/migrate-from-chainlink-vrf) section.
Or, if you already have a VRF task and want to cover all the missing events, you can set up a fallback task to ensure completeness, refer to the [Create a Fallback VRF](/vrf/how-to-guides/create-a-fallback-vrf) section.
## 4. Select Deployment Network
Ensure you choose the same network where both your VRF requester and receiver contracts are deployed.
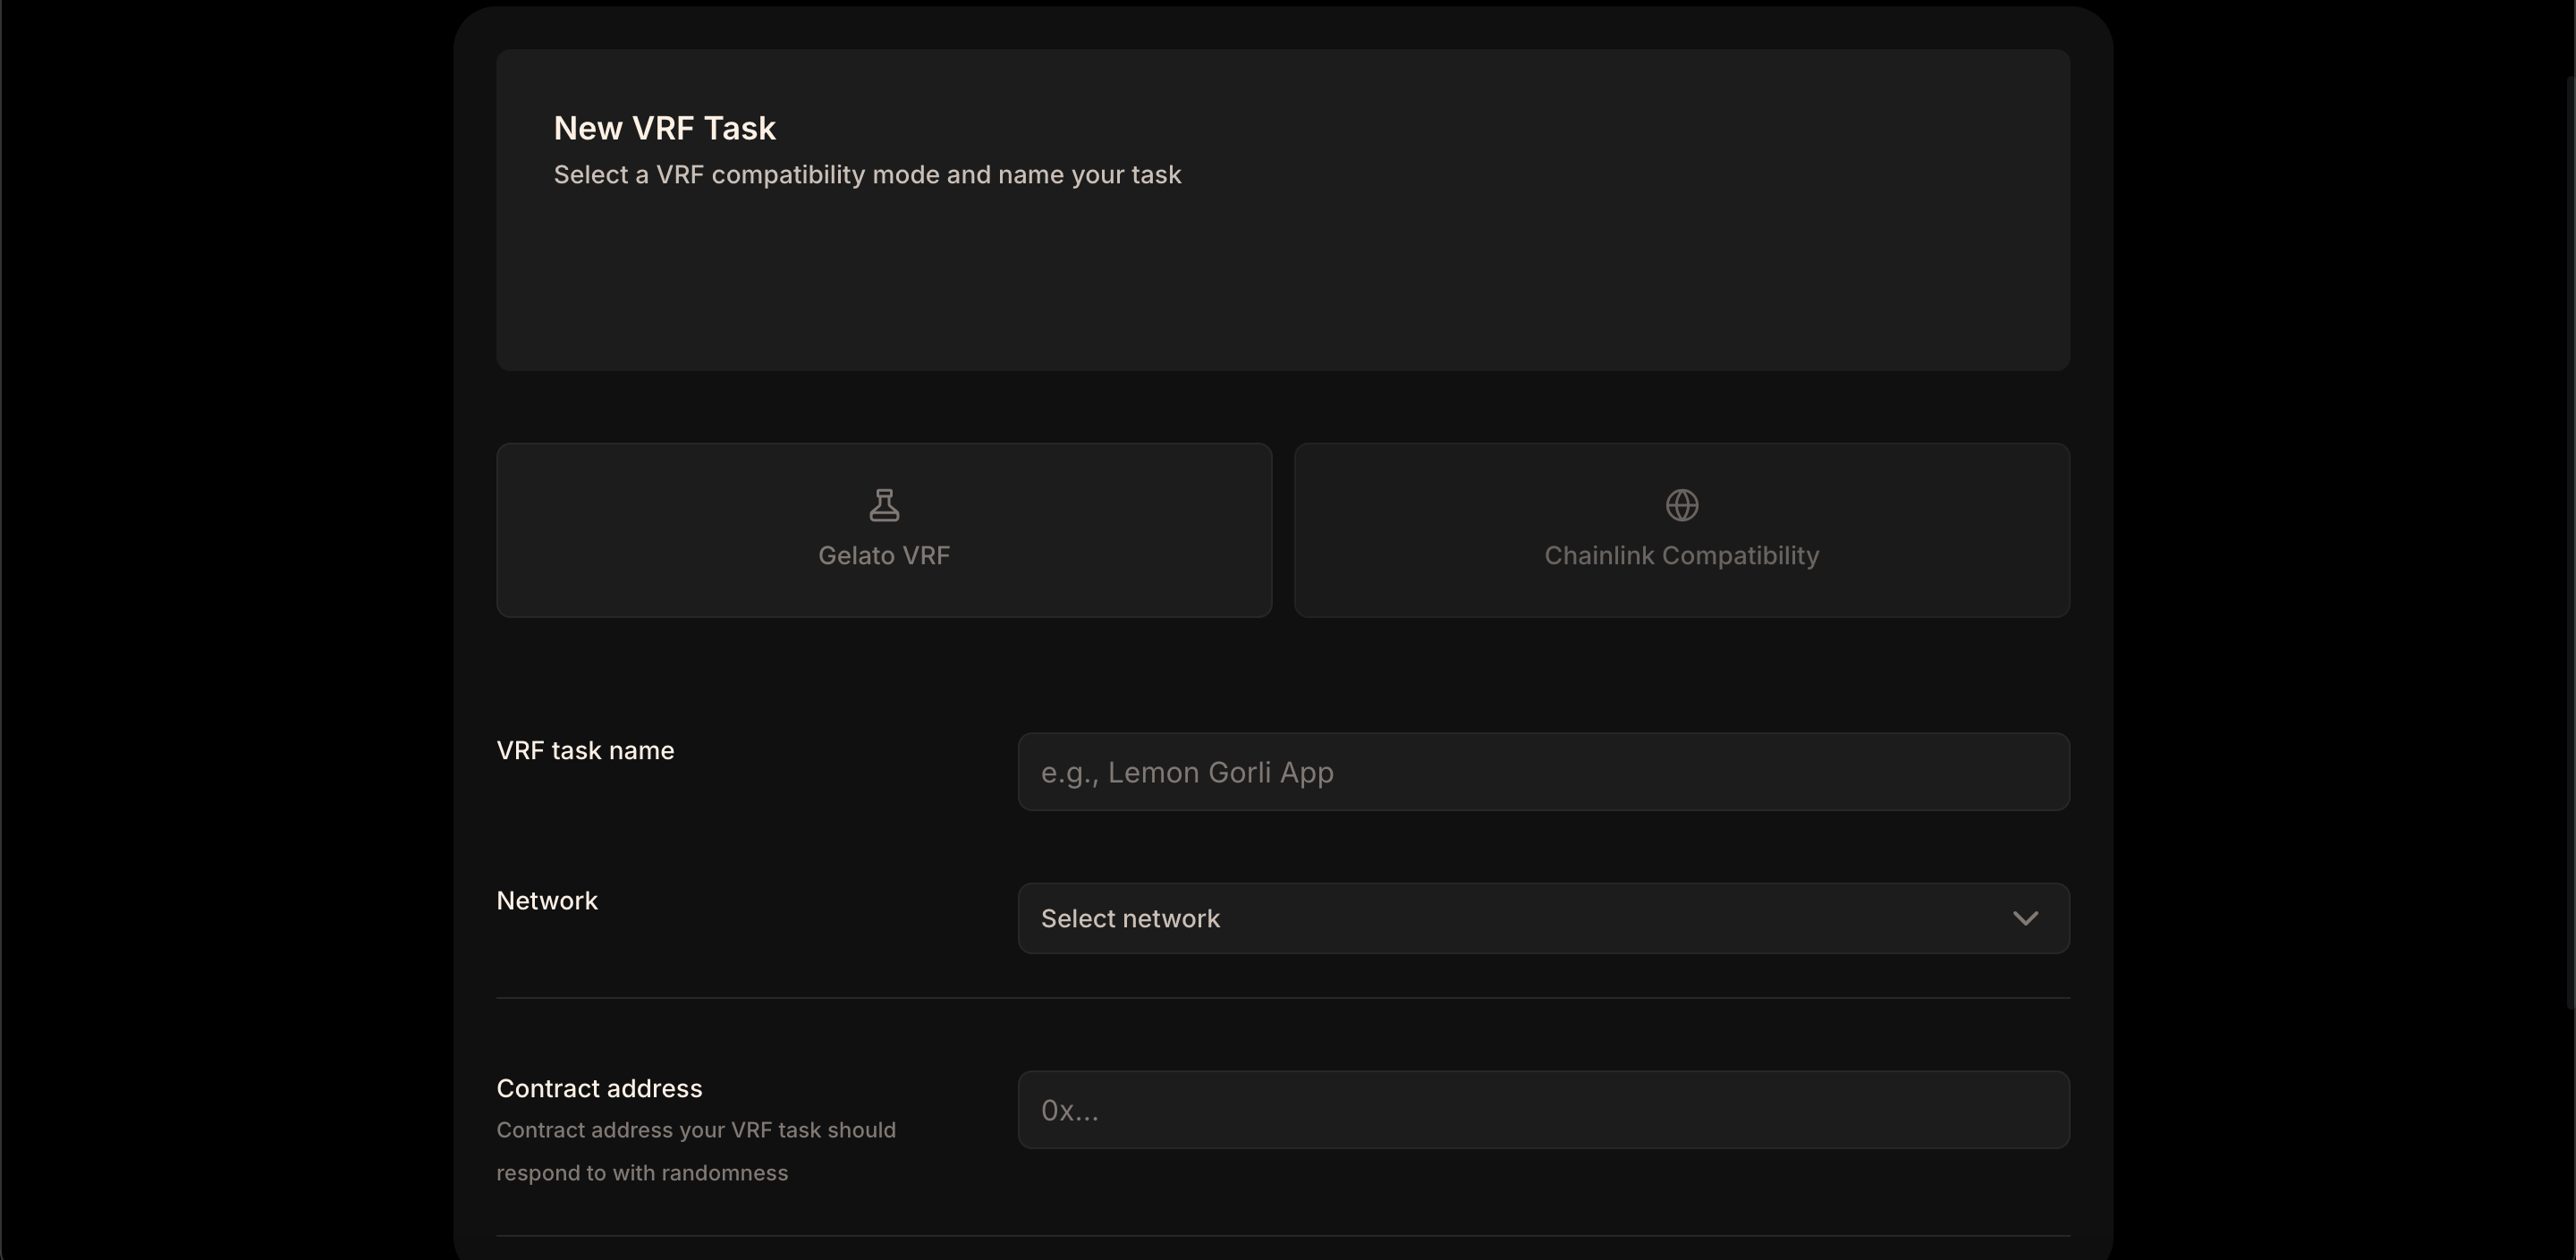
## 5. Specify the Request Contract
You'll be asked to provide the address of the Request Contract to which the Gelato nodes should respond. Enter the address you gathered in step 1.
## 6. Launch your VRF Instance
Once all details are correctly entered, go ahead and launch your Gelato VRF instance.
---
## 1. Gather Necessary Addresses
Before you begin, make sure you have the address of your requester contract at hand. This will be essential for the deployment process.
Head over to the [VRF Quick Start guide](/vrf/how-to-guides/deploy-your-contract-inheriting-gelato-vrf) to learn how to prepare your contract for requesting randomness.
## 2. Access the VRF Deployment Portal
Navigate to the [Gelato app](https://app.gelato.cloud).
## 3. Choose your VRF Type
When prompted to select the VRF type, opt for "Gelato VRF". If you previously deployed a Chainlink consumer contract and wish to transition, refer to the [Migrate from Chainlink VRF](/vrf/how-to-guides/migrate-from-chainlink-vrf) section.
Or, if you already have a VRF task and want to cover all the missing events, you can set up a fallback task to ensure completeness, refer to the [Create a Fallback VRF](/vrf/how-to-guides/create-a-fallback-vrf) section.
## 4. Select Deployment Network
Ensure you choose the same network where both your VRF requester and receiver contracts are deployed.

## 5. Specify the Request Contract
You'll be asked to provide the address of the Request Contract to which the Gelato nodes should respond. Enter the address you gathered in step 1.
## 6. Launch your VRF Instance
Once all details are correctly entered, go ahead and launch your Gelato VRF instance.
---
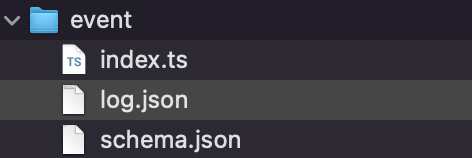 Copy in the `log.json` file the raw data of the event you want to test:
### event/log.json
```json
{
"blockNumber": 48758053,
"blockHash": "0x6794a56583329794f184d50862019ecf7b6d8ba6b3210f68ca4b91a8fa81817d",
"transactionIndex": 29,
"removed": false,
"address": "0xb74de3F91e04d0920ff26Ac28956272E8d67404D",
"data": "0x",
"topics": [
"0xddf252ad1be2c89b69c2b068fc378daa952ba7f163c4a11628f55a4df523b3ef",
"0x0000000000000000000000000000000000000000000000000000000000000000",
"0x000000000000000000000000eec2ba9b9f0202c63bba29ea9a4ce5c23f9865fd",
"0x0000000000000000000000000000000000000000000000000000000000001099"
],
"transactionHash": "0x2c500a55f5c24d587e73805975d91395634a971dca5939f43d34d774d0f7147b",
"logIndex": 343
}
```
The data in `log.json` will be injected in your event context in local runs via CLI:
```bash
npx w3f test event/index.ts --logs
```
```bash
Web3Function running logs:
> Transfer of NFT #4249 from 0x0000000000000000000000000000000000000000 to 0xeeC2ba9B9F0202c63bba29Ea9A4Ce5c23f9865FD detected
Web3Function Result:
✓ Return value: {"canExec":false,"message":"Event processed 0x2c500a55f5c24d587e73805975d9"}
---
Copy in the `log.json` file the raw data of the event you want to test:
### event/log.json
```json
{
"blockNumber": 48758053,
"blockHash": "0x6794a56583329794f184d50862019ecf7b6d8ba6b3210f68ca4b91a8fa81817d",
"transactionIndex": 29,
"removed": false,
"address": "0xb74de3F91e04d0920ff26Ac28956272E8d67404D",
"data": "0x",
"topics": [
"0xddf252ad1be2c89b69c2b068fc378daa952ba7f163c4a11628f55a4df523b3ef",
"0x0000000000000000000000000000000000000000000000000000000000000000",
"0x000000000000000000000000eec2ba9b9f0202c63bba29ea9a4ce5c23f9865fd",
"0x0000000000000000000000000000000000000000000000000000000000001099"
],
"transactionHash": "0x2c500a55f5c24d587e73805975d91395634a971dca5939f43d34d774d0f7147b",
"logIndex": 343
}
```
The data in `log.json` will be injected in your event context in local runs via CLI:
```bash
npx w3f test event/index.ts --logs
```
```bash
Web3Function running logs:
> Transfer of NFT #4249 from 0x0000000000000000000000000000000000000000 to 0xeeC2ba9B9F0202c63bba29Ea9A4Ce5c23f9865FD detected
Web3Function Result:
✓ Return value: {"canExec":false,"message":"Event processed 0x2c500a55f5c24d587e73805975d9"}
---
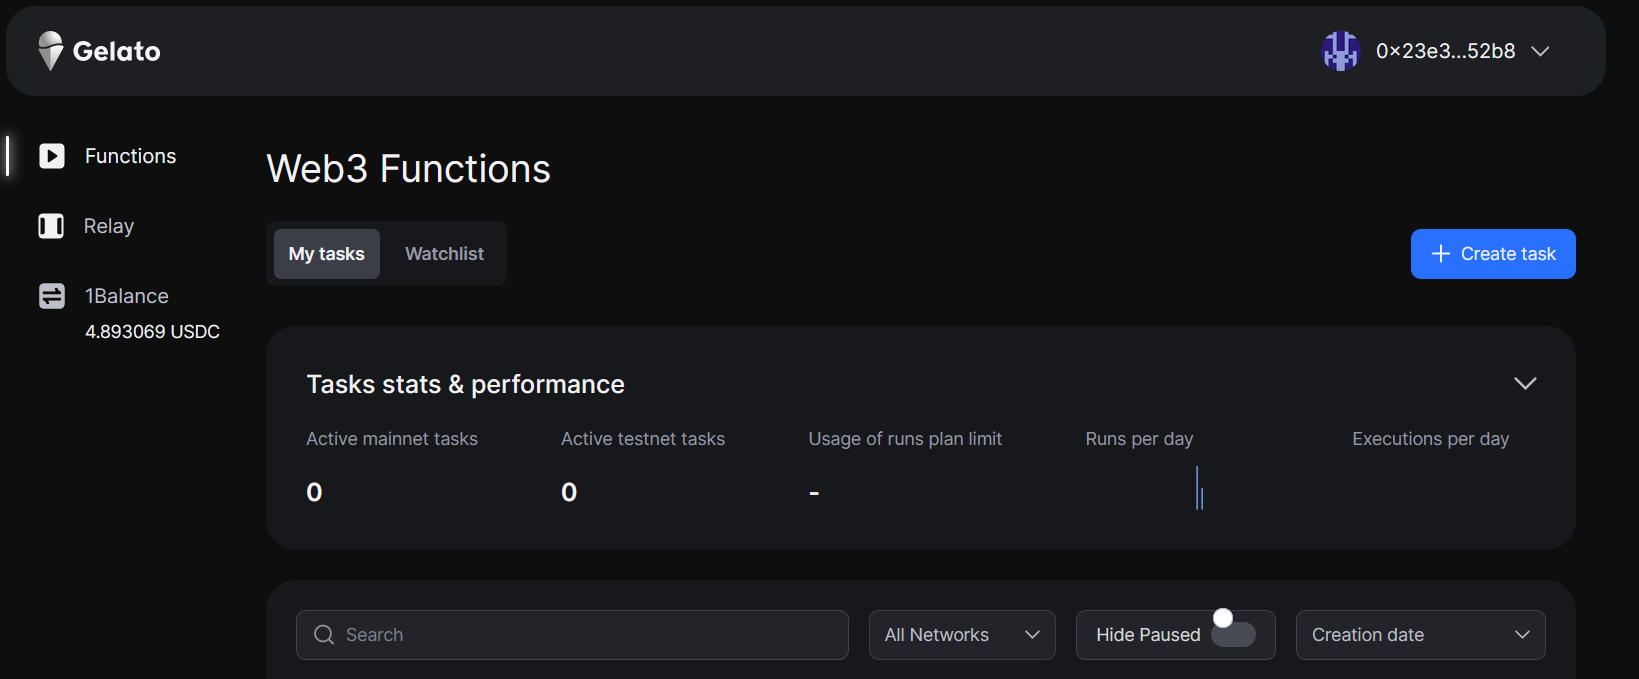
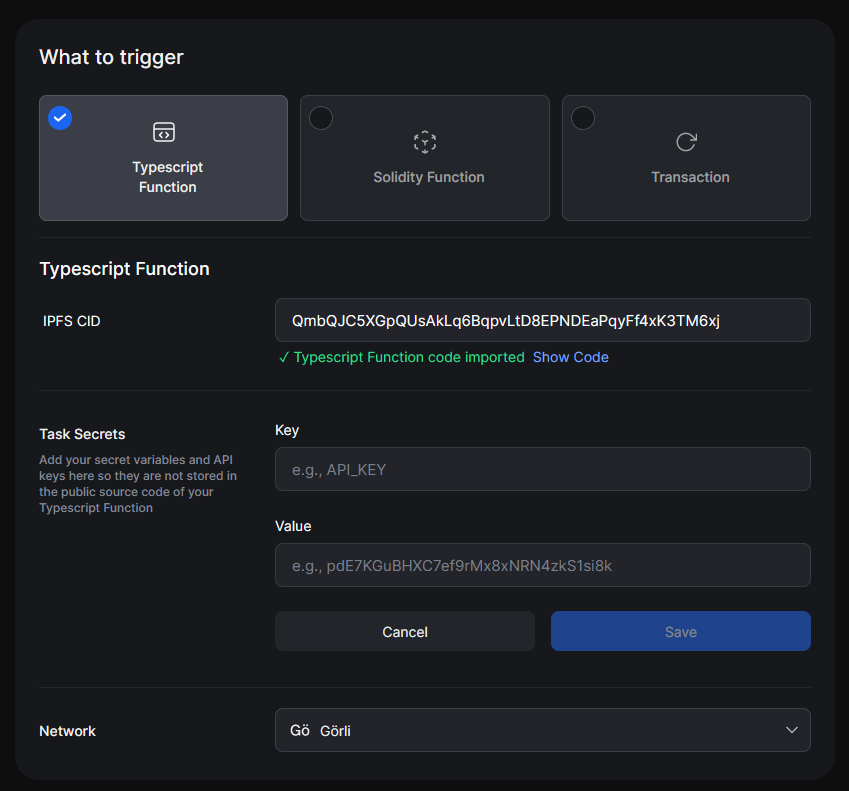 1. **Selection of Function**
- Navigate to the What to trigger section.
- Within the Typescript Function subsection, find the IPFS CID input box.
2. **Function Details Input**
- Input the CID you secured after deploying your Typescript function.
- Upon entry, you should see a message like "Typescript Function code imported," signifying a successful connection.
3. **Network Configuration**
- Scroll to the Network dropdown menu.
- Choose the blockchain network where the Typescript function should work, e.g., "Sepolia."
4. **Task Configuration**
- If your Typescript function needs secret variables or API keys, securely enter them in the Task Secrets section. For every secret:
- **Key**: Define the name of the variable or key, e.g., "API_KEY".
- **Value**: Enter the associated secret value.
- Click Save after each input to guarantee its safe storage.
---
1. **Selection of Function**
- Navigate to the What to trigger section.
- Within the Typescript Function subsection, find the IPFS CID input box.
2. **Function Details Input**
- Input the CID you secured after deploying your Typescript function.
- Upon entry, you should see a message like "Typescript Function code imported," signifying a successful connection.
3. **Network Configuration**
- Scroll to the Network dropdown menu.
- Choose the blockchain network where the Typescript function should work, e.g., "Sepolia."
4. **Task Configuration**
- If your Typescript function needs secret variables or API keys, securely enter them in the Task Secrets section. For every secret:
- **Key**: Define the name of the variable or key, e.g., "API_KEY".
- **Value**: Enter the associated secret value.
- Click Save after each input to guarantee its safe storage.
---
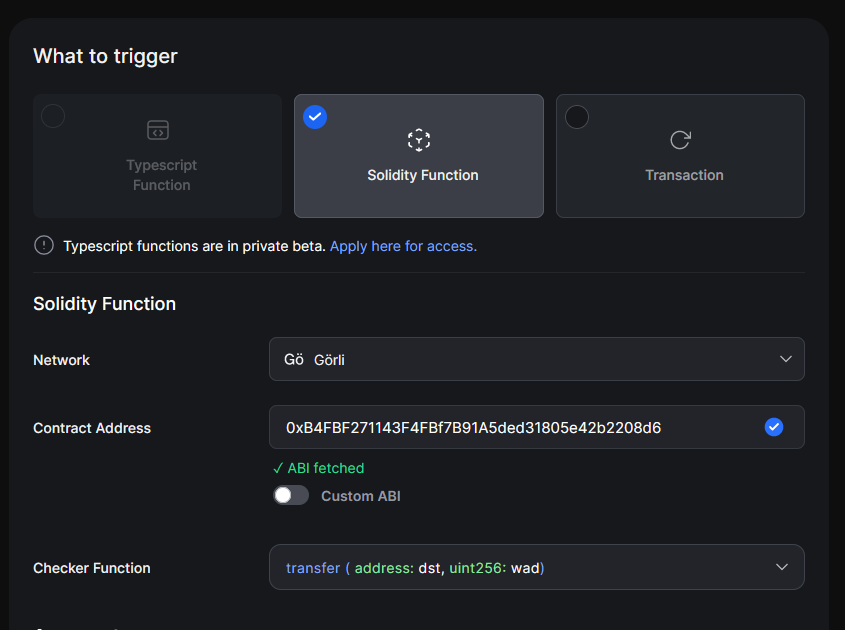 1. **Selection of Function**
- Navigate to the What to trigger section.
- Choose the Solidity Function option
2. **Network Configuration**
- Locate the Network dropdown.
- Select your desired blockchain network where the contract is deployed, e.g., "Göerli."
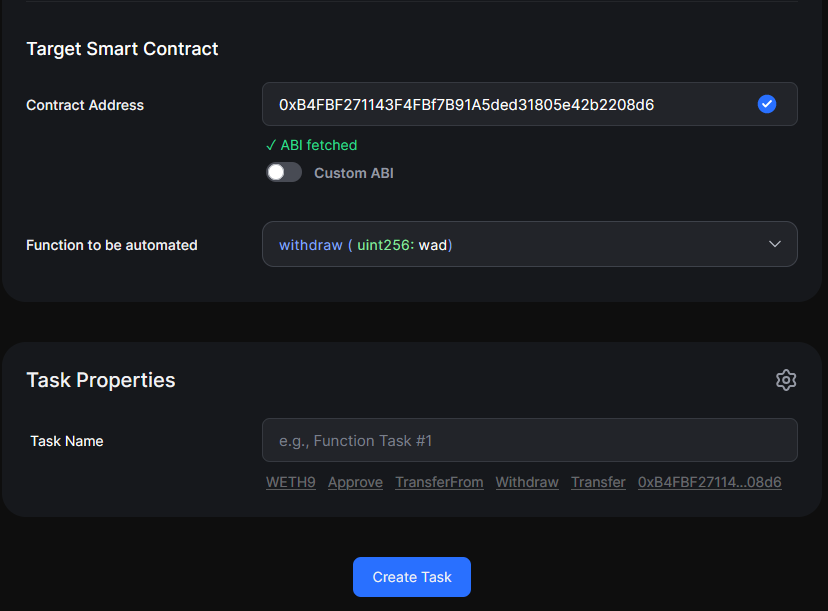
3. **Function Details Input**
- Under the Solidity Function section, find the input labeled Contract Address.
- Enter the Ethereum address of your deployed Solidity contract. Ensure accuracy as this determines where your functions will interact.
- Once the contract address is entered, the ABI (Application Binary Interface) should automatically populate. If using a custom ABI, select the Custom ABI option and input it accordingly.
4. **Task Configuration**
- A checker function evaluates conditions before triggering the main function. From the Checker Function dropdown, choose the specific function you want as a condition checker.
- Enter the Target Contract where the automated function call should be sent. From the subsequent dropdown, select the specific function you wish to automate.
1. **Selection of Function**
- Navigate to the What to trigger section.
- Choose the Solidity Function option
2. **Network Configuration**
- Locate the Network dropdown.
- Select your desired blockchain network where the contract is deployed, e.g., "Göerli."
3. **Function Details Input**
- Under the Solidity Function section, find the input labeled Contract Address.
- Enter the Ethereum address of your deployed Solidity contract. Ensure accuracy as this determines where your functions will interact.
- Once the contract address is entered, the ABI (Application Binary Interface) should automatically populate. If using a custom ABI, select the Custom ABI option and input it accordingly.
4. **Task Configuration**
- A checker function evaluates conditions before triggering the main function. From the Checker Function dropdown, choose the specific function you want as a condition checker.
- Enter the Target Contract where the automated function call should be sent. From the subsequent dropdown, select the specific function you wish to automate.
 ---
---
 - To learn about creating Typescript function tasks from the UI: [Creating Typescript Function Task](/web3-functions/how-to-guides/write-typescript-functions)
- To learn about creating Solidity function tasks from the UI: [Creating Solidity Function Tasks](/web3-functions/how-to-guides/write-solidity-functions)
- To learn about creating Automated Transaction Tasks from the UI: [Initiate an Automated Transaction](/web3-functions/how-to-guides/initiate-an-automated-transactions)
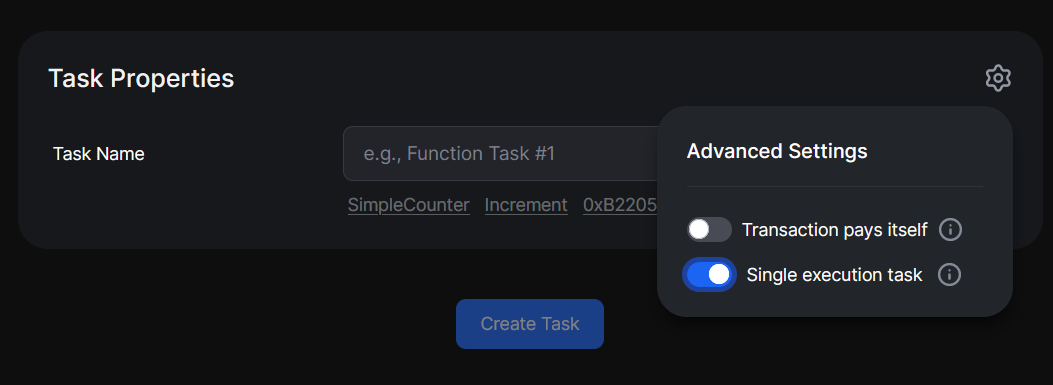
## Single Execution Task
If you want to have Gelato call your function only once. If so, you can open up the Advanced Settings panel when creating a new task and select Single execution task
The task will still be cancelled if the execution reverts on-chain
- To learn about creating Typescript function tasks from the UI: [Creating Typescript Function Task](/web3-functions/how-to-guides/write-typescript-functions)
- To learn about creating Solidity function tasks from the UI: [Creating Solidity Function Tasks](/web3-functions/how-to-guides/write-solidity-functions)
- To learn about creating Automated Transaction Tasks from the UI: [Initiate an Automated Transaction](/web3-functions/how-to-guides/initiate-an-automated-transactions)
## Single Execution Task
If you want to have Gelato call your function only once. If so, you can open up the Advanced Settings panel when creating a new task and select Single execution task
The task will still be cancelled if the execution reverts on-chain
 ---
---
 If you're already using Safe, access your dashboard
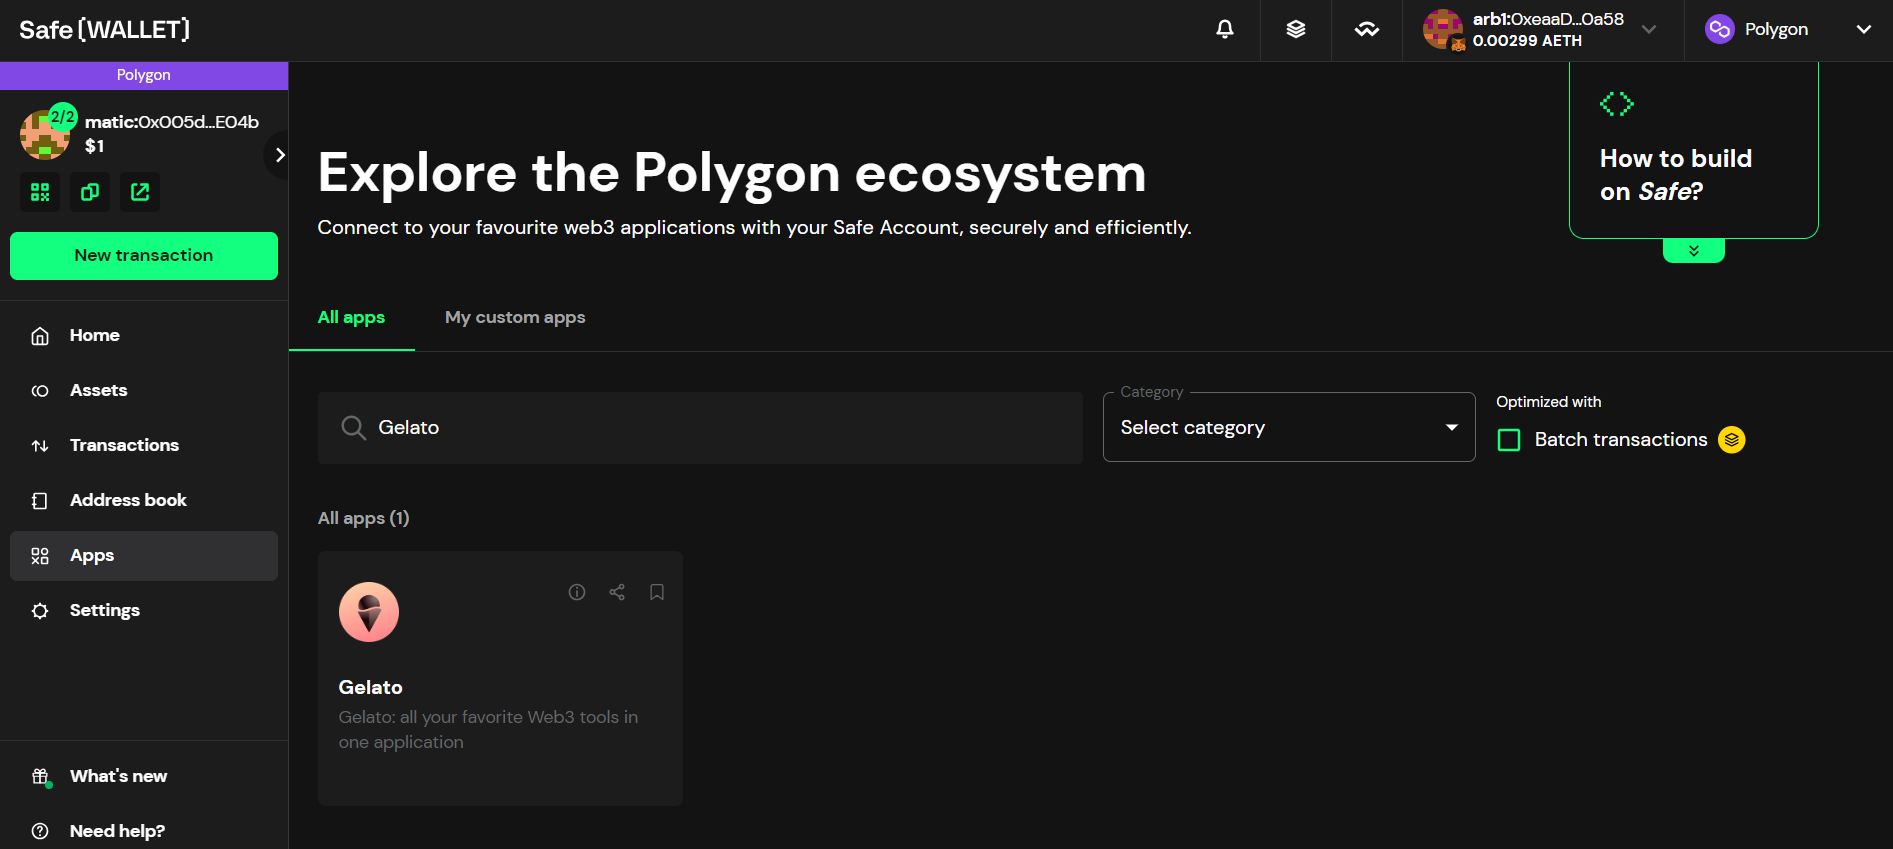
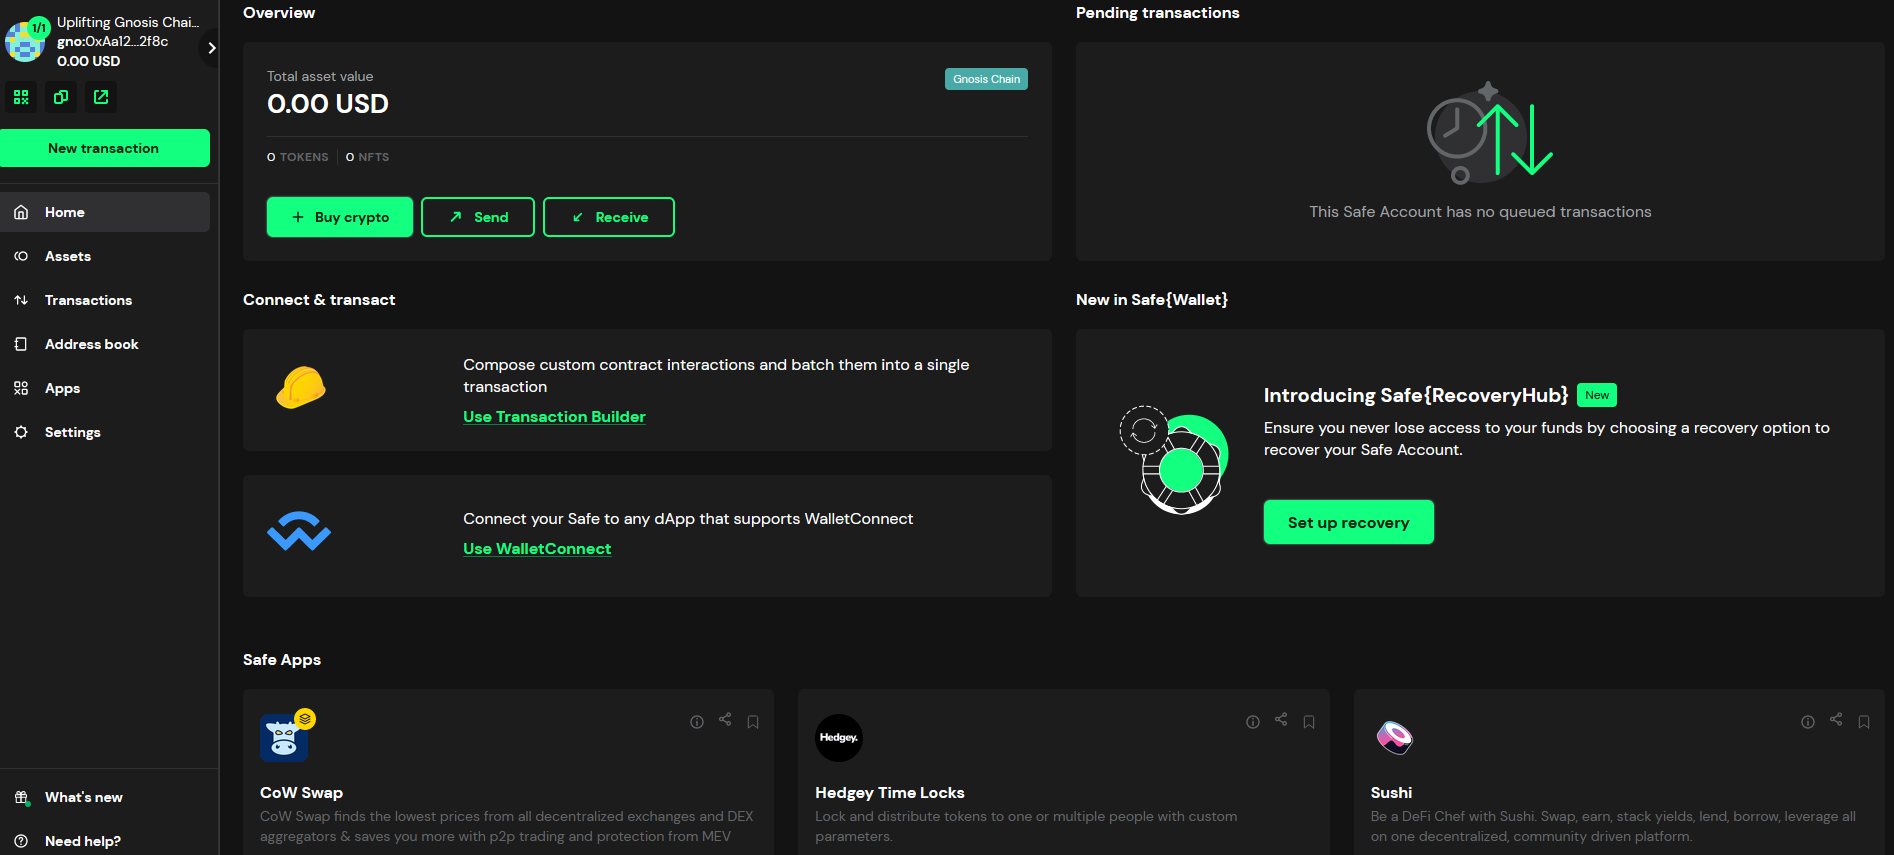 Under the Apps tab, search for Gelato and click on the app. You will then be re-directed to the Gelato app login screen, where you should be able to sign-in.
 After completing these steps, you'll be required to sign in through the Safe UI:
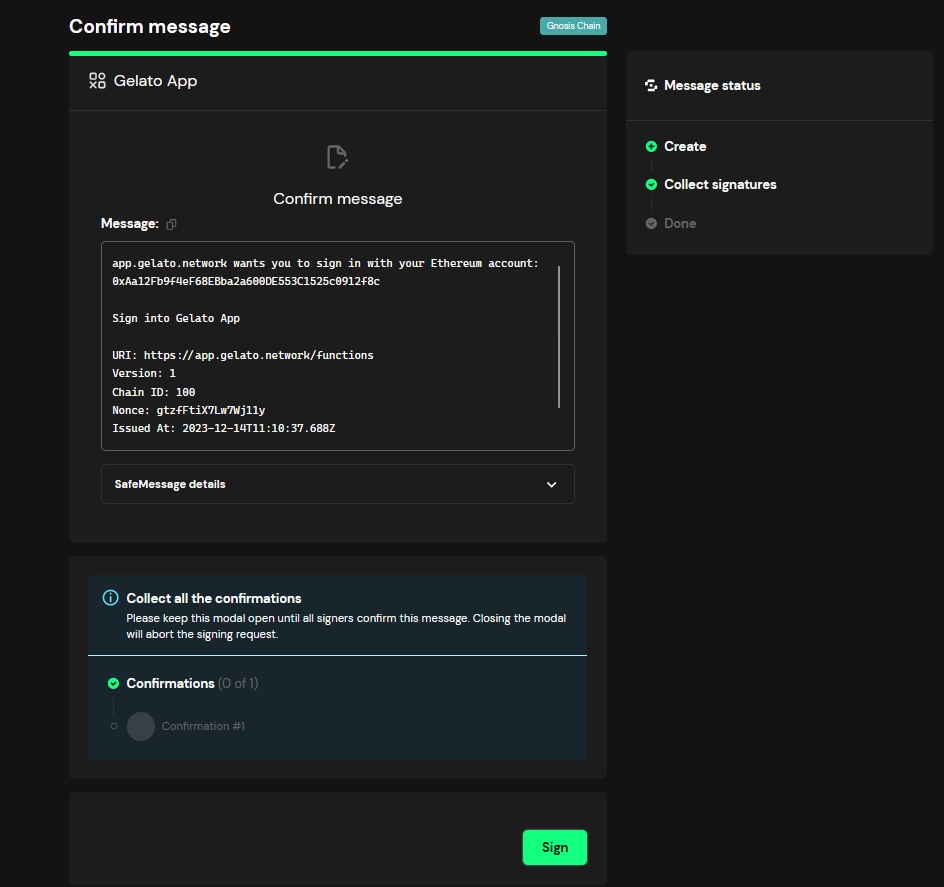 If your Safe requires multiple signatures (multi-sig) the sign-in process will need approvals from the minimum number of signers set for your Safe before it can complete
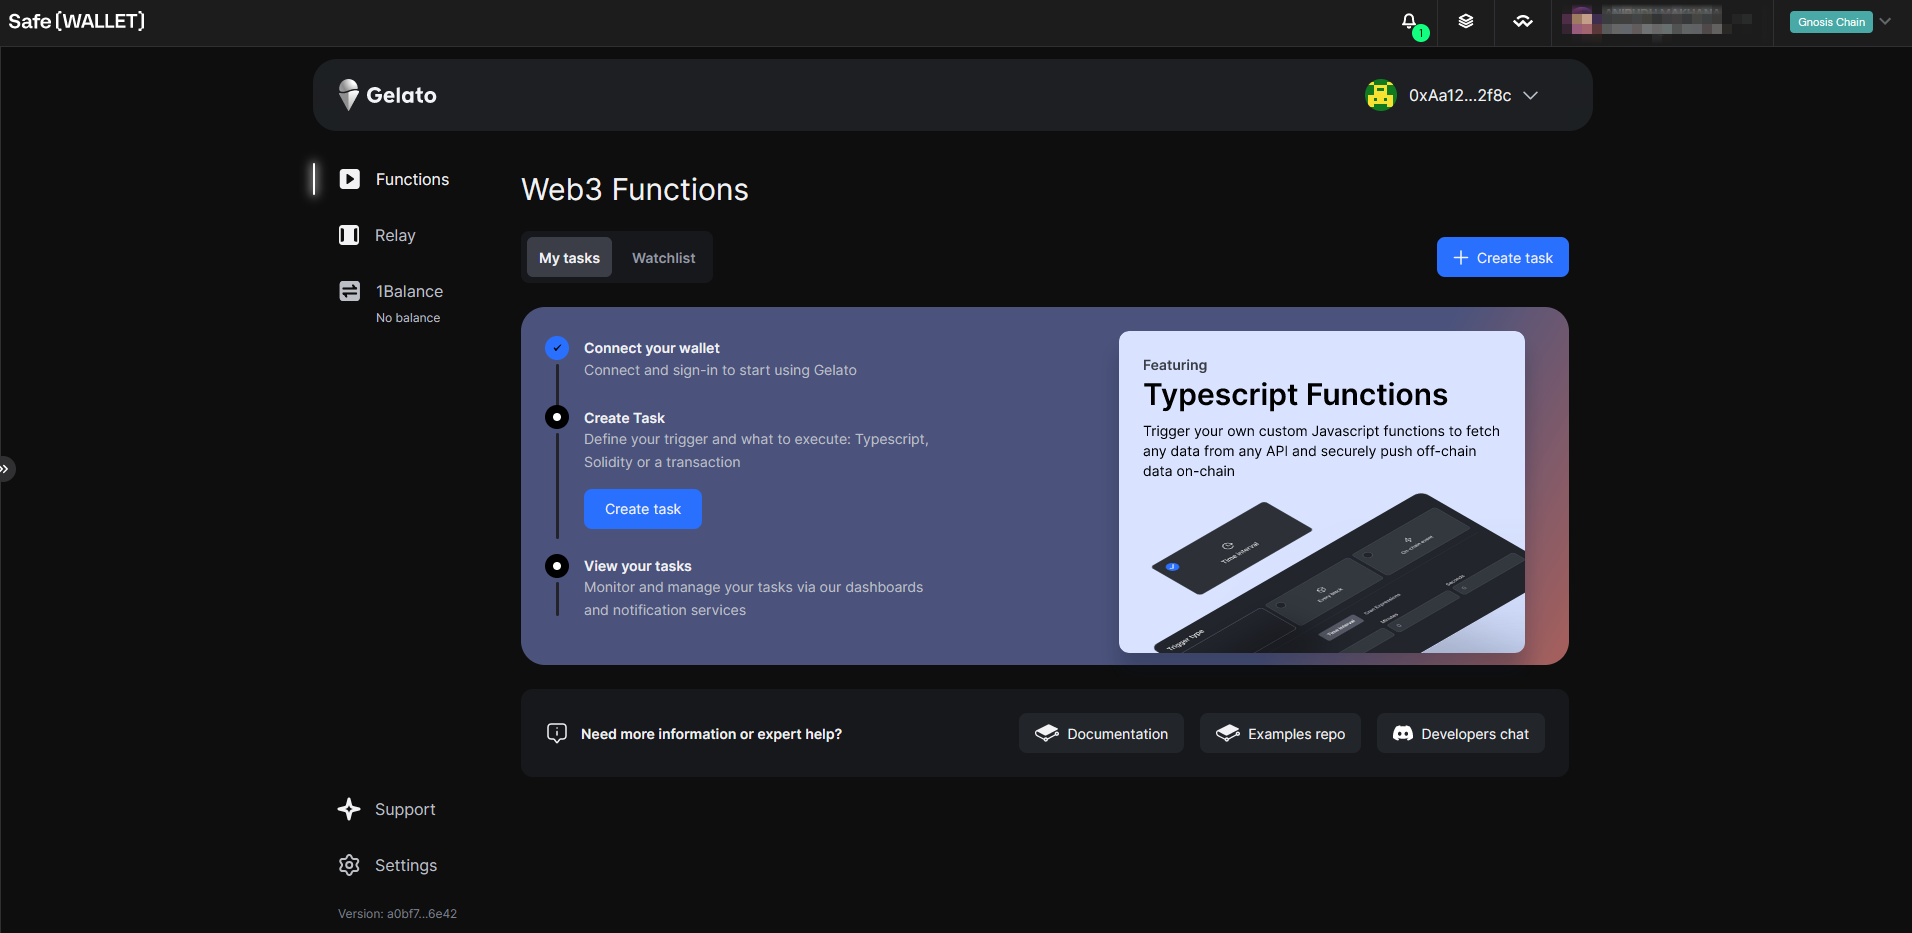 And that's it! You now have full access to the Gelato app!
---
And that's it! You now have full access to the Gelato app!
---
 Finally, Click on "Create Task" button! Its just that simple!
---
Finally, Click on "Create Task" button! Its just that simple!
---
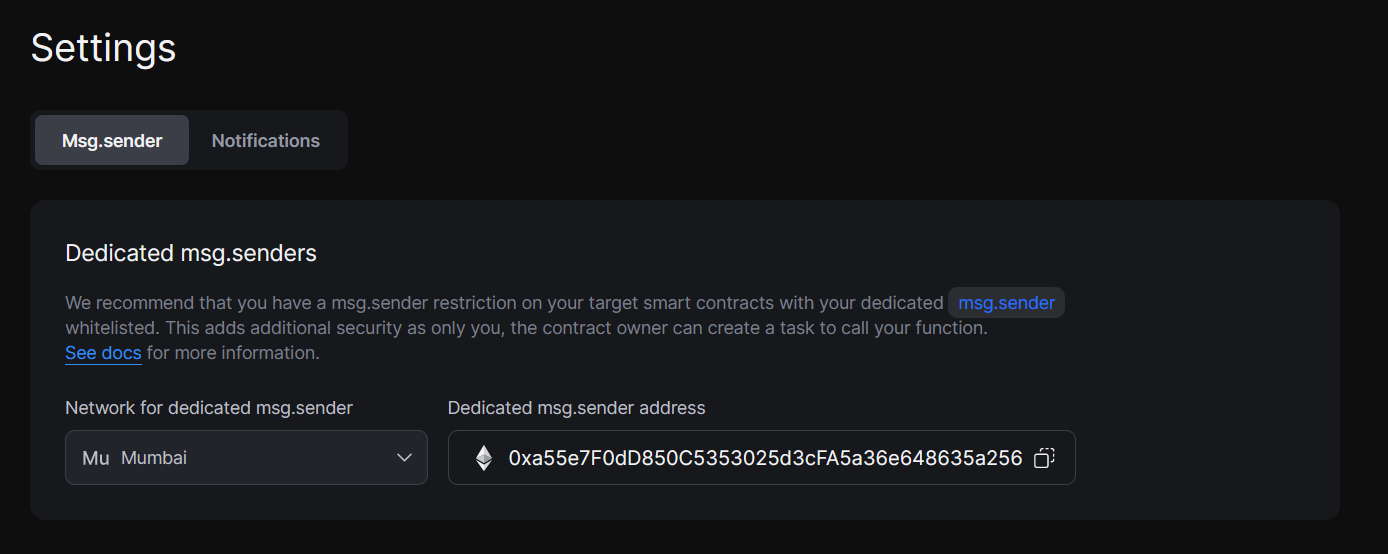 If you are the owner of the target contract in question, it's recommended to implement a msg.sender restriction within your smart contract. This involves whitelisting a dedicated msg.sender address. Such a measure ensures that only tasks you have created can call your function, significantly elevating the security posture of your operations. For a hands-on guide and to manage your dedicated msg.sender settings, please connect to the app and visit your own Settings page.
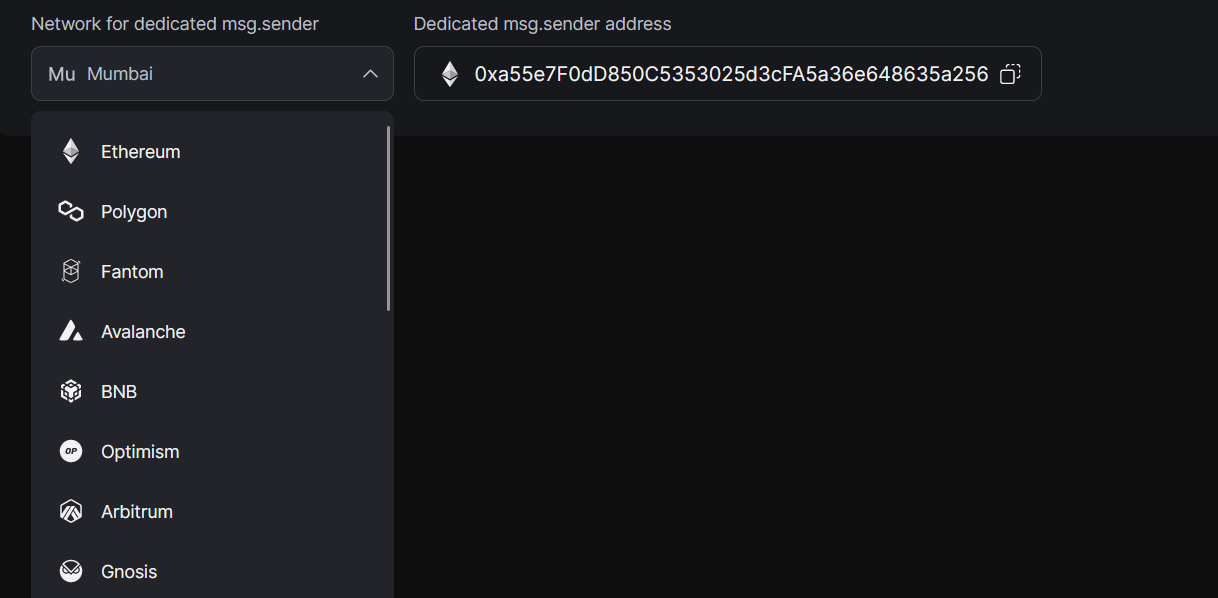
Remember that your dedicated msg.sender can vary across different blockchain networks. You can view the dedicated msg.sender for each network through the provided settings link.
If you are the owner of the target contract in question, it's recommended to implement a msg.sender restriction within your smart contract. This involves whitelisting a dedicated msg.sender address. Such a measure ensures that only tasks you have created can call your function, significantly elevating the security posture of your operations. For a hands-on guide and to manage your dedicated msg.sender settings, please connect to the app and visit your own Settings page.
Remember that your dedicated msg.sender can vary across different blockchain networks. You can view the dedicated msg.sender for each network through the provided settings link.
 `msg.sender` restrictions should be added to the function that Gelato will call during execution, not the checker function. Learn more about it here: [Writing Solidity Functions](/web3-functions/how-to-guides/write-solidity-functions#1-understand-the-role-of-a-checker)
You can have this restriction by inheriting [AutomateReady](https://github.com/gelatodigital/automate/blob/master/contracts/integrations/AutomateReady.sol).
```AutomateReady``` exposes a modifier ```onlyDedicatedMsgSender``` which restricts ```msg.sender``` to only task executions created by ```taskCreator``` defined in the constructor.
```solidity
modifier onlyDedicatedMsgSender() {
require(msg.sender == dedicatedMsgSender, "Only dedicated msg.sender");
_;
}
```
If you would like to have additional callers for your function. You can implement a whitelist like so.
```solidity
mapping(address => bool) public whitelisted;
modifier onlyWhitelisted() {
require(
whitelisted[msg.sender] || msg.sender == dedicatedMsgSender,
"Only whitelisted"
);
_;
}
```
---
`msg.sender` restrictions should be added to the function that Gelato will call during execution, not the checker function. Learn more about it here: [Writing Solidity Functions](/web3-functions/how-to-guides/write-solidity-functions#1-understand-the-role-of-a-checker)
You can have this restriction by inheriting [AutomateReady](https://github.com/gelatodigital/automate/blob/master/contracts/integrations/AutomateReady.sol).
```AutomateReady``` exposes a modifier ```onlyDedicatedMsgSender``` which restricts ```msg.sender``` to only task executions created by ```taskCreator``` defined in the constructor.
```solidity
modifier onlyDedicatedMsgSender() {
require(msg.sender == dedicatedMsgSender, "Only dedicated msg.sender");
_;
}
```
If you would like to have additional callers for your function. You can implement a whitelist like so.
```solidity
mapping(address => bool) public whitelisted;
modifier onlyWhitelisted() {
require(
whitelisted[msg.sender] || msg.sender == dedicatedMsgSender,
"Only whitelisted"
);
_;
}
```
---
 ## Logs & Status
Besides the task logs available in the UI, Gelato Web3 Functions offer a more detailed and granular monitoring system providing status and logs APIs.
### Task Status URL
Provided the `ChainId` and `taskId`, this API will return the current Task status
```
https://api.gelato.digital/tasks/web3functions/networks/{chainId}/tasks/{taskId}/status
```
For example, if your chainId, taskId are:
```
chainId: 137
taskId: 0xdeaeee394c952d8b23c86eacc704adf7b605d89d992cec9a5fc86e4a517f053b
```
Then the URL to go to is:
```
https://api.gelato.digital/tasks/web3functions/networks/137/tasks/0xdeaeee394c952d8b23c86eacc704adf7b605d89d992cec9a5fc86e4a517f053b/status
```
For this taskId, here is the returned task information:
```json
{
"task":{
"chainId":137,
"taskId": "0xdeaeee394c952d8b23c86eacc704adf7b605d89d992cec9a5fc86e4a517f053b",
"taskState":"CheckPending",
"creationDate":"2023-06-01T20:10:39.985Z",
"lastCheckDate":"2023-06-09T06:22:44.966Z",
"lastCheckMessage":"Fail to run Web3Function: Web3Function exited with code=1",
"lastExecDate":"2023-06-09T08:15:11.883Z",
"lastExecTransactionHash": "0xc2e57f5b56bf24ae77eca31fbe76ecf16cd30cb0fc5592207bb567addff62402"
}
}
```
The first thing to look at is the taskState key:
#### Task states:
For the taskState key, these are the possible values:
- **CheckPending**: the task is pending simulation.
- **ExecPending**: the task is executable and is awaiting inclusion into the blockchain.
- **WaitingForConfirmation**: the task was included into the blockchain but is still awaiting the required amount of blocks confirmations.
- **ExecSuccess**: the task has been successfully executed.
- **Cancelled**: the task has been canceled by the owner
- **ExecReverted**: the task transaction has been reverted.
### Task Logs URL
Provided the ChainId and taskId, this API will return the logs in the last 24 hours.
Query Parameters:
- `limit` (optional): The number of log entries to return, ranging from 1 to 100.
- `page` (optional): Specifies the page number of logs to fetch, ranging from 1 to 100.
```
https://api.gelato.digital/tasks/web3functions/networks/{chainId}/tasks/{taskId}/logs?limit=NrLogs&page=PageNr
```
For example, if your chainId, taskId, NrLogs and PageNr are:
```
chainId: 137
taskId: 0xdeaeee394c952d8b23c86eacc704adf7b605d89d992cec9a5fc86e4a517f053b
NrLogs:2
PageNr: 1
```
Then the URL to go to is:
```
https://api.gelato.digital/tasks/web3functions/networks/137/tasks/0xdeaeee394c952d8b23c86eacc704adf7b605d89d992cec9a5fc86e4a517f053b/logs?limit=2&page=1
```
For this taskId, here is the returned task information:
```json
{
"logs": [
{
"date":"2023-06-09T08:43:52.404Z",
"state":"WaitingForConfirmation",
"type":"WaitingForConfirmation",
"message":"txHash: 0x788726ed95f2f916a47cae0c6cdfbea91e1c8e3756f91e0efc08fa501daed8f0"
},
{
"date":"2023-06-09T08:43:51.835Z",
"state":"ExecPending",
"type":"ExecPendingCheck",
"message":"Task submitted for execution",
"web3FunctionLogs":[
"Text generated: ",
"Chaffinches are small, colourful birds which feed on seeds and insects. They have buff-coloured breasts streaked with brown markings, bright pinkish-red faces and wings marked with white bars. In summer they breed in woodlands; in winter many move south to warmer areas.",
"Text generated: ",
"Chameleons are lizards known for their ability to change color, excellent vision and long, sticky tongues used to catch prey."
]
}
]
}
```
## Alerts
Web3 Functions provides an alerting service to enable you to get notified about your task executions, problems or when your balance is getting low. Alerting currently supports notifications in Telegram, with other channels on the way.
### Types of notifications
{(() => {
const notificationTypes = [
{
type: "Balance",
description: "If your task uses Gelato Balance you need to ensure that you always have enough funds deposited, otherwise your executions will stop executing until you top-up. Set a balance alert to be notified when your funds are running low - you can use our default levels or set your own threshold."
}
];
return (
## Logs & Status
Besides the task logs available in the UI, Gelato Web3 Functions offer a more detailed and granular monitoring system providing status and logs APIs.
### Task Status URL
Provided the `ChainId` and `taskId`, this API will return the current Task status
```
https://api.gelato.digital/tasks/web3functions/networks/{chainId}/tasks/{taskId}/status
```
For example, if your chainId, taskId are:
```
chainId: 137
taskId: 0xdeaeee394c952d8b23c86eacc704adf7b605d89d992cec9a5fc86e4a517f053b
```
Then the URL to go to is:
```
https://api.gelato.digital/tasks/web3functions/networks/137/tasks/0xdeaeee394c952d8b23c86eacc704adf7b605d89d992cec9a5fc86e4a517f053b/status
```
For this taskId, here is the returned task information:
```json
{
"task":{
"chainId":137,
"taskId": "0xdeaeee394c952d8b23c86eacc704adf7b605d89d992cec9a5fc86e4a517f053b",
"taskState":"CheckPending",
"creationDate":"2023-06-01T20:10:39.985Z",
"lastCheckDate":"2023-06-09T06:22:44.966Z",
"lastCheckMessage":"Fail to run Web3Function: Web3Function exited with code=1",
"lastExecDate":"2023-06-09T08:15:11.883Z",
"lastExecTransactionHash": "0xc2e57f5b56bf24ae77eca31fbe76ecf16cd30cb0fc5592207bb567addff62402"
}
}
```
The first thing to look at is the taskState key:
#### Task states:
For the taskState key, these are the possible values:
- **CheckPending**: the task is pending simulation.
- **ExecPending**: the task is executable and is awaiting inclusion into the blockchain.
- **WaitingForConfirmation**: the task was included into the blockchain but is still awaiting the required amount of blocks confirmations.
- **ExecSuccess**: the task has been successfully executed.
- **Cancelled**: the task has been canceled by the owner
- **ExecReverted**: the task transaction has been reverted.
### Task Logs URL
Provided the ChainId and taskId, this API will return the logs in the last 24 hours.
Query Parameters:
- `limit` (optional): The number of log entries to return, ranging from 1 to 100.
- `page` (optional): Specifies the page number of logs to fetch, ranging from 1 to 100.
```
https://api.gelato.digital/tasks/web3functions/networks/{chainId}/tasks/{taskId}/logs?limit=NrLogs&page=PageNr
```
For example, if your chainId, taskId, NrLogs and PageNr are:
```
chainId: 137
taskId: 0xdeaeee394c952d8b23c86eacc704adf7b605d89d992cec9a5fc86e4a517f053b
NrLogs:2
PageNr: 1
```
Then the URL to go to is:
```
https://api.gelato.digital/tasks/web3functions/networks/137/tasks/0xdeaeee394c952d8b23c86eacc704adf7b605d89d992cec9a5fc86e4a517f053b/logs?limit=2&page=1
```
For this taskId, here is the returned task information:
```json
{
"logs": [
{
"date":"2023-06-09T08:43:52.404Z",
"state":"WaitingForConfirmation",
"type":"WaitingForConfirmation",
"message":"txHash: 0x788726ed95f2f916a47cae0c6cdfbea91e1c8e3756f91e0efc08fa501daed8f0"
},
{
"date":"2023-06-09T08:43:51.835Z",
"state":"ExecPending",
"type":"ExecPendingCheck",
"message":"Task submitted for execution",
"web3FunctionLogs":[
"Text generated: ",
"Chaffinches are small, colourful birds which feed on seeds and insects. They have buff-coloured breasts streaked with brown markings, bright pinkish-red faces and wings marked with white bars. In summer they breed in woodlands; in winter many move south to warmer areas.",
"Text generated: ",
"Chameleons are lizards known for their ability to change color, excellent vision and long, sticky tongues used to catch prey."
]
}
]
}
```
## Alerts
Web3 Functions provides an alerting service to enable you to get notified about your task executions, problems or when your balance is getting low. Alerting currently supports notifications in Telegram, with other channels on the way.
### Types of notifications
{(() => {
const notificationTypes = [
{
type: "Balance",
description: "If your task uses Gelato Balance you need to ensure that you always have enough funds deposited, otherwise your executions will stop executing until you top-up. Set a balance alert to be notified when your funds are running low - you can use our default levels or set your own threshold."
}
];
return (
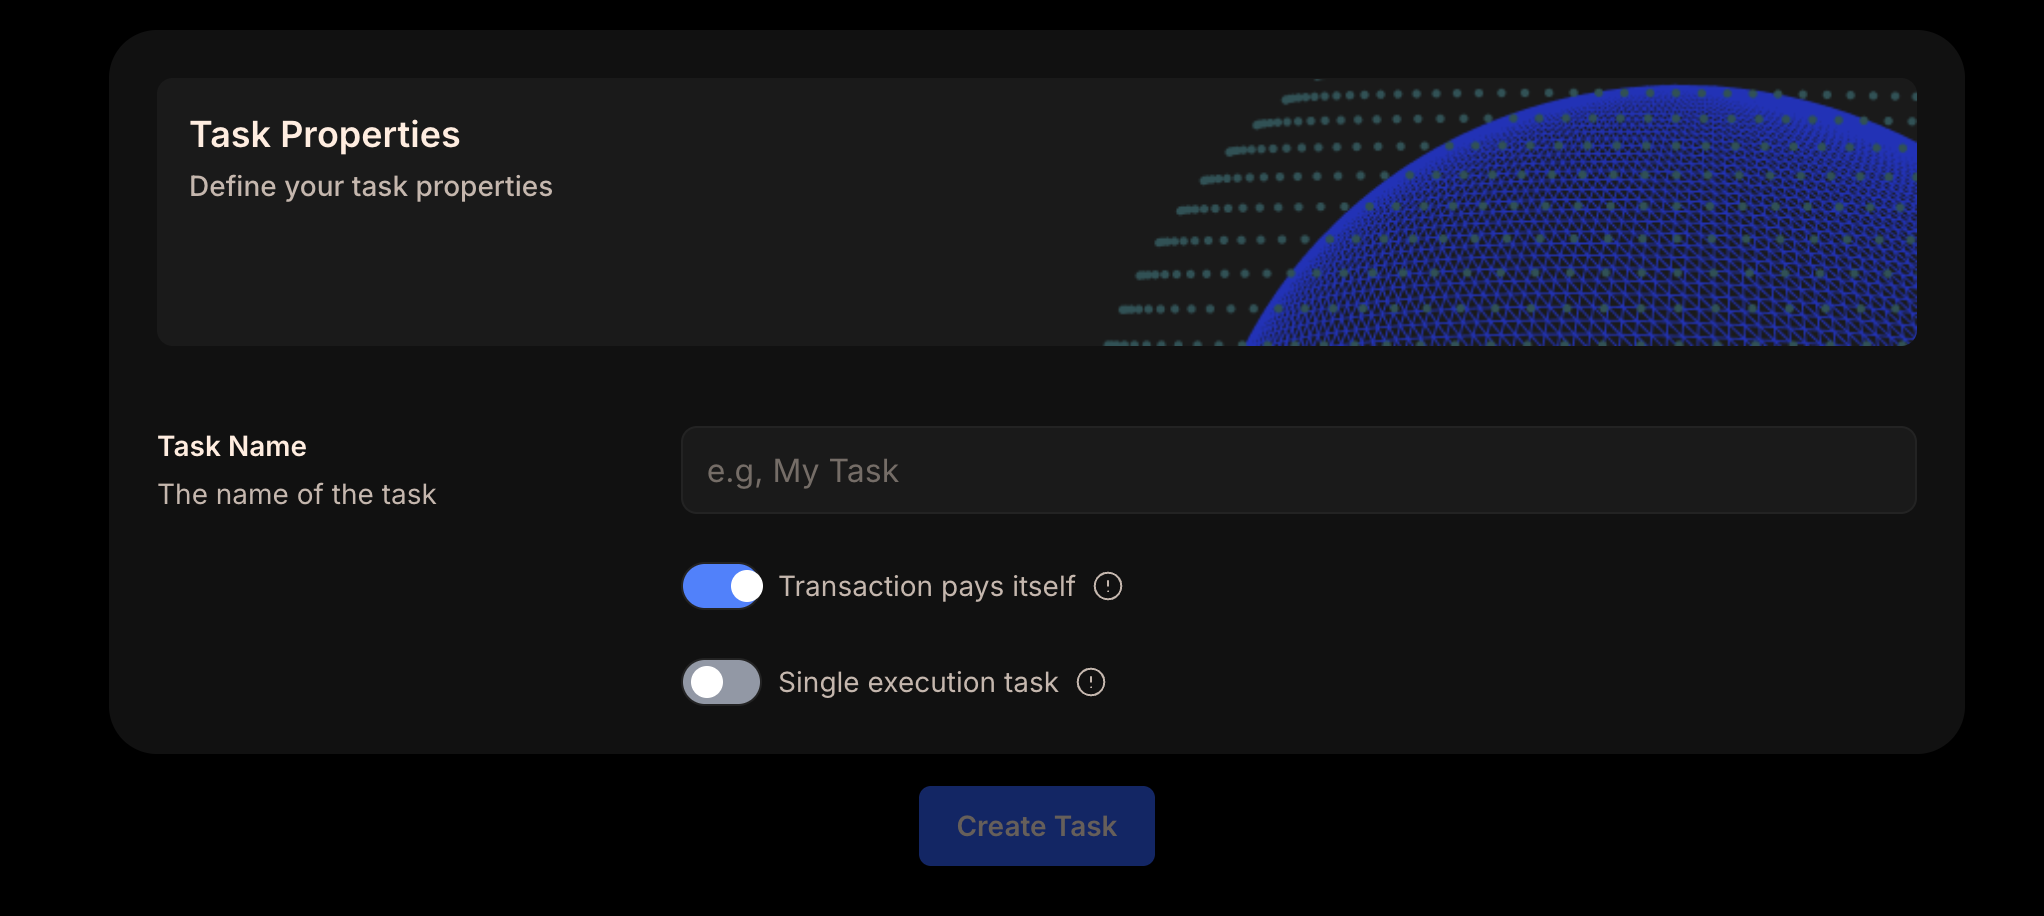 ---
## Summary
- Total pages processed: 216
- Errors: 0
---
For the concise version of this documentation, see llms.txt
For section-specific summaries, see the /summaries directory
---
## Summary
- Total pages processed: 216
- Errors: 0
---
For the concise version of this documentation, see llms.txt
For section-specific summaries, see the /summaries directory